I was standing in my kitchen, a half‑finished batch of chocolate chip cookies burning on the bottom rack, when a friend dared me to bring the whole autumn vibe into a single bite. I stared at the smoky, over‑cooked crumbs and thought, “What if I could bottle the smell of a crisp October morning, the fizz of fresh apple cider, and the cozy hug of a warm blanket into a cookie?” That moment sparked the birth of what I now swear is the most addictive version of whoopie‑pie‑style cookies you’ll ever taste. I tossed a splash of apple cider into the batter, swapped ordinary sugar for a richer brown, and whipped up a caramel‑like filling that oozes like liquid gold when you bite into it.
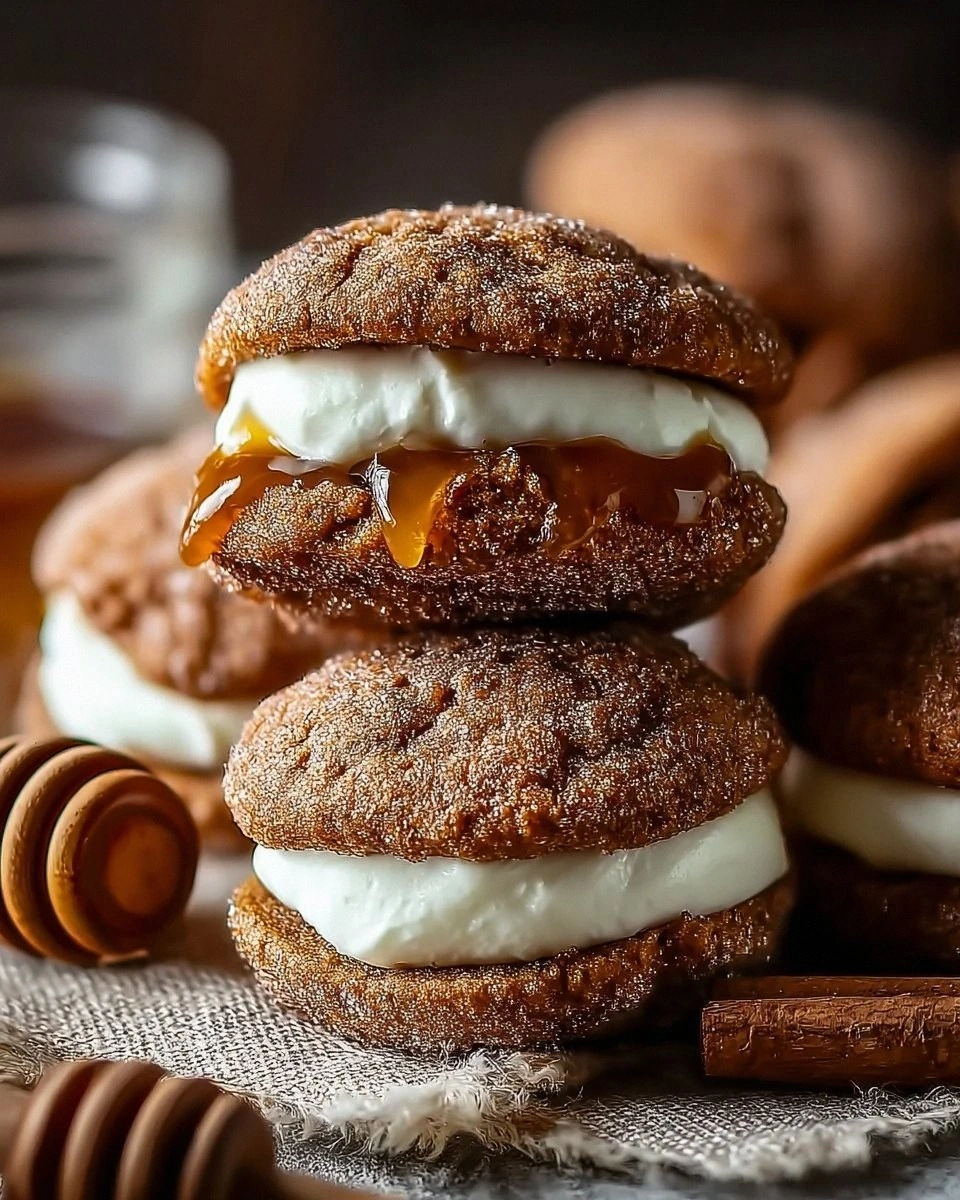
Picture this: you pull the tray from the oven and the kitchen is instantly filled with the scent of toasted cinnamon, nutmeg, and that unmistakable caramel‑apple perfume that makes your nose do a little happy dance. The cookies themselves have a soft, cake‑like top that gives way to a slightly chewy edge—think a marshmallow that’s been lightly toasted. When you sandwich two of those clouds together with the silky, buttery caramel, it’s like a warm hug that melts on your tongue, leaving behind a lingering sweet‑spiced afterglow. I dare you to taste this and not go back for seconds; the first bite will set a new standard for what a “cookie” can be.
Most recipes get this completely wrong—either the filling is too runny, the dough is dense, or the spices are an afterthought. Here’s what actually works: a precise balance of baking soda and apple cider that lifts the batter without making it cake‑like, a butter‑rich caramel that stays soft at room temperature, and a spice blend that’s measured to perfection, not just a pinch of “whatever you have.” The secret ingredient? A splash of vanilla extract in both the dough and the filling that ties the whole flavor orchestra together. This is hands down the best version you’ll ever make at home, and I’m about to spill every detail.
Okay, ready for the game‑changer? I’m going to walk you through every single step—by the end, you’ll wonder how you ever made whoopie pies any other way. Stay with me here — this is worth it. Let’s dive in and turn your kitchen into a cozy autumn bakery.
What Makes This Version Stand Out
- Flavor Fusion: Apple cider and warm spices mingle with buttery caramel for a layered taste that evolves bite by bite.
- Texture Harmony: A pillowy, cake‑like top meets a slightly chewy edge, while the filling stays gooey but not runny.
- Simplicity: Only fourteen ingredients, most of which you already have in your pantry, and no fancy equipment required.
- Unique Twist: The cider replaces part of the liquid, giving the dough a subtle fruitiness that’s impossible to achieve with water or milk.
- Crowd‑Pleaser: Even the pickiest sweet‑tooth will admit these are addictive; they disappear faster than you can say “second round.”
- Ingredient Quality: Using real butter (not margarine) and a good‑quality apple cider makes the difference between “good” and “legendary.”
- Cooking Method: Baking at a moderate 350°F ensures the cookies rise just enough without drying out, while the caramel filling sets perfectly.
- Make‑Ahead Potential: The cookies keep beautifully for days, and the filling can be prepared ahead of time and refrigerated.
Inside the Ingredient List
The Flavor Base
All‑purpose flour is the backbone of any baked good, providing the structure that holds the cookie together. I use a light sift to avoid any lumps, which ensures a tender crumb. If you’re gluten‑sensitive, a 1‑to‑1 gluten‑free flour blend works just as well, but the texture will be slightly less airy. Tip: Look for flour that feels powdery to the touch; cheap “bread” flour can make the cookies too dense.
Baking soda is the secret behind those perfectly risen cookies! It reacts with the acidity in the apple cider, creating tiny air pockets that lift the batter. Skipping it means flat, cakey cookies that lack that signature “whoopie” bounce. If you’re out of soda, you can substitute 1/4 tsp of baking powder, but expect a milder rise.
The Texture Crew
Unsalted butter for the dough should be softened, not melted. This ensures the butter can be creamed with the sugar, trapping air for a light texture. The butter in the filling is the star of the caramel; it adds richness and a glossy sheen. If you’re using a butter substitute, the filling will lose its luscious mouthfeel.
Brown sugar introduces a deeper sweetness and a hint of molasses that pairs beautifully with the apple cider. It also contributes to the chewy texture of the cookie’s edge. You can swap half of it for white sugar if you prefer a cleaner sweetness, but the caramel undertones will be less pronounced.
The Unexpected Star
Apple cider is the hero of the show! Its natural acidity not only reacts with the baking soda but also infuses every bite with a lovely fruity essence. Choose a fresh, unfiltered cider for the most authentic flavor; a concentrate will make the dough too sweet. If you’re out of cider, a splash of apple juice mixed with a teaspoon of lemon juice mimics the acidity.
The Final Flourish
Ground cinnamon and nutmeg add warming spice that evokes the essence of fall. Cinnamon brings a sweet, woody note, while nutmeg contributes a subtle, nutty aroma. Too much nutmeg can overwhelm, so stick to the measured amounts. For a twist, try a pinch of ground ginger or allspice for a deeper spice profile.
Vanilla extract appears twice—in the dough and the caramel—binding all the flavors together. Use pure vanilla for the best aroma; imitation can taste flat. If you have vanilla beans, scrape the seeds into the batter and the filling for an even richer flavor.
Everything's prepped? Good. Let's get into the real action...
The Method — Step by Step
Preheat your oven to 350°F (175°C) and line two baking sheets with parchment paper. While the oven warms, whisk together the flour, baking soda, cinnamon, nutmeg, and salt in a large bowl. This dry mix will ensure the spices are evenly distributed and prevent any clumps of soda that could cause uneven rise. Pro tip: Sifting the dry ingredients twice guarantees a feather‑light texture.
In a separate stand‑mixing bowl, cream the softened butter with the brown sugar until the mixture is pale and fluffy—think cloud‑like, not greasy. This should take about 3‑4 minutes on medium speed; the sugar will dissolve and the butter will incorporate air, creating the foundation for a tender crumb. Watch Out: If the butter is too warm, it will melt instead of creaming, leading to dense cookies.
Add the eggs one at a time, beating well after each addition, then stir in the vanilla extract and apple cider. The batter will look slightly curdled—that’s normal; the acidity is reacting with the baking soda, creating tiny bubbles that will lift the cookies. Keep mixing just until everything is combined; over‑mixing can develop gluten and make the cookies tough.
Gradually fold the dry flour mixture into the wet ingredients, using a spatula to scrape the sides of the bowl. The dough should be soft, slightly sticky, and hold its shape when scooped. If it feels too dry, add a tablespoon of milk; if it’s too wet, sprinkle in a little extra flour—just a teaspoon at a time.
For the caramel filling, melt the butter for the filling in a saucepan over medium heat. Once melted, stir in the brown sugar and heavy cream, whisking constantly until the mixture bubbles and thickens—about 5 minutes. Remove from heat and whisk in the vanilla extract. Let the caramel cool to room temperature; it will thicken further as it sits.
Using a cookie scoop (or a tablespoon), drop rounded mounds of dough onto the prepared sheets, spacing them about 2 inches apart. The dough will spread slightly, so give them room. For perfectly uniform cookies, chill the scoops for 10 minutes before scooping—this helps the dough hold its shape.
Bake for 10‑12 minutes, or until the tops are lightly golden and the edges start to pull away from the parchment. The cookies should still look a bit soft in the center; they’ll continue to set as they cool. When you open the oven, the aroma of cinnamon and apple should hit you like a warm blanket—trust that feeling.
Allow the cookies to cool on the sheet for 5 minutes, then transfer them to a wire rack to cool completely. While they’re still warm, sandwich a generous dollop of the caramel filling between two cookies, pressing gently so the filling spreads to the edges. The caramel will melt slightly, creating a glossy seam that holds the duo together.
Store the assembled whoopie pies in an airtight container at room temperature for up to three days, or freeze them for longer storage. When you’re ready to enjoy, let them sit at room temperature for 10 minutes; the caramel will become perfectly gooey again. That’s it — you did it. But hold on, I’ve got a few more tricks that’ll take this to another level...
Insider Tricks for Flawless Results
The Temperature Rule Nobody Follows
Never bake whoopie pies straight from the fridge. Let the dough sit at room temperature for at least 15 minutes before scooping. This small step ensures the butter softens just enough to spread evenly, giving you a uniform dome on each cookie. I once tried skipping this and ended up with flat, pancake‑like cookies that fell apart when I tried to sandwich them. Trust the rule and your cookies will thank you.
Why Your Nose Knows Best
Instead of watching the timer obsessively, rely on your sense of smell. When the cookies are about 8 minutes in, the kitchen should fill with a sweet, spiced perfume. If you detect a hint of burnt sugar, pull them out immediately; the caramel filling can turn bitter in a heartbeat. This sensory checkpoint is the difference between “good” and “wow‑worthy.”
The 5‑Minute Rest That Changes Everything
After baking, let the cookies rest on the sheet for exactly five minutes before moving them. This brief pause allows the steam to finish cooking the interior, giving you that tender crumb you crave. Skipping this step leads to a gummy bottom and a cracked top—nothing ruins the visual appeal like a cracked whoopie pie.
Caramel Consistency Cheat
If your caramel feels too runny after cooling, whisk in a tiny pinch of corn syrup. It stabilizes the sugar crystals and prevents graininess, resulting in a silky, spreadable filling that holds its shape. A friend once tried a low‑fat butter substitute and ended up with a grainy mess; the corn syrup saved the day.
The Freeze‑Then‑Bake Trick
For a slightly crispier edge, place the scooped dough on a baking sheet and freeze for 20 minutes before baking. The cold dough hits the oven and forms a crust faster, giving you that satisfying snap when you bite into the edge. This is the secret I use when I want to impress guests with a texture contrast.
Creative Twists and Variations
This recipe is a playground. Here are some of my favorite ways to switch things up:
Maple Bacon Whoopie
Swap half of the apple cider for pure maple syrup and fold in crisp, crumbled bacon bits into the dough. The salty crunch pairs beautifully with the sweet caramel, creating a sweet‑savory masterpiece that’s perfect for brunch.
Pumpkin Spice Upgrade
Add ¼ cup of canned pumpkin puree to the batter and increase cinnamon to 3 teaspoons. The pumpkin deepens the autumnal flavor, while the extra spice makes each bite feel like a slice of pumpkin pie.
Chocolate‑Streusel Surprise
Mix ¼ cup of mini chocolate chips into the dough and sprinkle a thin layer of streusel (brown sugar, flour, butter) on top before baking. The chocolate melts slightly, and the streusel adds a crunchy topping that contrasts the soft interior.
Spiced Rum Drizzle
Add a tablespoon of spiced rum to the caramel filling and finish each assembled whoopie with a light drizzle of rum‑infused glaze. The adult twist makes these cookies a perfect after‑dinner treat.
Apple Cider Glaze
Brush the tops of the baked cookies with a thin glaze made from powdered sugar, a splash of apple cider, and a pinch of cinnamon. The glaze adds a glossy finish and an extra burst of cider flavor that intensifies as the cookies sit.
Storing and Bringing It Back to Life
Fridge Storage
Place the assembled whoopie pies in an airtight container lined with parchment paper. They’ll stay fresh for up to five days. The cool environment keeps the caramel from becoming overly soft, preserving the perfect bite.
Freezer Friendly
Wrap each whoopie individually in plastic wrap, then stack them in a freezer‑safe zip‑top bag. They’ll freeze beautifully for up to three months. When you’re ready to indulge, let them thaw in the refrigerator for an hour, then bring them to room temperature for the ultimate texture.
Best Reheating Method
To revive a day‑old whoopie, preheat your oven to 300°F (150°C), place the cookies on a parchment‑lined tray, and heat for 5‑7 minutes. Add a tiny splash of water (about a teaspoon) to the caramel before reheating; the steam revives the gooey center without making it runny.