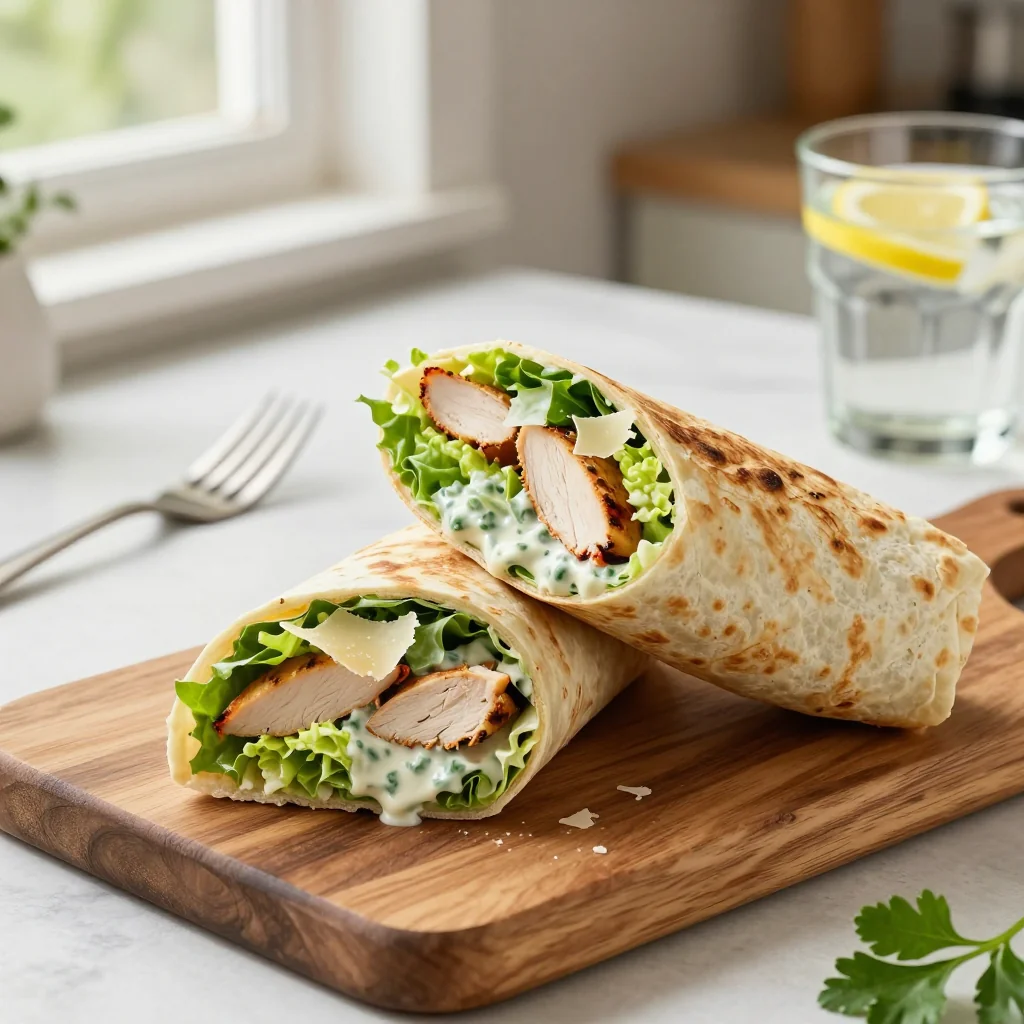
A fresh, protein‑packed wrap that brings the classic Caesar salad on the go – perfect for busy weekdays.

I still remember the first time I tasted a classic Caesar salad at a bustling seaside café in California. The crisp romaine, the tangy anchovy‑kissed dressing, and the salty shave of Parmesan created a symphony that lingered long after the last bite. That memory sparked a desire to capture that same bright, comforting flavor in a portable form that could survive the hustle of a workday.
The Chicken Caesar Wrap is a modern twist on that beloved salad, marrying tender grilled chicken with the familiar creamy dressing, all tucked inside a soft whole‑wheat tortilla. It’s a dish that feels both familiar and fresh, ideal for lunch‑box lovers who crave a gourmet touch without the need for a fork.
In this guide, I’ll walk you through every step—from selecting the best chicken breast to mastering a homemade Caesar dressing that beats any store‑bought version. You’ll learn how to prep efficiently, store the wraps for the week, and even customize the flavor profile to suit your palate.
Let’s dive in, and I promise you’ll finish this article with a clear plan to create a delicious, nutritious wrap that will become a staple in your meal‑prep arsenal.
🌟 Why This Recipe Will Win Your Heart
These wraps combine convenience, nutrition, and bold flavor, making them an unbeatable lunch choice.
- ✨ Balanced Nutrition: Each wrap delivers lean protein, healthy greens, and whole‑grain carbs, keeping you satisfied without a post‑lunch slump.
- ✨ Meal‑Prep Friendly: The ingredients hold up well in the fridge, and the wraps stay fresh for up to four days when stored properly.
- ✨ Customizable Flavor: Swap the dressing, add extra veggies, or spice it up with a dash of hot sauce – the base recipe is a flexible canvas.
- ✨ Quick Assembly: Once the chicken is grilled, the whole process takes under ten minutes, perfect for busy evenings.
- ✨ Portable & Mess‑Free: Wrapped tightly, they travel easily in a lunchbox without spilling or getting soggy.
- ✨ Crowd‑Pleaser: Even picky eaters love the familiar Caesar taste, making it a safe yet exciting option for families.
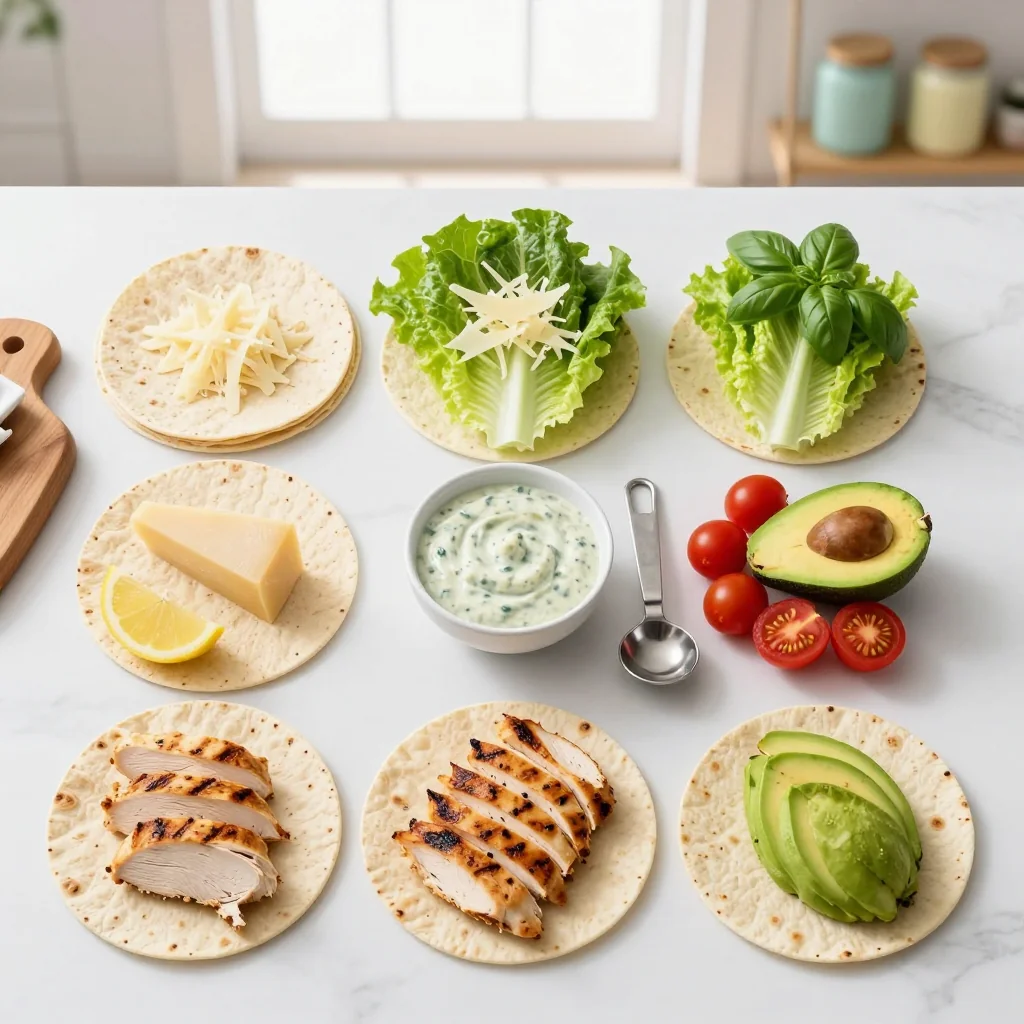
🥗 Ingredients
📝 Complete Ingredient List
For Grilled Chicken:
For Wrap Assembly:
For Caesar Dressing:
🔍 Focus on Key Ingredients
Chicken Breast
Choosing a high‑quality, skinless chicken breast ensures a lean source of protein while keeping the wrap light. Look for breasts that are firm, pink, and free of any discoloration. Trimming any visible fat helps achieve an even grill and prevents excess grease.
Romaine Lettuce
Romaine provides the signature crunch that defines a Caesar salad. Pick heads that feel heavy for their size and have crisp, deep‑green leaves. If possible, wash and spin the lettuce in a salad spinner to remove excess moisture, which can make the wrap soggy.
Parmesan Cheese
Freshly grated Parmesan adds a nutty, salty depth that pairs beautifully with the tangy dressing. Avoid pre‑shredded varieties that often contain anti‑caking agents; they won’t melt as nicely and can affect texture.
🔄 Quick Substitutions
| If you don’t have... | Use instead... |
|---|---|
| Chicken breast | Turkey breast strips |
| Whole wheat tortillas | Spinach or tomato tortillas |
| Caesar dressing | Greek yogurt mixed with lemon, mustard, and anchovy paste |
👨🍳 Step‑by‑Step Instructions
Follow these detailed steps to create perfectly balanced Chicken Caesar Wraps that stay fresh all week.
📋 Phase 1: Preparation & Mise en Place
Start by gathering and prepping all components before you fire up the grill.
Trim and Slice the Chicken
Pat the chicken breasts dry with paper towels. Trim any remaining fat and slice each breast horizontally into two equal pieces, creating four thin cutlets about 1 cm thick. This thickness ensures quick, even cooking and prevents the meat from drying out.
Season the Chicken
Drizzle the olive oil over the cutlets, then sprinkle both sides with garlic powder, salt, and pepper. Rub the seasonings in gently so the flavor adheres to the surface.
🔥 Phase 2: Cooking & Assembly
Now we’ll grill the chicken and build the wraps.
Grill the Chicken
Preheat a grill pan or outdoor grill to medium‑high heat (about 200 °C). Place the cutlets on the grill and cook for 3‑4 minutes per side, or until the internal temperature reaches 74 °C and the juices run clear. Avoid pressing the meat; this keeps it juicy.
Rest and Slice
Transfer the grilled chicken to a cutting board and let it rest for 3 minutes. Then slice each cutlet into thin strips (about 1 cm wide). Resting helps retain moisture and makes slicing easier.
Mix the Dressing
In a small bowl, whisk together the Caesar dressing, fresh lemon juice, Dijon mustard, and a pinch of black pepper. The lemon brightens the classic flavor while the mustard adds a subtle depth.
✨ Phase 3: Finishing & Serving
The final touches bring everything together.
Assemble the Wraps
Lay a tortilla flat on a clean surface. Spread a thin layer of dressing across the center, then add a handful of chopped romaine, a sprinkle of grated Parmesan, and a generous portion of the dressed chicken strips. Fold the sides inward and roll tightly.
Wrap for Storage
Wrap each assembled tortilla in parchment paper or a reusable silicone wrap. This helps retain moisture and prevents the tortilla from drying out. Place the wrapped rolls in an airtight container.
Serve or Reheat
When ready to eat, unwrap a roll and enjoy it cold for a crisp salad experience, or warm it briefly in a 180 °C oven for 5 minutes if you prefer a soft, melty texture. Pair with a side of fresh fruit or a light soup for a balanced meal.
💡 Expert Tips & Tricks
🛒 Choosing the Best Ingredients
Opt for free‑range chicken breasts; they usually have better flavor and texture. When buying romaine, look for leaves that are dark green with firm ribs. For Parmesan, a wedge that you grate yourself will melt more naturally and provide a fresher taste than pre‑grated packets.
🔪 Preparation Techniques
Use a sharp chef’s knife to slice the chicken thinly; this reduces cooking time and ensures each bite is tender. When chopping lettuce, a food processor can speed up the process, but hand‑chopping preserves the crisp texture.
🌡️ Mastering the Cooking
Preheat your grill pan until it’s hot enough that a drop of water sizzles instantly. This creates those coveted grill marks and locks in juices. If you notice the chicken browning too quickly, lower the heat slightly and finish cooking with a lid on the pan.
🍽️ Presentation & Service
Slice the wrap diagonally before serving; it not only looks elegant but also makes it easier to bite into. Sprinkle a tiny pinch of extra Parmesan on top for a glossy finish, and add a lemon wedge on the side for a fresh burst of acidity.
🏆 Pro Tips
Elevate your wrap from home‑cooked good to restaurant‑level great with these insider secrets.
- 🎯 Brine the Chicken: Submerge the chicken breasts in a light brine (1 tbsp salt dissolved in 500 ml water) for 30 minutes before seasoning. The brine enhances moisture retention, resulting in juicier meat even after grilling.
- 🎯 Use Anchovy Paste in the Dressing: Adding just a half‑teaspoon of anchovy paste intensifies the umami profile without making the dressing taste fishy, staying true to the classic Caesar flavor.
- 🎯 Toast the Tortillas Lightly: Warm the tortillas on a dry skillet for 20 seconds per side. This prevents sogginess and adds a subtle toasted aroma.
- 🎯 Add a Crunch Element: Include a handful of toasted pine nuts or crushed roasted chickpeas for an extra textural surprise that contrasts the soft chicken and lettuce.
- 🎯 Finish with a Drizzle of Truffle Oil: A few drops of high‑quality truffle oil over the assembled wrap add a luxurious earthy note that pairs beautifully with Parmesan.
- 🎯 Portion Scaling Precision: Use the portion adjuster on the recipe card; it automatically recalculates each ingredient, ensuring consistent flavor when scaling up or down.
"Great cooking is about mastering fundamentals and then daring to innovate." — Thomas Keller
🔄 Variations & Adaptations
The core recipe is versatile; feel free to experiment with these twists to suit dietary needs or flavor cravings.
🥬 Vegetarian/Vegan Version
Replace the chicken with grilled marinated tofu or tempeh. Use a vegan Caesar dressing made from cashew cream, lemon, Dijon, and capers. Keep the romaine, whole‑grain tortillas, and nutritional yeast in place of Parmesan for a cheesy note.
- Tofu: Press and slice into 1‑cm strips, marinate in soy sauce, garlic, and smoked paprika.
- Vegan Dressing: Blend ¼ cup soaked cashews, 2 tbsp lemon juice, 1 tsp Dijon, 1 tsp capers, and a splash of olive oil.
🌶️ Flavor Variations
Play with global flavor profiles while keeping the wrap structure intact.
Spicy Version:
Add ½ tsp crushed red pepper flakes to the chicken seasoning and mix a teaspoon of sriracha into the Caesar dressing. Finish with sliced jalapeños for an extra kick.
Mediterranean Version:
Swap the Caesar dressing for a tzatziki sauce, add sliced kalamata olives, sun‑dried tomatoes, and a sprinkle of feta cheese.
Asian Version:
Use a sesame‑ginger dressing (soy sauce, rice vinegar, sesame oil, ginger) and include shredded carrots, cucumber ribbons, and a drizzle of hoisin sauce.
⚠️ Dietary Adaptations
Gluten‑Free:
Substitute whole‑wheat tortillas with gluten‑free corn or rice wraps. Ensure the Caesar dressing is free from anchovy paste if you have a gluten sensitivity.
Lactose‑Free:
Omit Parmesan or use a lactose‑free cheese alternative. Choose a dairy‑free Caesar dressing made with almond‑based Parmesan.
Low‑Calorie:
Reduce the olive oil to a light spray, use low‑fat Greek yogurt in the dressing, and increase the lettuce proportion. This cuts calories by roughly 120 kcal per serving while preserving flavor.
👶 Family/Kids Version
Kids often prefer milder flavors. Use a lighter Caesar dressing (less anchovy, more lemon), add a few slices of avocado for creaminess, and cut the wrap into bite‑size pinwheels that are easy to handle.
📦 Storage & Reheating
🧊 Conservation
Refrigerator:
- Duration: 4 days
- Recommended container: Airtight glass or BPA‑free plastic container
- Tip: Keep the dressing separate until ready to eat to avoid soggy wraps.
Freezer:
- Duration: 2 months
- Method: Wrap each assembled roll tightly in parchment, then place in a freezer‑safe zip‑lock bag.
- Defrosting: Transfer to the refrigerator overnight or use the microwave’s defrost setting for 2‑3 minutes.
💡 For best texture, consume within the first two days if stored refrigerated.
♨️ Reheating
🔥 Oven (Recommended):
- Preheat to 180 °C (350 °F).
- Cover the wrap loosely with aluminum foil.
- Heat for 5 minutes.
- Remove foil and continue for 2 minutes to crisp the tortilla.
⚡ Microwave (Quick):
- Place the wrap on a microwave‑safe plate and cover with a microwave‑safe lid.
- Heat on medium power for 45 seconds.
- Rotate, then heat another 30 seconds if needed.
- Let stand 1 minute before unwrapping.
🍳 Skillet:
Heat a non‑stick skillet over medium heat, add a splash of water, cover, and warm for 2‑3 minutes, then uncover and press gently to toast the tortilla.
🍷 Perfect Pairings
🥗 Side Dishes
- Quinoa Salad with Herbs: Light, protein‑rich, and complements the wrap without overpowering the Caesar flavor.
- Roasted Sweet Potato Wedges: Their natural sweetness balances the tangy dressing.
- Fresh Fruit Medley: Berries or sliced citrus cleanse the palate between bites.
🍷 Wine & Beverage Pairings
- Chardonnay (unoaked): Its crisp acidity mirrors the lemon in the dressing.
- Rosé (dry): Offers a refreshing contrast to the creamy wrap.
- Non‑Alcoholic: Sparkling water with a splash of lime or a light iced green tea.
🍰 To Complete the Meal
Start with a light tomato‑basil bruschetta, then enjoy the wrap, and finish with a lemon sorbet or a small almond biscotti. This progression keeps the palate lively and ends on a refreshing note.
❓ Frequently Asked Questions
Q: Can I use pre‑cooked rotisserie chicken instead of grilling fresh chicken?
Absolutely. Shred the rotisserie chicken and toss it with a little extra olive oil and seasoning before mixing with the dressing. This shortcut reduces cooking time but may alter the texture slightly, making it less firm than grilled strips.
Q: How do I prevent the tortilla from becoming soggy?
The key is to keep the dressing separate until just before serving, or to use a thin layer of dressing. Additionally, pat the lettuce dry after washing and wrap the tortilla tightly with parchment paper to absorb excess moisture.
Q: Is there a way to make the dressing lower in fat?
Yes. Substitute half of the Caesar dressing with plain Greek yogurt, add a splash of low‑fat milk, and keep the lemon juice and mustard for flavor. This cuts the fat content by roughly 30 % while preserving creaminess.
Q: What common mistakes should I avoid when making these wraps?
Overcooking the chicken is the most common error; it leads to dryness. Also, using too much dressing can make the wrap soggy. Finally, failing to wrap tightly can cause the ingredients to slip out when eating.
Q: Can I freeze the wraps after they are assembled?
Yes, but for the best texture, freeze without the dressing. Add the dressing after thawing, or keep the dressing in a separate container and combine just before eating.
Q: How far in advance can I prepare the chicken?
Cooked chicken can be stored in the refrigerator for up to three days. For longer storage, freeze the cooked strips in a zip‑lock bag; they will keep for up to two months and can be thawed as needed.
🎉 Let’s Get Cooking!
This Chicken Caesar Wrap blends the beloved flavors of a classic salad with the convenience of a handheld meal, making it ideal for busy professionals, students, and families alike. By following the step‑by‑step guide, you’ll achieve perfectly grilled chicken, a vibrant crunch from fresh romaine, and a creamy dressing that ties everything together.
Remember, the secret to a great wrap lies in preparation: keep ingredients dry, season thoughtfully, and adjust portions with our handy calculator. Whether you enjoy it cold straight from the fridge or warmed in the oven, each bite promises satisfaction and balanced nutrition.
I can’t wait to hear how you personalize this recipe! Share your photos, ask questions in the comments, and don’t forget to rate the recipe so we can keep improving.
Have you tried this recipe?
Leave a comment and rating below! Share your photos on Instagram with #CaesarWrapMagic for a chance to be featured.
Chicken Caesar Wraps for Lunch Meal Prep
Protein‑packed Caesar wraps perfect for a quick, satisfying lunch.
📝 Ingredients
Grilled Chicken
Wrap Assembly
Caesar Dressing
👨🍳 Instructions
- 1 Slice chicken breasts horizontally into thin cutlets and season with olive oil, garlic powder, salt, and pepper.
- 2 Grill the cutlets over medium‑high heat for 3‑4 minutes per side until cooked through.
- 3 Let the chicken rest, then slice into thin strips.
- 4 Whisk together Caesar dressing, lemon juice, Dijon mustard, and black pepper.
- 5 Toss the chicken strips with half of the dressing.
- 6 Lay a tortilla flat, spread a thin layer of remaining dressing, add lettuce, Parmesan, and chicken strips.
- 7 Roll tightly, wrap in parchment, and store in an airtight container.
- 8 When ready, enjoy cold or warm in a 180 °C oven for 5 minutes.
- 9 Serve with your favorite side dish and a refreshing beverage.
- 10 Share your creation on social media and leave a review!
🥗 Nutritional Information (per serving)
*Values are approximate.
📚 You Might Also Like
Mediterranean Chicken Pita
Spicy Thai Peanut Noodles
Lemon Herb Quinoa Salad


💬 Comments & Reviews
Leave a Comment
No comments yet. Be the first to share your thoughts!