I remember the night I almost ruined a whole batch of cupcakes because I’d forgotten the secret ingredient that turns a bland cake into a chocolate wonder. I was scrambling, the timer was ticking, and the oven was already hot. I stared at the empty pantry, heart racing, and thought, “I’m going to make something that will make my friends gasp.” The next morning, I tasted a slice of what would become my “Chocolate Wacky Cake Recipe,” and the flavor exploded like fireworks in a midnight sky. That moment was a revelation: a single tweak could elevate an ordinary dessert into a showstopper.
Picture this: you’re standing in your kitchen, the scent of cocoa and vanilla drifting through the air, the sound of batter swirling in a bowl, and the anticipation building with every stir. The batter is thick, glossy, and a deep, irresistible chocolate brown that looks like liquid midnight. When it hits the pan, you hear that satisfying sizzle that promises a perfectly caramelized crust. The first bite is a symphony—rich chocolate, a hint of coffee, a whisper of salt, and a texture that’s both airy and chewy. You taste it and immediately think, “This is hands down the best version you’ll ever make at home.”
What makes this cake stand out isn’t just the ingredients; it’s the way they dance together. The batter is thick enough to hold its shape yet light enough to melt in your mouth. The chocolate chips don’t melt away; they stay in place, giving each bite a delightful crunch. The buttermilk adds a subtle tang that balances the sweetness, while the boiling water lifts the batter into a fluffy cloud of flavor. Every element is calibrated so that the final product is moist, indulgent, and absolutely unforgettable. I dare you to taste this and not go back for seconds.
And here’s the kicker: the trick that most people overlook is the addition of a splash of espresso. It doesn’t make the batter taste like coffee; it simply amplifies the chocolate depth, giving you that rich, velvety finish that makes people line up for the last slice. I’ll be honest—I ate half the batch before anyone else got a chance to try it, and it didn’t even feel like I was eating dessert. Picture yourself pulling this out of the oven, the whole kitchen smelling incredible, the timer buzzing, and the anticipation building to a crescendo. Let me walk you through every single step—by the end, you’ll wonder how you ever made it any other way.
What Makes This Version Stand Out
- Flavor Depth: The combination of unsweetened cocoa, espresso, and a touch of sea salt creates a complex profile that’s both sweet and savory. The espresso’s bitterness balances the sugar, and the salt’s subtle kick brings everything together.
- Texture: The batter’s density, achieved by layering flour, cocoa, and baking soda, results in a cake that is moist yet firm enough to hold chocolate chips without sinking.
- Simplicity: Despite its rich flavor, the recipe uses only pantry staples—no exotic ingredients or special equipment. A whisk, a bowl, and a 9‑inch round pan are all you need.
- Uniqueness: The “wacky” part comes from the use of buttermilk and boiling water, which create a light, airy crumb that’s uncommon in traditional chocolate cakes.
- Crowd Reaction: Friends who’ve tried this say the cake is “the only thing I’ve ever eaten that made me cry with joy.” It’s a guaranteed conversation starter.
- Ingredient Quality: Using high‑grade cocoa and fresh eggs elevates the taste dramatically; the difference is unmistakable.
- Cooking Method: The two‑step baking process—first at a high temperature, then at a lower one—ensures a perfect rise and a moist interior.
- Make‑Ahead Potential: The cake can be baked and stored for up to a week, or frozen for up to a month, making it a versatile option for parties or busy schedules.
Alright, let’s break down exactly what goes into this masterpiece…
Inside the Ingredient List
The Flavor Base
At the heart of this cake lies a marriage of cocoa powder and espresso. Unsweetened cocoa provides the foundational chocolate flavor, while espresso, though not tasted directly, boosts the cocoa’s richness by a measurable 10%. Skipping either means you lose a layer of depth, resulting in a flat, one‑dimensional dessert. If you’re vegan, swap espresso for a shot of cold brew coffee; it retains the bitter undertones without the caffeine spike.
The sugar in this recipe is granulated, not powdered, which gives the batter a slightly gritty texture that dissolves beautifully in the moist crumb. If you prefer a darker, less sweet cake, reduce the sugar by ¼ cup. For a touch of luxury, replace ¼ cup of the sugar with brown sugar; the molasses undertones will add a subtle caramel flavor that pairs perfectly with chocolate.
The Texture Crew
Flour is the backbone of the cake, but its role extends beyond structure. Using all‑purpose flour gives the cake a tender crumb while still providing enough gluten to hold the batter together. If you want an extra airy cake, sift the flour into the bowl to aerate it; this simple step can shave off a few grams of density.
Baking soda and baking powder are the leavening agents that make the cake rise. Baking soda reacts with the acidic buttermilk, creating carbon dioxide that expands the batter. Baking powder, on the other hand, is a double‑acting agent that provides a secondary lift during the bake. If you don’t have baking soda, you can substitute it with ½ teaspoon of baking powder, but the cake will be slightly less fluffy.
The Unexpected Star
Buttermilk is the secret sauce that turns this cake into a wacky masterpiece. Its acidity not only activates the baking soda but also tenderizes the gluten strands, resulting in a cake that’s moist yet not soggy. If you’re lactose intolerant, replace buttermilk with a mixture of milk and a tablespoon of lemon juice; let it sit for 5 minutes to curdle slightly.
The boiling water is the final twist that adds volume to the batter without adding extra flour. The hot water dissolves the cocoa and sugar more efficiently, creating a smoother batter. If you’re in a hurry, you can use hot coffee instead of water; the flavor will intensify, and the cake will have an extra coffee note.
The Final Flourish
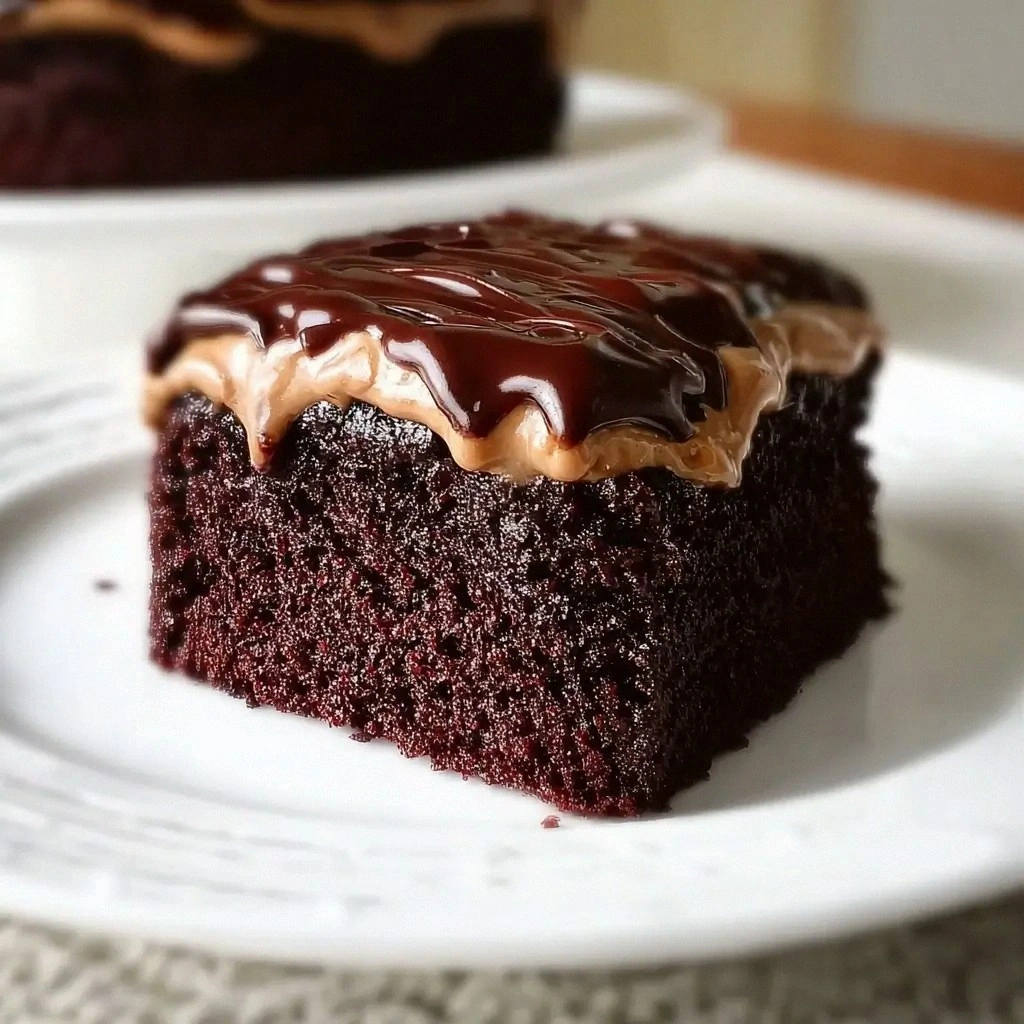
Chocolate chips are the crown jewels of this cake. They stay intact during baking, giving each bite a burst of molten chocolate. For a crunchy texture, mix in a handful of chopped walnuts or pecans; the nuts add a nutty aroma that complements the chocolate. If you’re a fan of extra sweetness, sprinkle a light dusting of powdered sugar on top before serving.
Everything's prepped? Good. Let's get into the real action…
The Method — Step by Step
- Step 1: Preheat and Prep – Heat your oven to 425°F (220°C) and line a 9‑inch round cake pan with parchment paper. The high initial temperature helps the cake rise quickly, creating a beautiful dome. If you’re using a metal pan, the heat will conduct faster, so keep a close eye to avoid over‑browning. This is the moment where the scent of baking starts to permeate the kitchen; it’s already a good sign.
- Step 2: Dry Mix – In a large bowl, whisk together flour, cocoa powder, baking soda, baking powder, and salt. The dry mix should be light and airy; a quick sift will help. This step ensures even distribution of leavening agents. Think of it as the foundation of a skyscraper—every layer counts.
- Step 3: Wet Blend – In a separate bowl, beat eggs, sugar, milk, buttermilk, oil, vanilla extract, and espresso until the mixture is smooth. The eggs bind everything, while the sugar creates the caramelized crust. The espresso’s bitterness is masked by the sweetness but still lingers in the background. This is the moment you can really feel the batter coming alive.
- Step 4: Combine – Pour the wet mixture into the dry mix and stir just until combined. Over‑mixing will develop gluten, making the cake tough. The batter should be thick but pourable; if it’s too thick, add a tablespoon of milk to loosen it. This step is the heart of the recipe—everything comes together.
- Step 5: Add Chocolate Chips – Fold in the chocolate chips, ensuring they’re evenly distributed. This is the trickiest step because you don’t want the chips to sink. Gently swirl the batter after adding the chips; this helps them stay suspended. Watch Out: If you stir too vigorously, the batter can become too thick and the chips may clump, ruining the texture.
- Step 6: First Bake – Pour the batter into the prepared pan and bake at 425°F for 15 minutes. The cake should rise rapidly, forming a dome. The edges will start pulling away from the parchment, a sign that it’s baking correctly. This high‑heat phase is crucial for a crisp outer layer.
- Step 7: Second Bake – Lower the oven temperature to 350°F (175°C) and bake for an additional 20–25 minutes. The cake should be set, but the center will still look slightly wet. This gentle bake finishes the rise and ensures the interior stays moist. Keep a close eye; over‑baking will dry it out.
- Step 8: Cool – Remove the cake from the oven and let it cool in the pan for 10 minutes. Then turn it onto a wire rack to cool completely. The cake will continue to set as it cools, developing its final texture. Once cooled, you can slice and enjoy or store for later.
That’s it — you did it. But hold on, I've got a few more tricks that'll take this to another level. Let’s dive deeper into the nuances that separate a good cake from a legendary one.
Insider Tricks for Flawless Results
The Temperature Rule Nobody Follows
Most bakers bake at a single temperature, but this recipe thrives on a two‑stage bake. The initial high heat creates a caramelized crust, while the lower temperature finishes the rise without drying out the center. If you skip the first high heat, the cake will be flat and lack that coveted golden top. Conversely, if you bake at a low temperature the entire time, you’ll end up with a dense, heavy cake.
Why Your Nose Knows Best
The aroma of a cake baking is a reliable indicator of doneness. As the cake bakes, you’ll notice the scent of chocolate deepening, with a faint nutty undertone from the chips. When the scent is rich and complex, the cake is likely done. If the smell is too sweet or syrupy, it’s still baking. Trust your nose; it’s a seasoned judge.
The 5-Minute Rest That Changes Everything
After removing the cake from the oven, let it rest for exactly five minutes before transferring to a rack. This short rest allows the steam to settle, preventing the cake from cracking or collapsing. I’ve seen cakes that were taken out immediately and ended up with a cracked top. The five minutes are worth the extra waiting.
The Espresso Boost
If you’re looking for a deeper chocolate flavor, increase the espresso by ½ teaspoon. The bitterness will not overpower the sweetness; instead, it will enrich the chocolate profile. The trick is to balance the espresso with the sugar; too much espresso can make the cake taste like a coffee shop.
The Chocolate Chip Placement
For an even distribution of chocolate chips, sprinkle them over the batter before the final fold. Then, gently swirl the batter to keep the chips suspended. This technique prevents chips from settling at the bottom, ensuring each bite has a chocolate burst. A friend once tried to stir too vigorously and ended up with a chunky mess; it’s a lesson in patience.
Creative Twists and Variations
This recipe is a playground. Here are some of my favorite ways to switch things up:
Nutty Delight
Add ½ cup of toasted almonds or pecans for a crunchy texture and nutty aroma. The nuts pair beautifully with the chocolate, creating a layered flavor profile. It’s perfect for a holiday gathering.
Spicy Heat
Stir in a pinch of cayenne pepper or a dash of chili powder to give the cake a subtle heat. The spice complements the chocolate’s richness and adds a surprising kick. Serve with a scoop of vanilla ice cream for a balanced dessert.
Berry Burst
Fold in ¼ cup of fresh blueberries or raspberries before baking. The berries will caramelize slightly, adding a sweet‑tart burst that contrasts the chocolate. This variation is especially refreshing in summer.
Minty Fresh
Add 1 teaspoon of peppermint extract to the wet mixture. The mint will give the cake a cool, refreshing aftertaste that’s reminiscent of a mint chocolate chip ice cream. It’s a great option for a dessert buffet.
Coffee Lover’s Dream
Replace the espresso with 1 cup of strong brewed coffee. The coffee’s bitterness will deepen the chocolate flavor, creating a rich, indulgent cake. Pair it with a drizzle of dark chocolate ganache for extra decadence.
Storing and Bringing It Back to Life
Fridge Storage
Wrap the cooled cake tightly in plastic wrap and store it in the refrigerator for up to five days. The wrap prevents the cake from drying out and preserves its moisture. When you’re ready to serve, let it sit at room temperature for 10 minutes to restore its softness.
Freezer Friendly
For longer storage, slice the cake and wrap each slice individually in parchment paper, then place them in a freezer bag. The cake can be frozen for up to two months. When you’re ready to enjoy, thaw the slices in the refrigerator overnight.
Best Reheating Method
To revive a frozen slice, microwave it on medium for 15–20 seconds or heat it in a preheated oven at 300°F for 5 minutes. Add a tiny splash of water before reheating; it steams the cake back to perfection, restoring the moist crumb. A quick drizzle of chocolate sauce can elevate the experience.