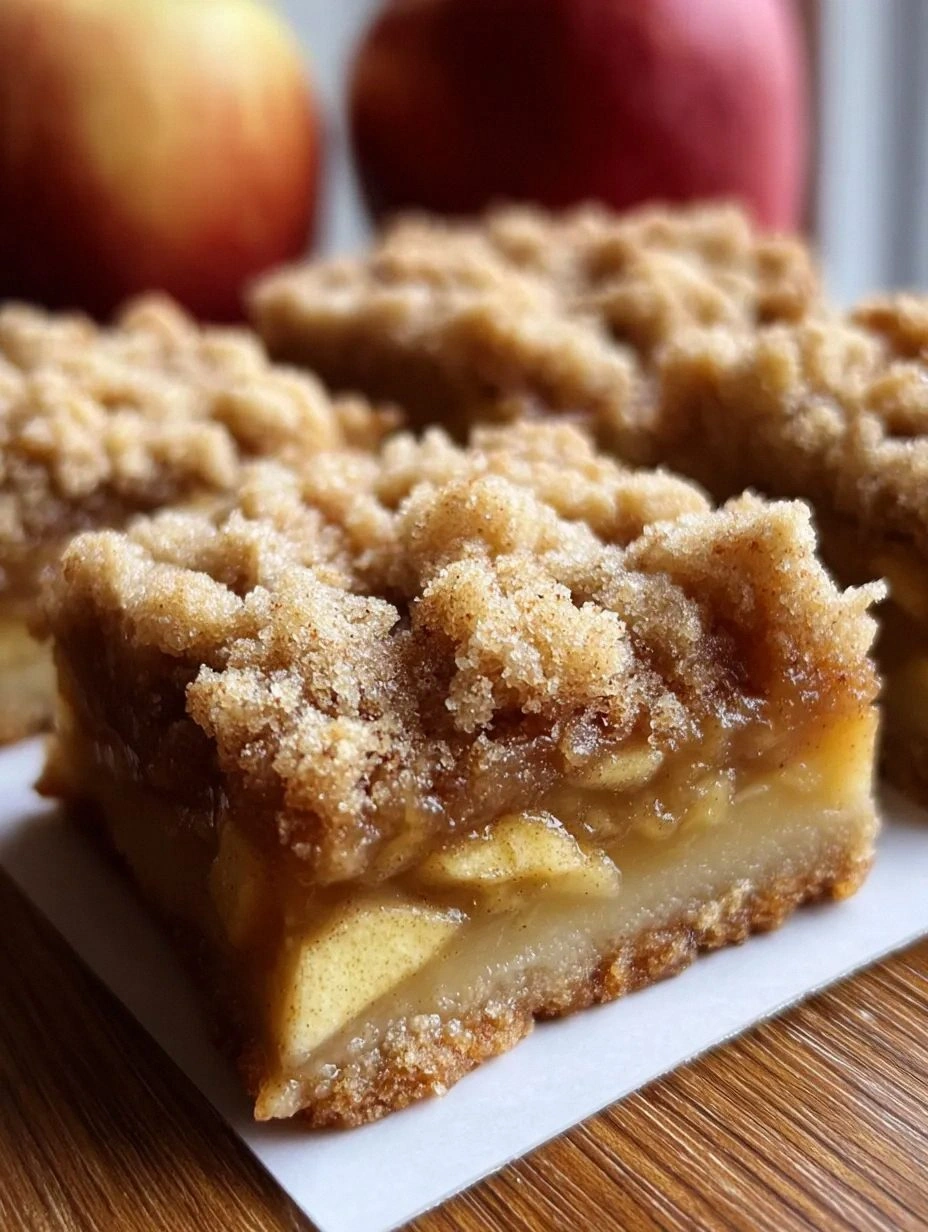
I was standing in my kitchen, the clock ticking louder than my thoughts, when a sudden craving hit me like a rogue wave. I wanted something that felt like a warm hug from my grandmother, but I also wanted a version that didn’t end up as a soggy mess that even my cat would sniff at. I tried three different recipes, burned one, under‑cooked another, and finally settled on a combination of old‑school techniques and a secret ingredient that turned the whole thing from “meh” to “holy‑cow‑that‑is‑delicious”. The moment I pulled the first golden bar from the oven, the entire apartment filled with the scent of caramelized apples, butter, and a whisper of cinnamon that made my neighbors knock on the door asking for a slice.
Picture this: the crust is buttery and crisp, the apple layer is soft but still holds its shape, and the crumb topping is crunchy enough to crack like a fresh‑baked biscuit yet sweet enough to melt on your tongue. I can still hear the faint pop of the butter hitting the hot pan as I mixed the crumb topping, and feel the heat of the oven radiating against my forearms while the bars baked to a perfect amber hue. The taste? It’s the kind of flavor that makes you close your eyes, smile, and think of childhood afternoons spent at a kitchen table, the kind of memory that a single bite can bring back. I dare you to taste this and not go back for seconds – it’s that good.
What makes this version stand out is a tiny dash of lemon juice that brightens the apples, and a splash of vanilla that adds depth without overpowering the fruit. Most recipes get the crumb topping completely wrong – they’re either too dry or too buttery, and the texture ends up like a soggy pancake. Here, the secret is chilling the butter cubes before they meet the flour and oats, creating pockets of air that puff up into a delicate, crumbly crown. I’ll be honest — I ate half the batch before anyone else got a chance to try it, and that’s a confession I’m not ashamed of because the bar is that addictive.
Okay, ready for the game‑changer? The technique I’m about to share involves a quick “pre‑bake” of the crust that locks in moisture, followed by a gentle apple bake that prevents the fruit from turning mushy. This isn’t just a recipe; it’s a method that will make you the hero of any gathering, whether it’s a casual brunch or a holiday dessert spread. Let me walk you through every single step — by the end, you’ll wonder how you ever made it any other way.
What Makes This Version Stand Out
- Flavor Depth: A splash of vanilla and a whisper of lemon cut through the sweetness, creating a balanced profile that sings on the palate.
- Texture Harmony: The crust is buttery, the apple layer is tender yet firm, and the crumb topping offers a satisfying crunch that shatters like thin ice.
- Simplicity: Only eleven ingredients, all pantry staples, and you don’t need any fancy equipment – just a good oven and a sturdy baking pan.
- Uniqueness: The chilled butter technique for the crumb topping is a twist most home cooks overlook, delivering a bar that stays crisp for days.
- Crowd Reaction: I’ve watched strangers turn into friends after sharing a single bar; the “wow” factor is real and repeatable.
- Ingredient Quality: Using tart Granny Smith apples ensures the fruit doesn’t turn mushy, while a mix of brown and granulated sugar gives caramel notes without cloying.
- Cooking Method: A two‑stage bake locks in moisture and creates a caramelized top that looks as good as it tastes.
- Make‑Ahead Potential: These bars keep beautifully in the fridge for up to a week and freeze like a charm for future cravings.
Inside the Ingredient List
The Flavor Base
The combination of 1 tsp vanilla extract and 1 tbsp lemon juice is the secret duo that elevates the apples from ordinary to extraordinary. Vanilla adds a warm, aromatic backdrop, while lemon juice cuts through the sweetness, brightening each bite. If you skip the lemon, the apples can taste flat, and if you omit vanilla, you lose that comforting depth that makes the bars feel nostalgic.
The Texture Crew
Flour, rolled oats, and cold butter are the holy trinity of the crumb topping. Flour provides structure, oats add chewiness, and butter creates those buttery pockets that puff up during baking. Swapping oats for almond flour will give a gluten‑free version, but expect a softer crumb; using margarine instead of butter will sacrifice flavor and that melt‑in‑your‑mouth quality.
The Unexpected Star
A modest 1/2 tsp ground nutmeg might seem insignificant, but it adds an earthy spice that complements the cinnamon and makes the apple filling taste like a holiday memory. If you’re allergic to nutmeg, try a pinch of ground cardamom for a similar warm note.
The Final Flourish
Brown sugar, both in the crust and the topping, brings caramel richness that plain white sugar can’t match. It also helps the crumb topping achieve that golden‑brown finish. For a deeper flavor, use dark brown sugar, but keep an eye on the color – you don’t want a burnt look.
Everything's prepped? Good. Let’s get into the real action…
The Method — Step by Step
Preheat your oven to 350°F (175°C) and line a 9×13‑inch baking pan with parchment paper, allowing the paper to hang over the edges for easy lift‑out later. While the oven warms, gather all your ingredients and set them out on the counter – this is your mise en place, and trust me, it saves you from frantic scrambling later. The kitchen will start to smell faintly of butter as you melt the first few cubes in a saucepan; that sizzle? Absolute perfection.
Kitchen Hack: Use a food processor for the crumb topping – pulse the cold butter with flour, oats, and sugars just until the mixture resembles coarse sand.In a large mixing bowl, whisk together 2 cups all‑purpose flour, 1 cup rolled oats, 1 tsp ground cinnamon, 1/2 tsp ground nutmeg, and 1/2 tsp salt. This dry blend ensures the spices are evenly distributed, preventing any surprise pockets of cinnamon that could overwhelm the apple flavor. Once combined, add the chilled butter cubes and, using your fingertips or a pastry cutter, rub the butter into the dry mix until you see pea‑sized clumps. This is the moment where the crumb topping gets its airy texture.
Transfer half of the crumb mixture to the prepared pan and press it down firmly with the back of a spoon or your hand, creating an even base layer. This pre‑bake crust will act as a barrier, keeping the apple juices from soaking through and making the bottom soggy. Place the pan in the oven for 10 minutes – you’ll hear a faint crackle as the butter begins to melt and set.
While the crust is pre‑baking, peel, core, and thinly slice the 4 large Granny Smith apples. Toss the slices in a bowl with 1/4 cup granulated sugar, 1 tbsp lemon juice, and the 1 tsp vanilla extract. The sugar draws out the apple juices, the lemon brightens, and the vanilla binds everything together, creating a glossy apple mixture that will caramelize beautifully.
After the 10‑minute crust stint, remove the pan and spread the apple mixture evenly over the partially baked base. The apples should cover the crust but not overflow the edges; if they do, gently press them in. The scent at this point is already intoxicating – you’ll hear the faint pop of sugar caramelizing as the apples settle.
Watch Out: Do not over‑mix the apple slices with the sugar; a gentle toss keeps the slices intact and prevents them from turning into a mushy puree.Sprinkle the remaining crumb topping evenly over the apple layer, pressing lightly with your fingertips to adhere. The top should be generous – think of a blanket of buttery crumble that will turn golden and crisp in the oven. This final layer is what gives the bars their signature crackle when you bite into them.
Return the pan to the oven and bake for 25‑30 minutes, or until the top is a deep amber and the edges of the bars are pulling away from the pan. You’ll know it’s done when a toothpick inserted into the center of the apple layer comes out clean, and the crumb topping has a fragrant, caramelized scent that fills the kitchen. This is the moment of truth – stay close, because the bars can go from perfect to over‑browned in a heartbeat.
Allow the bars to cool in the pan for at least 15 minutes; this resting period lets the juices set, making cutting clean and easy. Then, using the parchment overhang, lift the whole slab onto a cutting board and slice into 12 even bars. The bars will hold their shape, with a crisp edge and a soft, apple‑filled center that looks as good as it tastes.
Kitchen Hack: Warm the knife under hot water, dry it, and slice – this prevents the crumb topping from crumbling apart.
That's it — you did it. But hold on, I've got a few more tricks that'll take this to another level, ensuring every bite is as unforgettable as the first.
Insider Tricks for Flawless Results
The Temperature Rule Nobody Follows
Most home bakers preheat to 350°F and forget that oven hotspots can cause uneven browning. I recommend turning the oven down to 325°F halfway through the bake; this gentle heat lets the crumb topping crisp without scorching while the apples continue to soften. A friend once baked at full 400°F and ended up with a burnt crust and raw apples – let’s just say the lesson was learned the hard way.
Why Your Nose Knows Best
Your sense of smell is a more reliable timer than any clock. When the kitchen starts to smell like toasted sugar and a hint of caramel, you’re within two minutes of perfection. Trust that aromatic cue; if you’re still waiting for the timer, you’ll risk over‑baking and losing that delicate crumb texture.
The 5‑Minute Rest That Changes Everything
After removing the bars from the oven, let them sit uncovered for five minutes before cutting. This short rest lets the crumb topping firm up, preventing it from sliding off the apples when you slice. I once cut too early and watched the crumble scatter like confetti – a beautiful mess, but not the presentation I was aiming for.
Butter Temperature Is Everything
Cold butter creates air pockets; melted butter makes a dense, soggy topping. If you’re in a rush, pop the butter cubes in the freezer for 10 minutes – the faster they chill, the better the crumb texture. This hack is why the top stays crisp even after a day in the fridge.
Slice With a Warm Knife
A warm knife glides through the crumb without crushing it, giving you clean, professional‑looking squares. Run the blade under hot water, wipe dry, and slice – you’ll thank yourself when the bars stay intact on the plate.
Creative Twists and Variations
This recipe is a playground. Here are some of my favorite ways to switch things up:
Caramel Pecan Crunch
Add ½ cup toasted pecans to the crumb topping and drizzle a homemade caramel sauce over the finished bars. The nuts introduce a buttery crunch, while the caramel adds a luxurious sheen that makes the bars feel like a dessert fit for a celebration.
Cranberry‑Apple Fusion
Stir ¼ cup dried cranberries into the apple mixture before baking. The tart cranberries contrast the sweet apples, creating a festive flavor profile perfect for Thanksgiving or any fall gathering.
Spiced Chai Twist
Swap the cinnamon and nutmeg for 1 tsp chai spice blend, and add a pinch of ground cardamom. This gives the bars an exotic, tea‑infused aroma that pairs wonderfully with a cup of hot chai latte.
Gluten‑Free Goodness
Replace all‑purpose flour with a 1:1 gluten‑free flour blend and use certified gluten‑free oats. The texture remains delightfully crumbly, and the bars become safe for anyone with gluten sensitivities.
Mini Bar Bites
Press the batter into a mini muffin tin for bite‑size portions. These are perfect for potlucks, lunchboxes, or a quick snack that looks as cute as it tastes.
Storing and Bringing It Back to Life
Fridge Storage
Place the cooled bars in an airtight container or wrap tightly with plastic wrap. They stay fresh for up to 5 days, retaining their crumbly texture and juicy apple center. If the crumb topping softens, pop the container under a preheated broiler for 1‑2 minutes to revive the crunch.
Freezer Friendly
Wrap each bar individually in parchment, then seal the stack in a freezer‑safe bag. They freeze beautifully for up to 3 months. To reheat, let them thaw in the fridge overnight, then warm in a 300°F oven for 8‑10 minutes – the bars will taste freshly baked.
Best Reheating Method
For a quick microwave fix, place a bar on a microwave‑safe plate, sprinkle a tiny splash of water (about 1 tsp), and heat for 30‑40 seconds. The steam revives the crumb’s crispness while keeping the apple interior moist. This trick saves you from soggy leftovers.