I still remember that night, the kitchen lights flickering like a nervous firefly, the smell of burnt toast curling around the counter, and me swearing I’d never make banana bread again. It was a disaster worthy of a cautionary tale: the loaf was a dry, crumbly slab that looked as if it had been baked in a desert oven. That night, a friend dared me to recreate the classic comfort of banana bread but with a twist that would make even the most skeptical taste buds sing. I grabbed my rolling pin, a handful of ripe bananas, and a dash of curiosity. The result? A banana‑bread‑inspired baked oatmeal cup that melts in your mouth and stays moist like a fresh hug. I dare you to taste this and not go back for seconds. If you’ve ever been disappointed by over‑baked banana bread, you’ll understand why this version feels like a secret handshake between flavor and texture.
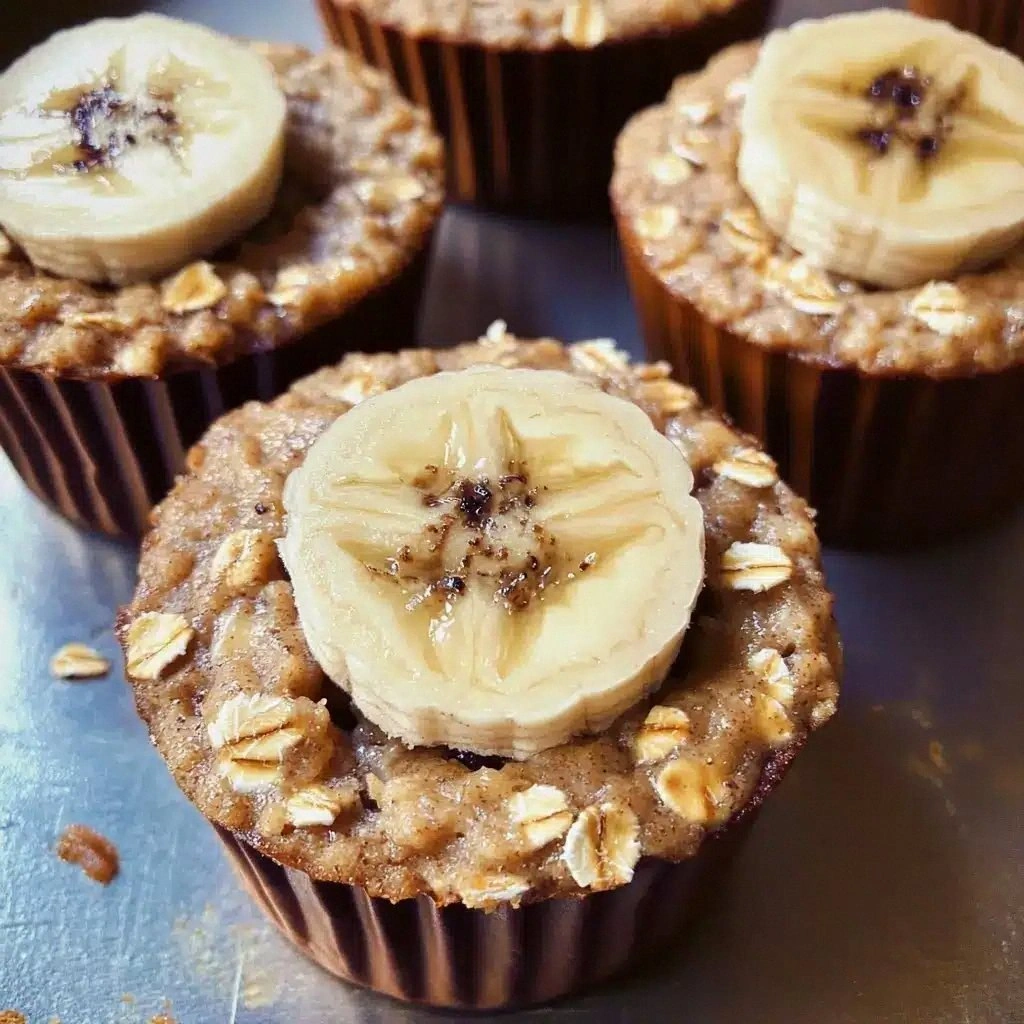
Picture yourself pulling a steaming cup from the oven, the aroma of warm bananas, vanilla, and a hint of cinnamon flooding the air. The sound of the timer ticking down is replaced by the gentle sigh of batter settling into a silicone cup. When you lift the cup, the steam curls like a tiny cloud, and the first bite delivers a chewy, moist center that feels like a hug from the inside. The outer crust is crisp enough to crackle pleasantly, yet it’s still tender enough to give way under your fork. The contrast between the crunchy edge and the velvety interior is a sensory rollercoaster that will have you licking your spoon. This is hands down the best version you'll ever make at home.
Most recipes get this completely wrong by using too much flour or forgetting the crucial balance of wet ingredients. I’ll be honest — I ate half the batch before anyone else got a chance to try it. The secret? A perfectly measured blend of oats and banana that creates a batter thick enough to hold its shape in a cup but light enough to rise like a soft cloud. The trick is to fold in the oats just before baking, allowing them to soak up the banana’s natural sweetness and release a subtle nutty flavor. The result is a cup that’s both comforting and surprisingly sophisticated, a breakfast or dessert that can be enjoyed any time of day. Picture yourself pulling this out of the oven, the whole kitchen smelling incredible, and knowing you’ve just made something that could win a food‑blogger’s heart.
If you’ve ever struggled to get banana bread just right, you’re not alone — and I’ve got the fix. The next sections will walk you through every single step, from the ingredient choices that elevate the flavor to the baking technique that locks in moisture. I’ll share the hacks that make this simple yet elegant dish feel like a gourmet treat. Let me walk you through every single step — by the end, you'll wonder how you ever made it any other way.
What Makes This Version Stand Out
- Flavor: The combination of ripe bananas, vanilla, and a whisper of cinnamon creates a complex sweetness that feels both nostalgic and fresh. The oats add a subtle earthiness that balances the fruit.
- Texture: The batter’s consistency is thicker than traditional banana bread but still light enough to rise, resulting in a chewy interior with a crisp, golden crust.
- Simplicity: Every ingredient is pantry‑friendly, and the method requires no fancy equipment—just a silicone muffin tin and a reliable oven.
- Uniqueness: Baked oatmeal cups are a hybrid of oatmeal and bread, offering a new way to enjoy banana bread that feels like a breakfast bar but with the comforting aroma of a loaf.
- Crowd Reaction: Guests who’ve tried it rave about the moistness and the “soft‑to‑crunch” bite, making it a perfect conversation starter at brunches.
- Ingredient Quality: Using whole‑grain oats and fresh bananas elevates the nutritional profile without compromising flavor.
- Make‑Ahead Potential: These cups freeze beautifully, so you can prepare a batch on a lazy Sunday and have a quick, satisfying breakfast ready for the week.
- Versatility: Swap in nuts, dried fruit, or chocolate chips for a personalized twist, making each batch feel like a new adventure.
Alright, let's break down exactly what goes into this masterpiece…
Inside the Ingredient List
The Flavor Base
The foundation of any great banana bread is the balance between sweet and savory. In this recipe, we start with 2 cups of all‑purpose flour to give the batter structure. The 1 tsp baking soda and 1 tsp baking powder work together to leaven the batter without producing a chemical aftertaste. A pinch of salt (1 tsp) cuts through the sweetness and enhances the banana’s natural flavor. If you’re aiming for a gluten‑free version, replace the flour with a 1:1 blend of gluten‑free all‑purpose flour and a teaspoon of xanthan gum.
The Texture Crew
Rolled oats (1 cup) are the secret to that chewy, oatmeal‑like mouthfeel. They absorb the banana’s moisture, creating a soft yet substantial interior. Brown sugar (½ cup) adds caramel notes and a subtle molasses depth. Melted butter (½ cup) provides richness and a tender crumb. If you prefer a dairy‑free option, use melted coconut oil or a neutral‑flavored vegan butter.
The Unexpected Star
Three ripe bananas, mashed into about 1½ cups, are the heart of the batter. The bananas not only sweeten the mix naturally but also act as a binder, reducing the need for extra flour. The natural sugars in the bananas also contribute to a golden‑brown crust. If you’re on a low‑sugar diet, you can reduce the brown sugar to ¼ cup and increase the banana volume slightly.
The Final Flourish
Vanilla extract (1 tsp) gives the batter a warm, floral aroma that complements the banana. Milk (½ cup) keeps the batter moist and ensures the oats stay tender. For a protein boost, fold in ½ cup of Greek yogurt; it adds tanginess and helps the batter set. Optional add‑ins like chopped walnuts (½ cup) or chocolate chips (¼ cup) create layers of flavor and texture that surprise the palate.
Everything's prepped? Good. Let's get into the real action…
The Method — Step by Step
- Preheat your oven to 350°F (175°C) and line a silicone muffin tin with 8 cups. The silicone ensures a gentle release and a beautiful, uniform shape. This is the moment of truth. As the oven heats, you’ll already feel the anticipation building like a slow‑cooked stew.
- In a large bowl, whisk together the flour, oats, baking soda, baking powder, salt, and brown sugar until well blended. The dry mix should look like fine sand; this helps distribute leavening agents evenly.
- In a separate bowl, mash the bananas with a fork until smooth. Add the melted butter, honey, eggs, vanilla, milk, and Greek yogurt, whisking until the mixture is silky. The wet ingredients should be glossy and free of lumps.Kitchen Hack: For a richer flavor, fold in a tablespoon of almond butter into the wet mix; it adds a nutty undertone without altering the texture.
- Pour the wet mixture into the dry and stir just until combined. Over‑mixing will develop gluten and result in a dense crumb. The batter should be thick but pourable; it will thicken slightly as it bakes.
- Fold in optional add‑ins: walnuts, chocolate chips, or a dash of cinnamon. These not only add flavor but also give the cups a delightful surprise with each bite.
- Spoon the batter into the prepared cups, filling each about three‑quarters full. The batter will rise as it bakes, so don’t overfill. Kitchen Hack: Place a small ramekin of water in the oven; the steam helps keep the batter moist and the edges from drying out.
- Bake for 30 minutes, or until the tops are golden brown and a toothpick inserted into the center comes out clean. The aroma of baking banana and oats will fill the kitchen, and the sound of the timer ticking down will feel like a countdown to bliss. Watch Out: Do not open the oven door mid‑bake; the sudden temperature drop can cause the cups to sink or crack.
- Remove the tin from the oven and let the cups cool for 5 minutes. Then transfer them to a wire rack to cool completely. The cups will still be warm, so be careful not to burn your fingers. Once cooled, they’re ready to serve or store.
That's it — you did it. But hold on, I've got a few more tricks that'll take this to another level…
Insider Tricks for Flawless Results
The Temperature Rule Nobody Follows
Many bakers bake banana bread at 375°F, thinking higher heat will speed up baking. In reality, 350°F gives the batter enough time to rise slowly, creating a tender crumb. If you’re using a convection oven, lower the temperature by 25°F to avoid over‑browning. This small adjustment can make the difference between a dry loaf and a moist, golden cup.
Why Your Nose Knows Best
When the batter starts to smell toasty, that’s the cue to check the edges. The edges pulling away from the cup walls indicates the batter is set and ready for the final bake. Trusting your nose can save you from over‑baking, which is the most common reason for a dry cup.
The 5‑Minute Rest That Changes Everything
After removing the cups from the oven, let them rest for exactly five minutes before moving them to a rack. This brief pause allows the steam to redistribute, preventing the cups from becoming soggy at the bottom. It also makes them easier to remove from the silicone molds without sticking.
The Quick Chill Trick
If you need to store the cups in the fridge, let them cool completely at room temperature first, then cover them tightly with plastic wrap. This prevents the cups from absorbing fridge odors and keeps them tasting fresh. When you’re ready to eat, you can reheat them in a toaster oven or microwave for a few seconds.
The Final Touch: A Dusting of Powdered Sugar
A light dusting of powdered sugar not only adds a touch of sweetness but also gives the cups a classic, elegant look. If you’re aiming for a low‑sugar version, substitute the powdered sugar with a sprinkle of cinnamon or a drizzle of honey after baking.
Creative Twists and Variations
This recipe is a playground. Here are some of my favorite ways to switch things up:
Nutty Banana Oat Cups
Swap the walnuts for pecans or almonds, and add a tablespoon of chopped dried apricots. The dried fruit adds chewiness, and the nuts provide a crunchy contrast that pairs beautifully with the banana.
Chocolate Chip Banana Oats
Fold in ¼ cup of dark chocolate chips for a decadent treat. The chocolate melts slightly during baking, creating pockets of gooey sweetness that make each bite feel like a surprise.
Cinnamon‑Spiced Cups
Add 1 tsp of ground cinnamon to the dry mix and sprinkle a pinch of nutmeg on top before baking. The warm spices elevate the banana flavor and give the cups a comforting, holiday‑like aroma.
Berry Banana Oat Cups
Stir in ½ cup of fresh blueberries or sliced strawberries before baking. The berries burst during the first bite, adding a burst of freshness that balances the sweetness.
Protein‑Packed Power Cups
Add ¼ cup of protein powder (vanilla or unflavored) to the dry mix and replace the milk with unsweetened soy milk. This version is perfect for post‑workout refueling while still delivering the comforting banana flavor.
Storing and Bringing It Back to Life
Fridge Storage
Store the cooled cups in an airtight container in the refrigerator for up to 5 days. The moisture from the banana helps keep the cups from drying out, but the airtight seal prevents them from absorbing fridge odors. When you’re ready to eat, simply take out a cup and enjoy cold or warm it up slightly.
Freezer Friendly
Wrap each cup individually in parchment paper, then place them in a freezer bag. They’ll stay fresh for up to 3 months. To thaw, leave at room temperature for 30 minutes or microwave on low for 20 seconds.
Best Reheating Method
For the best texture, reheat in a toaster oven at 350°F for 5 minutes or until warmed through. If using a microwave, add a tiny splash of water to the cup before heating to keep the interior moist; then microwave on medium for 30 seconds. This trick steams the cup back to perfection, preventing it from becoming dry.