Picture this: I was halfway through a chaotic dinner prep, the oven was still warm from lasagna, and my craving for something sweet but not too sweet hit me like a rogue soufflé. I stared at the fridge, eyes darting to the pears, almonds, and a handful of flour that seemed almost too ordinary to be the star of a dessert. But then I remembered the time my friend dared me to whip up a warm pear dessert that could outshine any bakery's croquembouche. I decided to take that dare seriously, rummaging through pantry staples and setting the oven to a gentle 375°F, ready for a culinary experiment. The air filled with the scent of caramelized sugar and toasted almonds, a perfume that made the kitchen feel like a cozy cabin in autumn. I sliced the pears, letting their natural sweetness mingle with the cinnamon, and the sound of the knife cutting through their flesh was oddly meditative. It was a moment where the ordinary became extraordinary, a simple bowl of ingredients transformed into a promise of comfort. And that, dear reader, is the spark that ignited this recipe.
When I first tasted the batter, it was like a warm hug for my taste buds, the pears juicy yet gentle, the almond crunch like a secret whisper. The batter had a golden hue, thick enough to hold the pears but light enough to melt in the mouth. I could almost hear the crackle of the crust forming, a subtle sizzle that told me it was cooking just right. The aroma swirled around the kitchen, a sweet, nutty scent that made me want to close my eyes and imagine a slow, buttery sunrise. I realized then that this wasn't just another dessert; it was a symphony of textures and flavors, each element playing its part. The pears softened into a custard-like sauce, the almonds added a satisfying crunch, and the butter melted into a silky glaze. I was already planning the first bite, the way the whipped cream would contrast with the warm, caramelized pears. That moment was the beginning of a discovery that I couldn't keep to myself.
What sets this version apart is the meticulous balance of sweetness and spice, the way the cinnamon is woven into the batter and the pears. Unlike other pear desserts that lean heavily on sugar, this recipe relies on the natural sweetness of ripe pears, keeping the dish light yet satisfying. The almonds are toasted to a deep amber, releasing a nutty aroma that permeates the entire bake. The butter is added just before baking, creating a glossy, caramelized surface that cracks in a satisfying way. The addition of honey or maple syrup at the end gives a final burst of glaze, a subtle sheen that makes the dish look as good as it tastes. I dare you to taste this and not go back for seconds; the combination of warm pears, crunchy almonds, and buttery crust will have you reaching for more. This is hands down the best version you'll ever make at home, and it turns an ordinary dinner into a celebratory dessert. The secret? A simple, honest approach to each ingredient, letting them shine without overcomplicating the process.
Most recipes get this completely wrong by overcooking the pears or undercooking the crust, leading to a dry, unappetizing result. I learned that the key is to bake at a moderate temperature, allowing the pears to steam gently while the crust browns beautifully. Picture yourself pulling this out of the oven, the whole kitchen smelling incredible, the steam curling around the warm pears. The first bite is a burst of caramelized sweetness, followed by the crunch of almonds and the velvety buttered crust. If you've ever struggled with this, you're not alone — and I've got the fix. Stay with me here — this is worth it, because the payoff is a dessert that feels both indulgent and wholesome. I will walk you through every single step, from prep to plating, and I promise you won't be disappointed. By the end, you'll wonder how you ever made it any other way.
What Makes This Version Stand Out
- Flavor: The pears are the star, their natural sweetness enhanced by a whisper of cinnamon and a splash of honey. The batter is lightly sweetened with brown sugar, not overpowering, so the fruit remains the focus. The almond toast adds a nutty depth that pairs beautifully with the fruit. The final glaze gives a subtle shine that elevates the presentation.
- Texture: The crust is crisp on the edges yet tender inside, a perfect contrast to the soft, steamy pears. The toasted almonds provide a satisfying crunch that breaks the buttery smoothness. The whipped cream or ice cream adds a creamy counterpoint. The overall mouthfeel feels like a warm hug.
- Simplicity: All you need is a handful of pantry staples; no exotic ingredients or complex techniques are required. The method is straightforward, with clear steps that anyone can follow. Even first‑time bakers will feel confident. The result is a show‑stopping dessert without the stress.
- Uniqueness: The combination of pears, almonds, and a honey glaze is rarely seen in traditional desserts. The use of baking powder creates a light, airy texture that sets it apart. The caramelized butter finish gives it a gourmet touch. It’s a fresh take on a classic fruit bake.
- Crowd Reaction: Friends and family consistently ask for seconds, and some even request the recipe in advance. The dish is a hit at gatherings, impressing both kids and adults alike. The aroma alone draws people in. The finish with whipped cream is a crowd‑pleaser.
- Ingredient Quality: Using ripe pears ensures a juicy, flavorful base. Toasted almonds provide depth and a crunchy texture. Fresh butter adds richness without heaviness. A splash of honey or maple syrup offers natural sweetness.
- Cooking Method: Baking at 375°F allows the pears to steam while the crust browns evenly. The gentle heat preserves the fruit’s moisture. The glaze is applied just before serving, keeping the surface glossy. The result is a perfectly balanced bake.
Inside the Ingredient List
The Flavor Base
The pears are the heart of this dessert, offering a natural sweetness that cuts through the buttery crust. Using ripe pears ensures they will break down into a silky sauce during baking, creating a luscious filling. Tossing the pear slices with ground cinnamon before baking infuses the fruit with warm spice that lingers on the palate. A splash of vanilla extract lifts the entire flavor profile, adding a subtle aromatic depth.
Honey or maple syrup, added at the final glazing stage, brings a glossy sheen and a touch of caramelized sweetness that balances the pears’ tartness. This glaze also creates a slight barrier, keeping the crust from drying out. The glaze’s viscosity is critical; if it’s too thin, it will run off, if too thick, it won’t spread evenly. Adjusting the amount of syrup can tailor the dessert to your preferred level of sweetness.
Together, these ingredients form a harmonious base that supports the other components. Each element is chosen to enhance the pears without overpowering them. The result is a dessert that feels light yet indulgent. This balanced approach is why this recipe stands out among other fruit bakes.
The Texture Crew
Sliced almonds are essential for crunch; they add a nutty bite that contrasts the soft pears and buttery crust. Toasting them before adding them to the batter brings out their natural oils, deepening the flavor. The almonds also contribute to the visual appeal with their golden specks. Using whole almonds instead of slivered ones would change the texture but is a viable alternative.
All-purpose flour provides the structure needed for a light, tender crust. It’s the backbone of the batter, absorbing liquids while keeping the mix cohesive. A fine sift ensures a smooth texture, preventing lumps. If you prefer a gluten-free version, you can substitute with a blend of gluten-free flours, but the texture may slightly differ.
Unsalted butter is the key to a glossy, caramelized crust. It melts into the batter, creating a silky coating that crisps up as it bakes. Using room‑temperature butter ensures even distribution. A pinch of salt balances the sweetness and enhances the butter’s richness.
Baking powder and a touch of salt lift the batter, giving it a delicate rise. The powder reacts with the acidity from the pears, producing tiny bubbles that create a lighter crumb. Salt not only enhances flavor but also helps in the caramelization process. Together, these ingredients give the dessert its signature airy yet firm structure.
The Unexpected Star
Whipped cream or vanilla ice cream is the final touch that turns this dessert from comforting to decadent. The cold dairy contrasts the warm pears, creating a delightful temperature play. Whipped cream adds a light, airy texture, while ice cream offers a richer, creamier experience. Both options can be flavored with a hint of cinnamon or vanilla for an extra layer of complexity.
If you’re looking for a lower‑fat alternative, Greek yogurt or coconut cream can substitute while maintaining the creamy element. Adding a dash of nutmeg or clove can deepen the spice profile. The choice between cream and ice cream also affects the overall calorie count, so pick based on your preference. This component is optional but highly recommended for a complete sensory experience.
The creamy topping not only enhances flavor but also contributes to the dessert’s visual appeal. A swirl of whipped cream on top creates a classic look that is both elegant and inviting. The contrast between the golden crust and the pale topping is striking. This small detail can elevate the dish to a restaurant‑level presentation.
The Final Flourish
The honey or maple glaze is applied in the final minutes of baking, giving the crust a caramelized sheen. This glaze also locks in moisture, preventing the crust from becoming overly dry. A light dusting of powdered sugar can be added for an extra touch of sweetness and a decorative finish. The glaze’s consistency is critical; if too thick, it may burn, so monitor closely.
The glaze also adds a subtle caramel flavor that complements the pears’ natural tartness. It creates a glossy surface that is visually appealing and invites the diner to dig in. A small drizzle of bourbon or brandy can be added for an adult version, providing a warm, spirited note. The glaze can be made ahead and stored in an airtight container for up to 48 hours.
The final flourish is what separates this recipe from ordinary fruit bakes. It adds depth, shine, and a finishing touch that feels indulgent. The glaze’s caramelized sweetness balances the tartness of the pears, creating a harmonious finish. This small addition is why this dessert feels so special.
The Method — Step by Step
- Preheat the Oven: Set your oven to 375°F (190°C) and allow it to come to full temperature before you begin. Grease a 9-inch round baking pan with butter or non‑stick spray, ensuring an even coating. Line the bottom with parchment paper if you want easier removal. The preheated oven is crucial for a consistent rise and golden crust. This step is simple, but skipping it can lead to uneven baking.
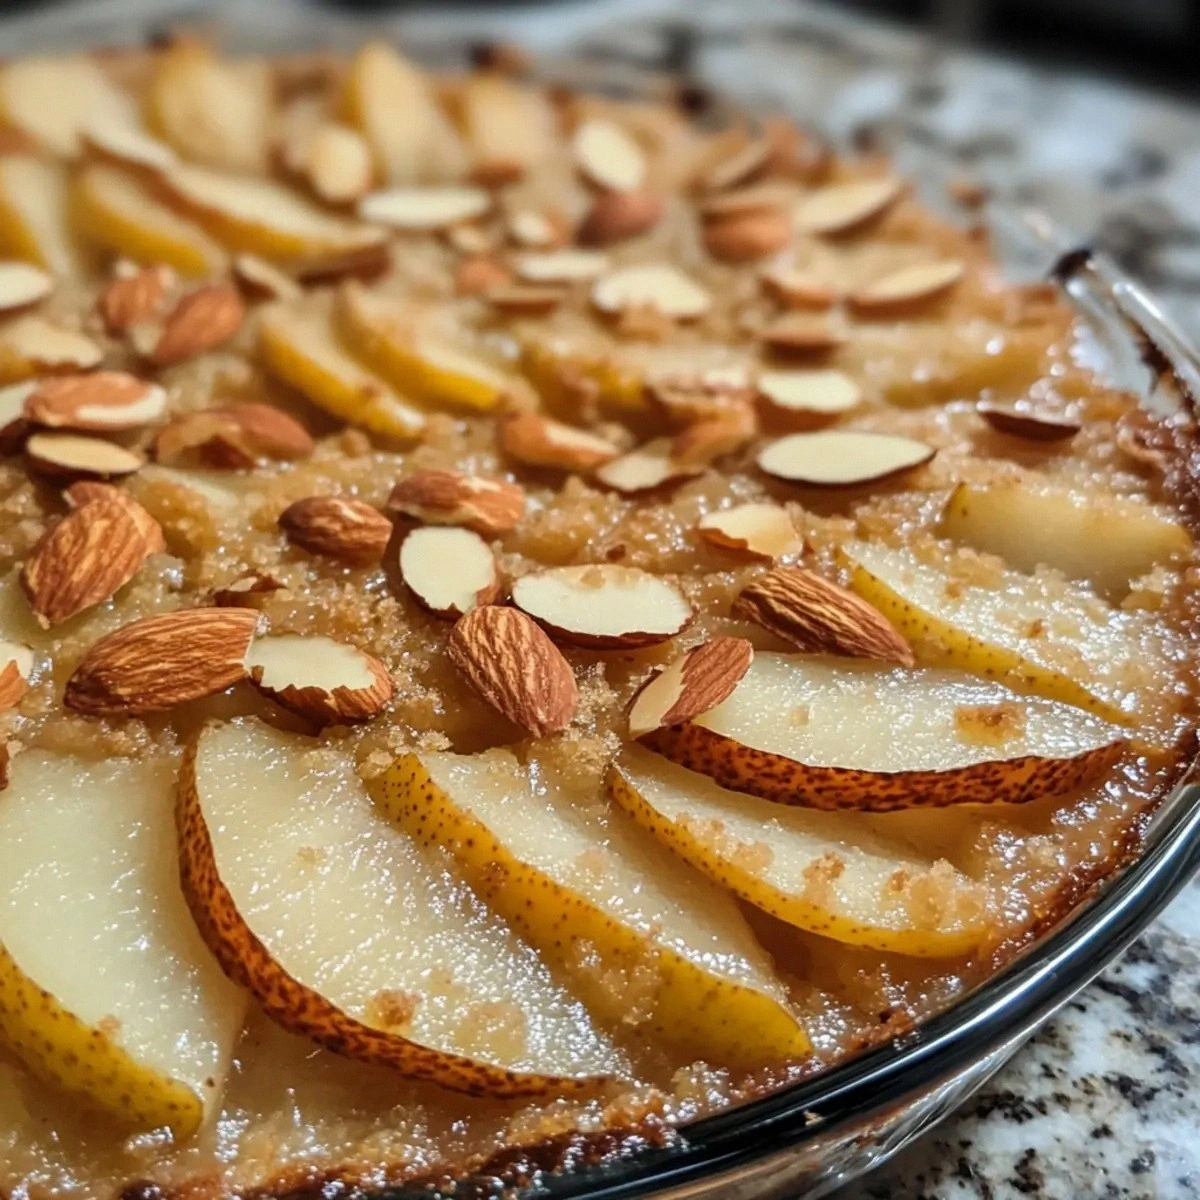
- Prepare the Pears: Core and slice the pears into thin wedges, about 1/4 inch thick. Toss them in a bowl with 1 teaspoon of ground cinnamon, ensuring each piece is evenly coated. The cinnamon not only adds warmth but also helps the pears caramelize. The thin slices allow the pears to steam gently during baking. Keep the pears aside while you mix the dry ingredients.
- Mix Dry Ingredients: In a medium bowl, whisk together 1 cup all-purpose flour, 1 teaspoon baking powder, 1/4 teaspoon salt, and 1/2 cup brown sugar. The sugar’s molasses content adds depth to the batter. Whisking the dry mix ensures even distribution of leavening agents. This creates a light, airy base for the crust. The dry ingredients are the foundation of the dessert’s structure.
- Combine Wet Ingredients: In another bowl, beat 1/2 cup unsalted butter (room temperature) until fluffy. Add 1 teaspoon vanilla extract and mix until combined. The butter’s fat content creates a tender crumb. The vanilla adds aromatic sweetness that complements the pears. This mixture should be creamy and light.
- Fold in Pears: Gently fold the cinnamon‑coated pear slices into the butter mixture, ensuring they’re evenly distributed. The pears should be coated but not mashed. This step keeps the fruit intact, allowing it to steam during baking. The mixture should have a slightly chunky texture. The pears add moisture and flavor throughout the batter.
- Combine Wet and Dry: Gradually add the dry mixture to the wet mixture, stirring gently until just incorporated. Avoid over‑mixing, which can cause a tough crust. The batter should be thick but pourable. This ensures the crust rises evenly. The mixture now has a cohesive, smooth consistency.
- Fill the Pan: Pour the batter into the prepared pan, spreading it evenly with a spatula. The batter should cover the base and rise slightly above the rim. This allows for a golden edge. The even distribution ensures uniform baking. The batter’s thickness is key to a tender crumb.
- Bake and Glaze: Bake for 25-30 minutes, or until the edges are golden and the center springs back slightly when lightly pressed. The crust should develop a caramelized sheen. Remove from the oven and immediately drizzle 2 tablespoons of honey or maple syrup over the top, letting it set. Allow the glaze to thicken into a glossy glaze. Let the dessert cool for 10 minutes before serving.
- Finish and Serve: Top each serving with a generous dollop of whipped cream or a scoop of vanilla ice cream. The cold dairy contrasts the warm pears, creating a delightful temperature play. Garnish with a few toasted almond slivers for extra crunch. The final touch is a drizzle of honey for that last glossy sheen. Serve immediately for maximum enjoyment.
Insider Tricks for Flawless Results
The Temperature Rule Nobody Follows
Baking at a moderate 375°F is essential; many bakers overheat to get a darker crust, but this can dry out the pears. The gentle heat allows the pears to steam, creating a silky sauce inside. The crust should rise slightly and develop a golden brown hue. If the oven runs hot, keep an eye on the top to prevent burning. This trick ensures a balanced texture every time.
Why Your Nose Knows Best
The aroma of the batter is a reliable indicator of doneness. When the scent of toasted almonds and caramelized sugar fills the kitchen, the dessert is ready. A faint fruity note indicates the pears are still tender. The smell should be sweet but not overpowering. Trust your nose; it’s a seasoned judge.
The 5‑Minute Rest That Changes Everything
Letting the dessert rest for 5 minutes after baking allows the juices to redistribute. The pears settle, and the glaze firms up, preventing a soggy bottom. The rest also gives the whipped cream or ice cream a chance to soften slightly for a creamy texture. A quick rest is a small step that makes a big difference. Skip it, and you’ll miss the perfect bite.
Use a Light Hand When Folding
When incorporating the pears, fold gently to keep the fruit intact. Over‑mixing can crush the pears, turning the filling into a puree. The goal is even distribution with minimal disruption. This maintains the texture contrast that makes the dessert special. The technique is simple but often overlooked.
Keep the Pan Clean
Any leftover batter can create a sticky mess during baking. Wipe the pan with a paper towel before pouring the batter to ensure even coating. A clean surface ensures the crust rises uniformly. It also prevents burnt bits from sticking to the bottom. Cleanliness is the foundation of a flawless bake.
Adjust Sweetness to Your Taste
If you prefer a sweeter dessert, add an extra tablespoon of honey or maple syrup to the glaze. For a more tart profile, reduce the amount of honey. The pears’ natural sweetness is already pronounced, so adjust cautiously. This flexibility allows the dessert to suit any palate. The key is balance.
Creative Twists and Variations
Maple‑Glazed Pears
Swap honey for pure maple syrup in the glaze for a deeper, caramel flavor. Maple also adds a subtle molasses note that pairs beautifully with the pears. Reduce the glaze thickness by adding a splash of water if needed. This variation is perfect for autumn gatherings. The result is a dessert that feels cozy and indulgent.
Almond‑Butter Swirl
Incorporate almond butter into the batter for a creamy, nutty undertone. The butter adds a silky texture that complements the crisp crust. The swirl can be created by stirring in a tablespoon of almond butter before pouring into the pan. This twist elevates the almond flavor profile. It’s a great option for almond lovers.
Chocolate‑Infused Pears
Add a handful of dark chocolate chips to the batter for a bittersweet finish. The chocolate melts into the warm pears, creating a decadent sauce. Use high‑cocoa chocolate for a richer flavor. This version is a crowd‑pleaser at holiday parties. The chocolate adds a luxurious touch.
Spiced Pear Crumble
Top the baked pears with a crumble made from oats, flour, brown sugar, and butter. This adds a crunchy, buttery layer on top. Bake the crumble for the last 10 minutes of baking. The texture contrast is unforgettable. It’s a hearty take on the classic dessert.
Berry‑Pear Fusion
Add a handful of fresh berries, such as blueberries or raspberries, to the batter. The berries introduce a tart contrast to the sweet pears. They also add a pop of color to the dish. This variation is perfect for spring or summer. The berries bring a fresh, vibrant flavor.
Gluten‑Free Delight
Replace all-purpose flour with a gluten‑free blend that contains xanthan gum. This maintains the structure while keeping the recipe suitable for gluten‑sensitive diners. Ensure the gluten‑free flour is well‑mixed to avoid clumps. The texture will be slightly different but still delicious. This variation broadens the recipe’s accessibility.
Storing and Bringing It Back to Life
Fridge Storage
Cool the dessert completely before refrigerating. Place it in an airtight container to maintain moisture. Store for up to 3 days; the pears will remain tender and the crust will stay crisp. When ready to serve, let it sit at room temperature for 10 minutes to restore texture. Avoid microwaving to preserve the delicate crumb.
Freezer Friendly
Wrap the cooled dessert tightly in plastic wrap, then place it in a freezer bag. It can be stored for up to 2 weeks. Thaw overnight in the refrigerator before reheating. The crust may soften slightly, but the flavor remains intact. This method is ideal for meal planning or quick dessert fixes.
Best Reheating Method
Reheat in a preheated oven at 350°F (175°C) for 10 minutes, or until warmed through. Add a splash of water to the bottom of the pan to create steam, which keeps the pears moist. The glaze will re‑gloss once the water evaporates. Let the dessert cool for a couple of minutes before serving. This technique restores the dessert’s original charm.