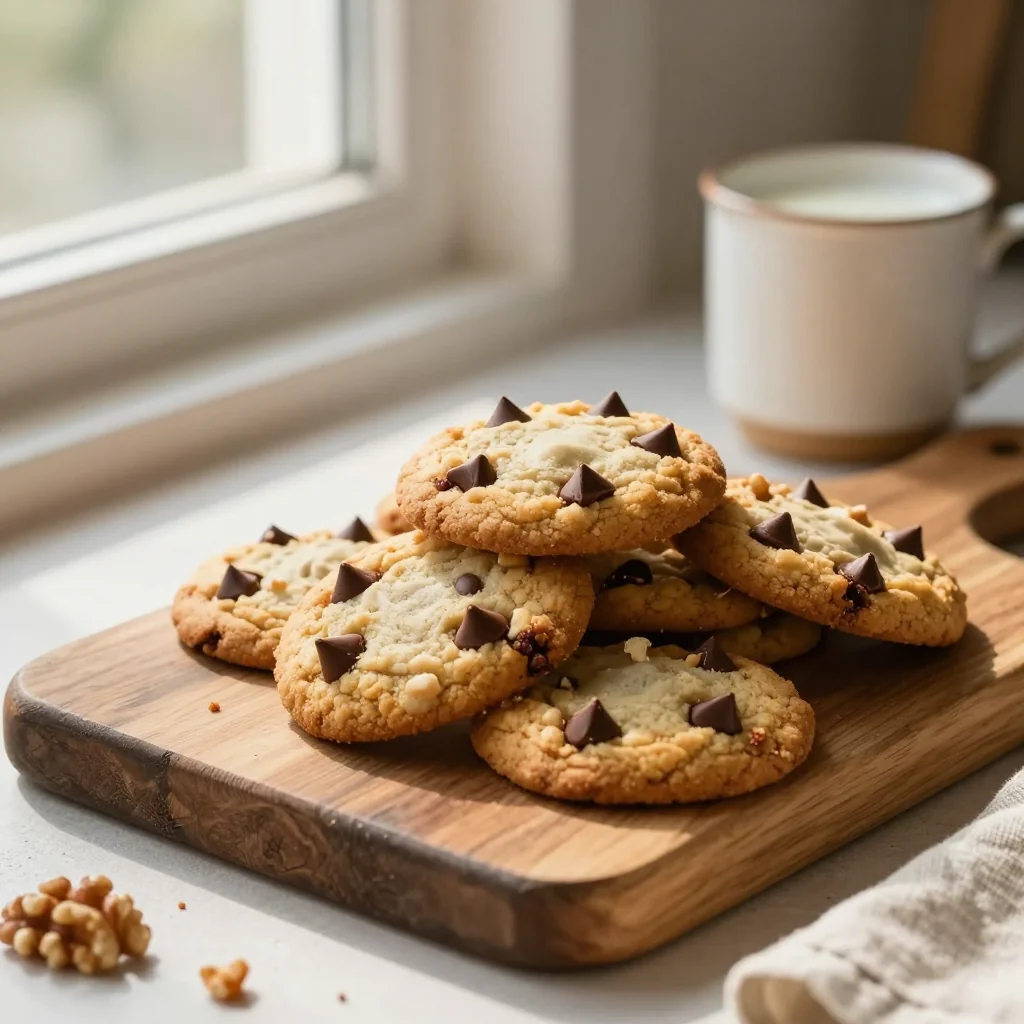
Crisp edges, chewy centers, and a perfect balance of chocolate and walnut in every bite.
When I was ten, my grandmother’s kitchen smelled like toasted walnuts and melted chocolate, a scent that still pulls me back to that warm, sun‑lit kitchen on a rainy afternoon. I remember sneaking a warm, still‑soft cookie off the cooling rack, its edges slightly crisp while the center remained gooey and fragrant. That memory sparked a lifelong love affair with cookies, and over the years I’ve refined the recipe until it achieved the perfect balance of chewiness, flavor, and texture.
The chocolate chip walnut cookie is a timeless classic, rooted in the tradition of American home baking but infused with a modern twist: the addition of toasted walnuts that add a buttery crunch and a subtle earthiness. This combination elevates the cookie from a simple treat to a sophisticated dessert that feels both nostalgic and fresh.
In this article, you’ll discover why the ratio of butter to sugar, the technique of chilling the dough, and the precise baking temperature all work together to create that coveted soft‑and‑chewy crumb. I’ll walk you through each step, share scientific explanations for why each ingredient matters, and give you pro‑tips that will guarantee bakery‑level results every time.
Ready to bake? Let’s dive in and create a batch of cookies that will make your friends and family beg for more.
🌟 Why This Recipe Will Capture Your Heart
These cookies combine classic comfort with a refined texture that keeps you reaching for another.
- ✨ Perfectly Balanced Sweetness: The mix of brown and white sugar yields a caramel‑like depth without overwhelming the palate.
- ✨ Chewy Center, Crisp Edge: A higher butter ratio and a short bake time lock in moisture while the edges caramelize.
- ✨ Walnut Crunch: Toasted walnuts add a buttery crunch and a subtle nutty aroma that complements the chocolate.
- ✨ Easy Scaling: The built‑in portion adjuster lets you double or halve the recipe without guesswork.
- ✨ Versatile Flavor Base: Swap dark chocolate for white, or add a dash of espresso for a mocha twist.
- ✨ Foolproof Technique: Chilling the dough and using parchment paper prevent spreading and ensure uniform thickness.
🥗 Ingredients
📝 Complete Ingredient List
For the Cookie Dough:
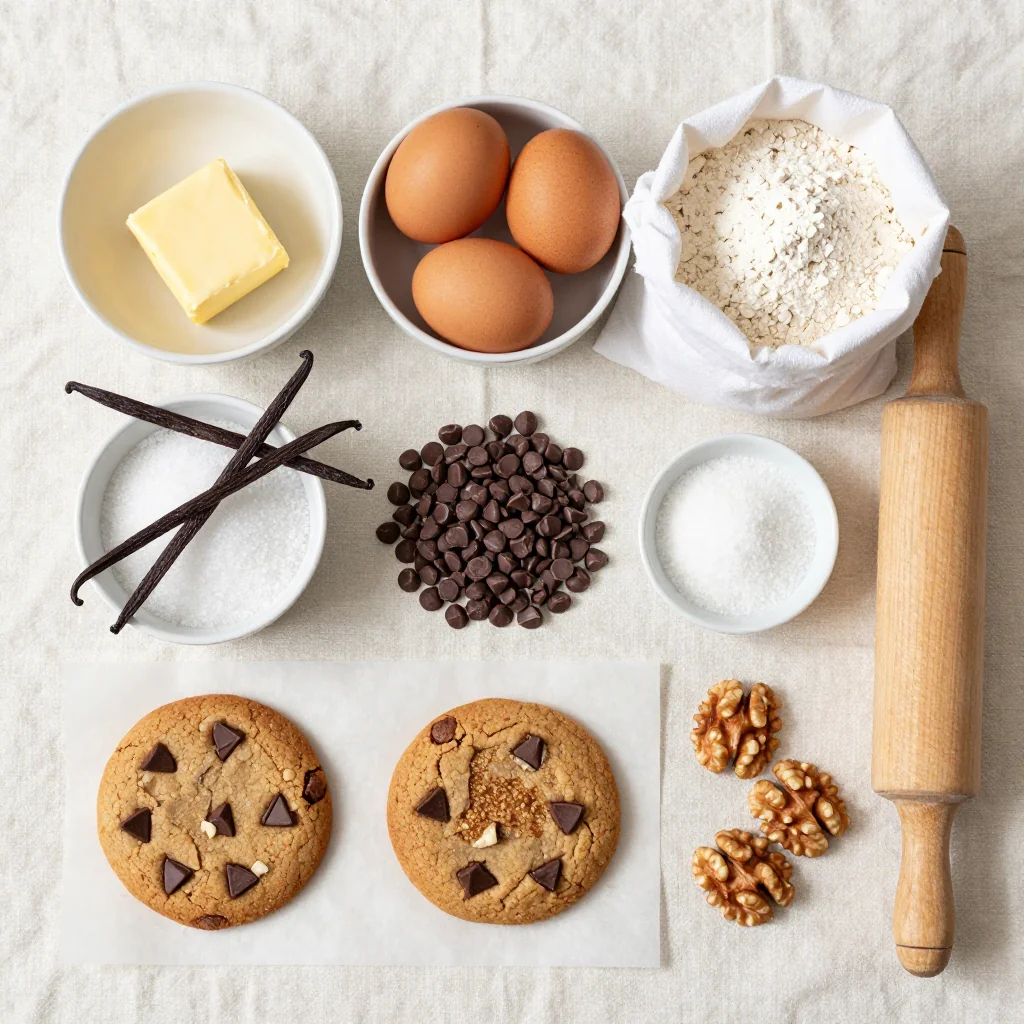
🔍 Focus on Key Ingredients
Unsalted Butter
Butter provides the tender crumb and a rich mouthfeel. Using unsalted butter allows precise control over the salt level, ensuring the cookies are not overly salty. Melt the butter gently and let it cool to room temperature before mixing; this prevents the dough from becoming too soft and helps maintain the right texture.
Brown Sugar
Brown sugar contains molasses, which adds moisture and a deep caramel flavor. It also contributes to the chewy texture because the moisture from the molasses is retained during baking. For an even richer flavor, you can use dark brown sugar, but light brown works perfectly for a balanced sweetness.
Toasted Walnuts
Toasting walnuts intensifies their natural oils and brings out a nutty aroma that pairs beautifully with chocolate. Roughly chop them after toasting to ensure each bite has a satisfying crunch without overwhelming the cookie.
🔄 Quick Substitutions
| Ingredient | Alternative |
|---|---|
| All‑purpose flour | Whole‑wheat flour (use 100 g, add 1 tbsp extra liquid) |
| Semisweet chocolate chips | Dark chocolate chunks or milk chocolate chips |
| Walnuts | Pecans, almonds, or hazelnuts (toasted) |
👨🍳 Step‑by‑Step Instructions
Follow these detailed steps to achieve perfectly soft and chewy cookies every time. The process is broken into three phases for clarity.
📋 Phase 1: Preparation and Mise en Place
Gather your tools, pre‑heat the oven, and prepare the dough.
Pre‑heat the oven and line baking sheets
Set your oven to 175 °C (350 °F) and line two baking sheets with parchment paper. This temperature is ideal for achieving a golden edge while keeping the center moist.
Toast the walnuts
Spread the walnuts on a dry skillet over medium heat. Stir constantly for 5‑7 minutes until they turn a light golden brown and release a nutty aroma. Transfer to a plate and let cool.
🔥 Phase 2: Mixing and Baking
Combine dry and wet ingredients, fold in chocolate and walnuts, then bake.
Mix dry ingredients
In a large bowl whisk together flour, baking soda, and salt. This ensures the leavening agent is evenly distributed, preventing any bitter pockets.
Combine wet ingredients
In a separate bowl, whisk the melted butter with brown sugar and granulated sugar until smooth. Beat in the egg and vanilla extract until fully incorporated.
Fold in chocolate and walnuts
Gently fold the chocolate chips and toasted walnuts into the wet mixture. Then add the dry ingredients, stirring just until a cohesive dough forms. Avoid over‑mixing.
Chill the dough
Cover the bowl with plastic wrap and refrigerate for at least 30 minutes. Chilling solidifies the butter, preventing excessive spreading and enhancing flavor development.
Scoop and bake
Using a cookie scoop (≈2 tbsp), portion the chilled dough onto the prepared baking sheets, spacing them 5 cm apart. Bake for 12‑14 minutes, or until the edges are lightly golden and the centers still look slightly under‑baked.
✨ Phase 3: Finishing Touches
Cool, garnish, and serve your cookies.
Cool on a wire rack
Allow the cookies to rest on the baking sheet for 2‑3 minutes before transferring them to a wire rack. This lets the residual heat finish the cooking process without drying them out.
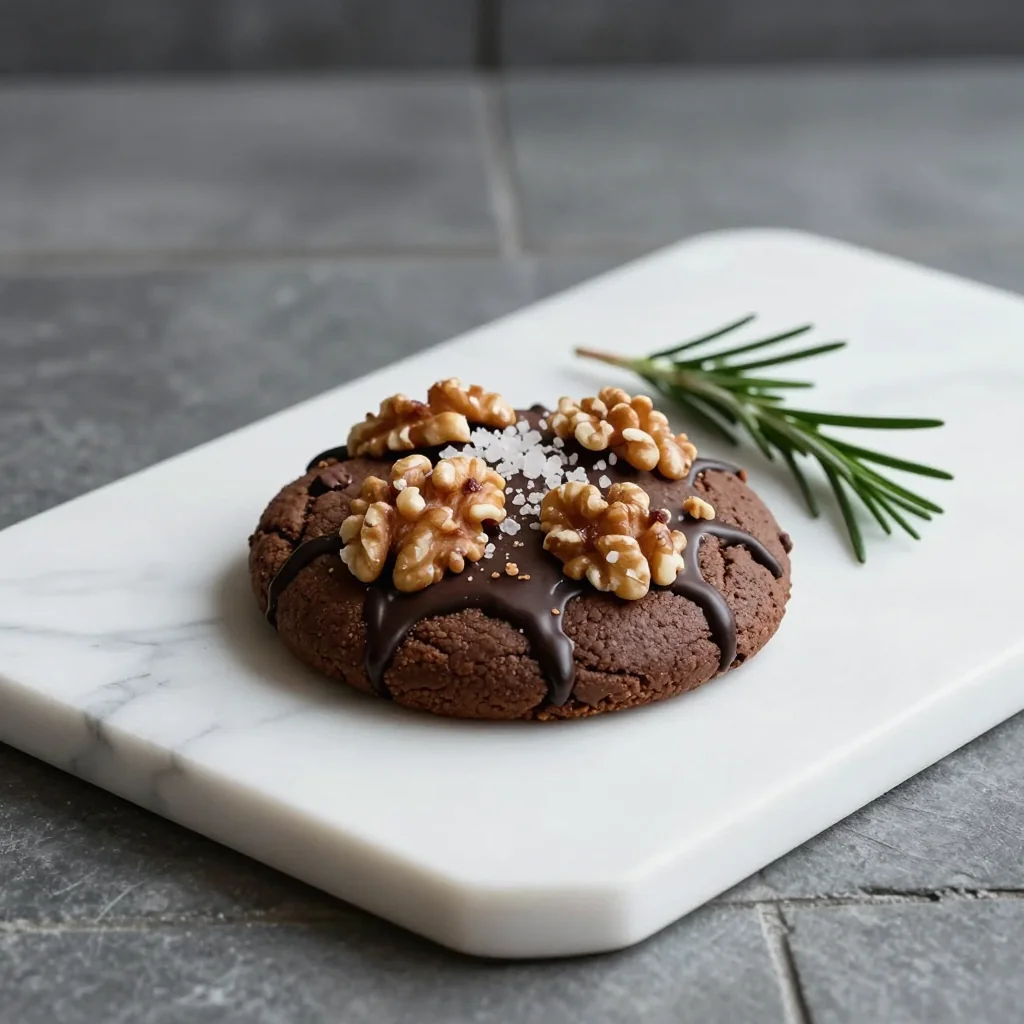
Optional sea‑salt finish
If you love a sweet‑salty contrast, sprinkle a tiny pinch of flaky sea salt on each warm cookie. The salt accentuates the chocolate and walnut flavors.
Serve and enjoy
Serve the cookies warm with a glass of cold milk, a scoop of vanilla ice cream, or simply on their own. They stay soft for up to 48 hours if stored properly.
💡 Expert Tips and Tricks
🛒 Choosing the Right Ingredients
Always opt for high‑quality chocolate chips; they melt evenly and provide a richer flavor than generic alternatives. For walnuts, select ones that are plump and free of cracks. Fresh walnuts have a brighter flavor, while older nuts can taste stale. When buying butter, choose European‑style butter with a higher fat content for a richer, more tender crumb.
🔪 Preparation Techniques
Measure flour using the spoon‑and‑level method to avoid compacting it, which can make cookies dense. Melt the butter slowly over low heat; rapid heating can cause the butter to separate, leading to a greasy texture. After mixing, let the dough rest at room temperature for 10 minutes before chilling; this helps the gluten relax and improves texture.
🌡️ Mastering the Baking Process
Every oven behaves slightly differently. Use an oven thermometer to verify the temperature. If you notice the cookies spreading too much, reduce the bake temperature by 10 °C (or 25 °F) and extend the bake time by a minute or two. For an extra chewy center, pull the cookies out when they still look a little soft; they will firm up as they cool.
🍽️ Presentation and Service
Arrange the cookies on a rustic wooden board or a marble slab for a visually appealing display. Drizzle a thin ribbon of melted dark chocolate over the tops for a glossy finish. Pair them with a scoop of vanilla bean ice cream and a dusting of cocoa powder for an elegant dessert plate.
🏆 Pro Tips
Professional bakers rely on science and precision to achieve consistent results. Below are insider secrets that take these cookies from good to extraordinary.
- 🎯 Control Moisture with Butter Temperature: Using butter that is just cool enough to be pourable but not liquid prevents the dough from becoming too loose. This subtle temperature control yields a dough that spreads just enough for a thin edge while retaining a thick, chewy center.
- 🎯 Use a Kitchen Scale for Accuracy: Weighing flour, butter, and sugars eliminates the variability that comes from spoon measurements, ensuring each batch is identical.
- 🎯 Incorporate a Rest Period After Mixing: Allowing the dough to rest for 30 minutes at refrigerator temperature lets the flour fully hydrate, resulting in a softer crumb and better flavor development.
- 🎯 Opt for a Lightly Greased Parchment: Lightly greasing the parchment paper reduces friction, allowing the cookies to slide off easily without tearing while also preventing excessive sticking.
- 🎯 Add a Pinch of Espresso Powder: A tiny amount of espresso powder intensifies chocolate flavor without adding any coffee notes, making the chocolate taste richer without any coffee undertones.
- 🎯 Finish with Flaky Sea Salt: Sprinkling a pinch of flaky sea salt just before baking creates a subtle crunch and balances the sweetness, a technique often used in gourmet bakeries.
"The secret to a perfect cookie is not in the ingredients alone, but in the love and precision you bring to each step." — Dominique Crenn, Chef‑Owner of Atelier Crenn
🔄 Variations and Adaptations
The base recipe is a versatile canvas. Feel free to experiment with flavors, dietary needs, or seasonal twists.
🥬 Vegetarian/Vegan Version
Swap the egg for a flax‑egg (1 tbsp ground flaxseed mixed with 2 tbsp water) for a vegan alternative. Replace butter with a plant‑based margarine or coconut oil, and use dairy‑free chocolate chips. This version maintains the same texture while being completely plant‑based.
- Flax‑egg: 1 tbsp ground flaxseed + 2 tbsp water (let sit 5 min)
- Vegan butter: 170 g (same ratio as dairy butter)
- Dairy‑free chocolate chips: 200 g
🌶️ Flavor Variations
Play with complementary flavors to create a new tasting experience. Below are three popular variations.
Spicy Chili‑Chocolate
Add ½ tsp of finely ground cayenne pepper to the dry ingredients for a gentle heat that pairs beautifully with dark chocolate.
Mediterranean Olive‑and‑Rosemary
Replace walnuts with 100 g of chopped Kalamata olives and add 1 tsp fresh rosemary. This savory‑sweet twist works well as an appetizer.
Asian Matcha‑Infused
Mix 1 tbsp of culinary‑grade matcha powder into the dry ingredients and substitute half of the chocolate chips with white chocolate chunks for a delicate green tea flavor.
⚠️ Dietary Adjustments
Gluten‑Free
Replace all‑purpose flour with a 1:1 gluten‑free flour blend. Add ½ tsp xanthan gum to improve structure.
Lactose‑Free
Swap butter for lactose‑free margarine and use dairy‑free chocolate chips.
Low‑Calorie
Reduce the sugar by 25 % and replace half of the chocolate chips with chopped dried apricots. This cuts calories while adding natural sweetness.
👶 Family/Children Friendly
Kids love a sweeter cookie, so increase the white sugar to 150 g and add a drizzle of caramel sauce after baking. Serve with a glass of cold milk and a side of fresh fruit for a balanced snack.
📦 Storage and Reheating
🧊 Conservation
Refrigerator
- Duration: Up to 5 days
- Container: Airtight glass jar or plastic container
- Tip: Place a slice of bread inside the container to keep cookies moist.
Freezer
- Duration: Up to 3 months
- Method: Freeze in a single layer on a baking sheet, then transfer to a freezer‑safe zip‑lock bag.
- Defrosting: Transfer to the refrigerator overnight or let sit at room temperature for 30 minutes.
💡 For optimal texture after freezing, reheat the cookies briefly in a pre‑heated oven (see below) rather than microwaving.
♨️ Reheating
Oven (Recommended)
- Preheat to 150 °C (300 °F).
- Place cookies on a baking sheet lined with parchment.
- Heat for 5‑7 minutes, until they feel warm throughout.
- Remove and let cool for 2 minutes; they will regain their softness.
Microwave (Quick)
- Place a cookie on a microwave‑safe plate.
- Cover with a damp paper towel.
- Heat on medium power for 15‑20 seconds.
- Check for warmth; add another 5‑second burst if needed.
Skillet
Heat a non‑stick skillet over low heat, add a single cookie, and cover for 1‑2 minutes. This method revives the crisp edge while keeping the center chewy.
🍷 Perfect Pairings
🥗 Accompaniments
- Fresh Mixed Berries: Their acidity cuts through the richness and adds a burst of color.
- Vanilla Bean Ice Cream: The creamy texture contrasts with the crunchy walnut bits.
- Salted Caramel Sauce: Drizzle for an extra layer of sweet‑salty flavor.
🍷 Wine & Beverage Pairings
- Late Harvest Riesling: Its honeyed notes echo the caramel tones of the cookie.
- Port (Ruby): The deep fruit flavors complement the chocolate and walnut.
- Non‑Alcoholic: Sparkling Water with a splash of orange zest.
🍰 To Complete the Meal
Start with a light citrus salad, follow with the cookies and a glass of wine, and finish with a tangy lemon sorbet. This progression balances sweetness, acidity, and richness for a memorable dining experience.
❓ Frequently Asked Questions
Q: Can I use salted butter instead of unsalted?
A: Yes, you can, but reduce the added salt to ¼ tsp to avoid over‑salting. Unsalted butter gives you more control over the final flavor profile.
Q: How do I prevent the cookies from spreading too much?
A: Ensure the butter is fully cooled before mixing, chill the dough for at least 30 minutes, and use parchment paper. If spreading continues, lower the oven temperature by 10 °C (25 °F) and bake a minute longer.
Q: Can I substitute the walnuts with another nut?
A: Absolutely! Pecans, almonds, or hazelnuts work well. Toast them lightly and adjust the amount if you prefer a milder nut flavor.
Q: What if I don’t have a kitchen scale?
A: Use the spoon‑and‑level method for flour and measure butter in tablespoons (1 cup ≈ 225 g). While not as precise, it will still produce good results.
Q: How can I make the cookies gluten‑free?
A: Replace the all‑purpose flour with a 1:1 gluten‑free flour blend, adding ½ tsp xanthan gum for structure. The texture will be slightly different but still delicious.
Q: Can I prepare the dough ahead of time?
A: Yes! The dough can be refrigerated for up to 24 hours. Shape the cookies, place them on a parchment‑lined tray, and freeze them on a baking sheet. Transfer frozen cookies directly to the oven for a quick bake.
🎉 Let’s Get Baking!
These chocolate chip walnut cookies are more than just a sweet treat—they’re a celebration of texture, flavor, and the joy of home baking. By mastering the balance of butter, sugar, and walnuts, you’ll create a cookie that’s soft in the middle, crisp on the edge, and packed with nutty richness. Whether you’re serving them at a family gathering or enjoying a quiet afternoon snack, they’re sure to become a beloved staple in your kitchen.
Don’t forget to experiment with the variations, adjust the portion size with the handy selector, and share your results with the community. Your feedback helps us improve and inspires others to try new twists.
Have you tried this recipe?
Leave a comment and rating below! Share your photos on Instagram with #WalnutCookieMagic for a chance to be featured.
Chocolate Chip Walnut Cookies Soft and Chewy
Crisp edges, chewy center, and a perfect blend of chocolate and walnuts.
📝 Ingredients
Cookie Dough
👨🍳 Instructions
- 1 Pre‑heat oven to 175 °C (350 °F) and line two baking sheets with parchment paper.
- 2 Toast walnuts in a dry skillet over medium heat for 5‑7 minutes, then let cool.
- 3 Whisk flour, baking soda, and salt together in a bowl.
- 4 In a separate bowl, combine melted butter, brown sugar, and white sugar; beat in egg and vanilla.
- 5 Fold chocolate chips and walnuts into the wet mixture, then add dry ingredients and stir until just combined.
- 6 Chill dough for 30 minutes in the refrigerator.
- 7 Scoop dough onto prepared sheets, spacing 5 cm apart.
- 8 Bake for 12‑14 minutes until edges are golden and centers are still soft.
- 9 Cool on the sheet for 2‑3 minutes, then transfer to a wire rack.
- 10 Optional: Sprinkle flaky sea salt on warm cookies and serve warm.
🥗 Nutritional Information (per serving)
*Nutritional values are estimates and may vary based on ingredient brands.
📚 You Might Also Like
Chocolate Chip Cookies with Dark Chocolate
Chewy Oatmeal Raisin Cookies
Walnut Chocolate Brownies


💬 Comments and Reviews
Leave a Comment
No comments yet – be the first to share your experience!