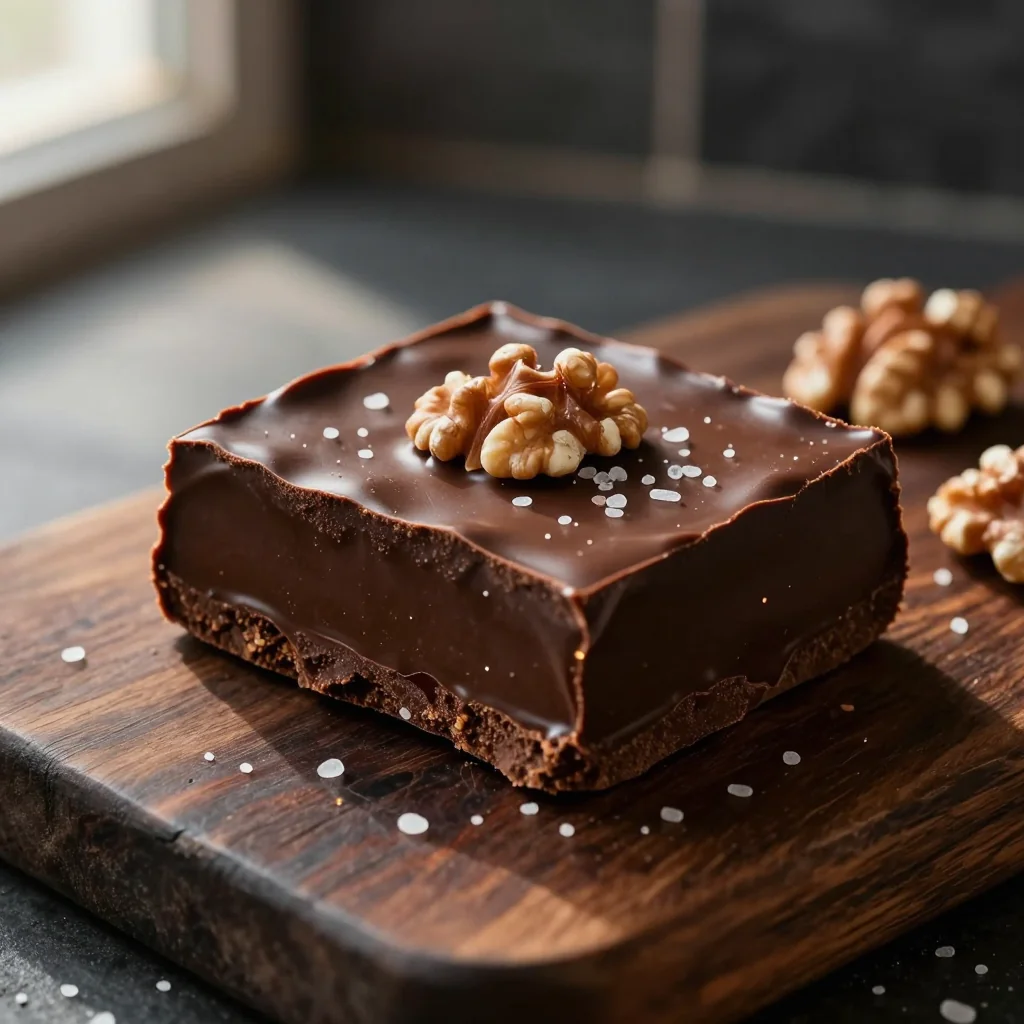
A silky, indulgent treat that balances rich chocolate with crunchy walnuts and a whisper of sea salt.

When I was a child, my grandmother would pull out a thick, glossy slab of chocolate fudge from the freezer on cold winter evenings. The moment the foil was torn away, a fragrant cloud of toasted walnut and sea‑salt aroma swirled through the kitchen, making the whole house feel warm and inviting. I still remember the crackle of the foil as we all gathered around the table, eyes bright with anticipation.
This particular fudge hails from the classic American confectionery tradition, where the marriage of sweet chocolate and salty accents has been celebrated for generations. Its roots lie in the early 20th‑century candy factories that first experimented with adding a pinch of sea salt to deepen the chocolate flavor, while walnuts were introduced for texture and a nutty counterpoint.
In this guide, I’ll walk you through every nuance—from selecting the perfect chocolate to achieving that glossy sheen that makes a fudge look professionally made. You’ll learn how to temper the chocolate just enough to stay glossy, how to toast walnuts for an extra crunch, and the science behind why a sprinkle of sea salt makes the chocolate taste richer.
Let’s dive in together, and I promise you’ll be able to create a fudge that feels both nostalgic and sophisticated—perfect for holidays, celebrations, or simply a quiet night in.
🌟 Why This Recipe Will Capture Your Heart
This fudge isn’t just a dessert; it’s an experience that engages all your senses, from the glossy sheen to the satisfying crunch.
- ✨ Unforgettable Texture: The combination of silky chocolate and crunchy walnuts creates a contrast that keeps each bite interesting.
- ✨ Perfect Balance of Sweet and Salty: A pinch of sea salt elevates the chocolate, making the sweetness feel less cloying.
- ✨ Simple Yet Impressive: With straightforward steps, you can produce a confection that looks like it came from a boutique patisserie.
- ✨ Versatile Presentation: Cut into bars, cubes, or even shaped using molds—perfect for gift‑giving.
- ✨ Long Shelf‑Life: Properly stored, this fudge stays fresh for weeks, allowing you to enjoy it over time.
- ✨ Crowd‑Pleaser: Whether you’re serving kids or adults, the mix of chocolate, nuts, and salt appeals to a wide palate.
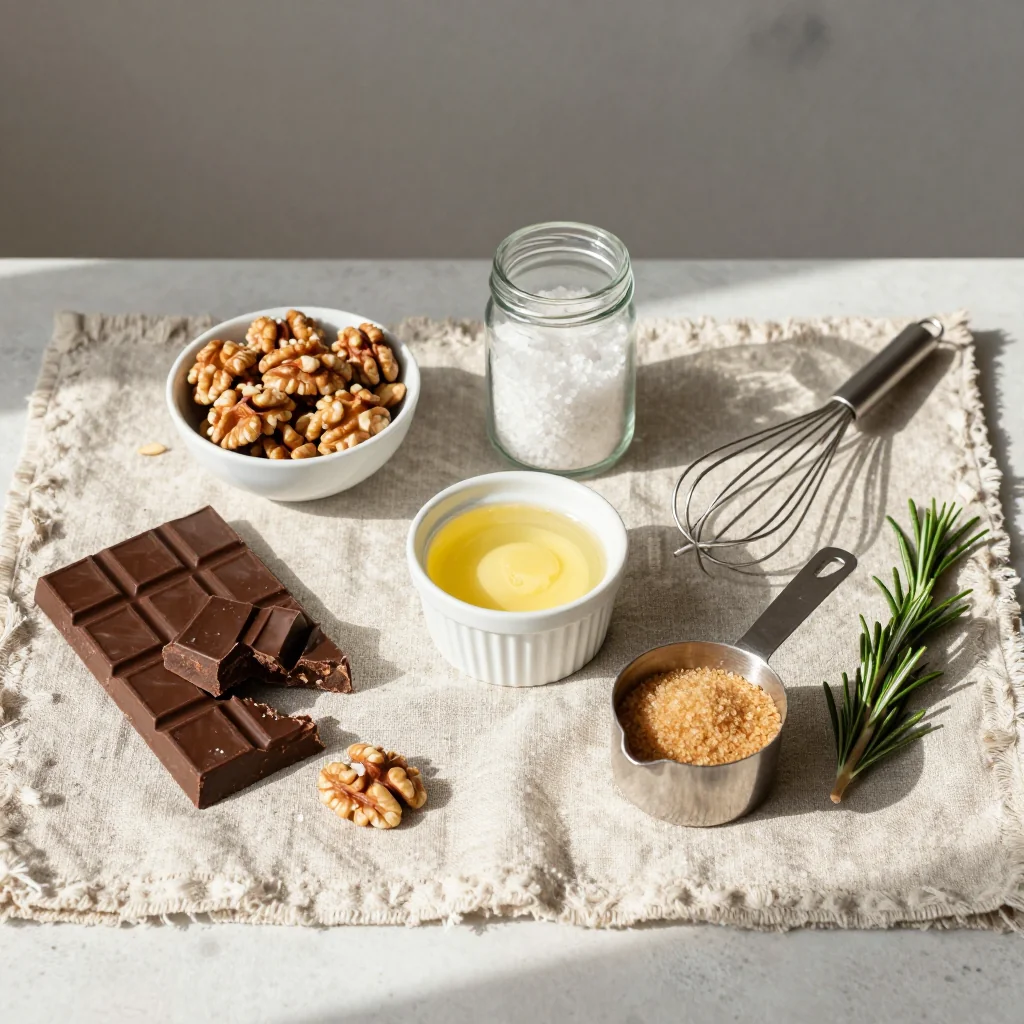
🥗 Ingredients
📝 Complete Ingredient List
For the Chocolate Base:
For the Walnut Topping:
For the Sea‑Salt Sprinkle:
🔍 Focus on Key Ingredients
Dark Chocolate (70% Cocoa)
The higher cocoa content provides a deep, bittersweet backbone that balances the sweetness of sugar and the richness of butter. Look for chocolate that melts smoothly and has a glossy finish when tempered. Choose a brand that lists cocoa butter as the first ingredient for the best texture.
Unsalted Butter
Butter contributes to the fudgy mouthfeel and helps the mixture set with a glossy sheen. Using unsalted butter lets you control the salt level precisely with the sea‑salt garnish.
Walnuts
Walnuts add a buttery crunch that contrasts with the smooth chocolate. Toast them lightly in olive oil to bring out a deeper, nutty flavor and to keep them from becoming soggy.
🔄 Quick Substitutions
| If you don’t have... | Use instead... |
|---|---|
| Dark chocolate | Milk chocolate (reduce sugar by 30 g) |
| Walnuts | Pecans or almonds, toasted |
| Heavy cream | Coconut cream (for dairy‑free) |
👨🍳 Step‑by‑Step Instructions
Follow these detailed steps to create a glossy, crackly fudge that will impress anyone who tries it.
📋 Phase 1: Preparation & Mise en Place
Gather and prep all components before you start melting chocolate.
Prepare the walnuts
Heat a skillet over medium heat, add 1 tbsp olive oil, then toss in the chopped walnuts. Toast for 3‑4 minutes, stirring constantly until they turn golden and fragrant. Transfer to a plate and set aside to cool. This step intensifies the nutty flavor and ensures a crisp texture.
Line the pan
Line an 8‑inch square baking pan with parchment paper, allowing excess to hang over the sides for easy removal. Lightly grease the parchment with a dab of butter to prevent sticking.
🔥 Phase 2: Cooking & Assembly
This is where the chocolate transforms into a smooth, glossy fudge.
Melt chocolate, butter, and cream
In a heavy‑bottomed saucepan, combine the dark chocolate, butter, and heavy cream. Heat over low‑medium flame, stirring constantly until everything is fully melted and the mixture is smooth. Use a silicone spatula to scrape the sides, ensuring no unmelted pieces remain.
Incorporate sugar and vanilla
Add the granulated sugar and a pinch of sea salt to the melted chocolate. Stir until the sugar dissolves completely—this usually takes 2‑3 minutes. Once dissolved, stir in the vanilla extract.
Combine with walnuts
Remove the saucepan from heat and fold in the toasted walnuts, reserving a small handful for garnish. The mixture should be glossy and slightly thick.
✨ Phase 3: Finishing & Serving
Set the fudge and add the finishing touches.
Pour and spread
Pour the chocolate mixture into the prepared pan, spreading it evenly with a spatula. Tap the pan gently on the counter to release any air bubbles.
Garnish with sea salt and walnuts
Sprinkle the reserved walnuts over the top, then dust the surface with the coarse sea‑salt crystals. The salt will create tiny bursts of flavor that contrast beautifully with the sweet chocolate.
Cool and cut
Allow the fudge to cool at room temperature for about 30 minutes, then transfer the pan to the refrigerator for at least 2 hours to set fully. Once firm, lift the parchment out and cut the fudge into 2‑inch squares using a sharp knife.
💡 Expert Tips & Tricks
🛒 Choosing the Right Ingredients
Invest in high‑quality chocolate with at least 70 % cocoa solids; the higher the cocoa butter content, the smoother the final texture. Look for unsalted butter with a creamy, slightly sweet flavor—European‑style butter works best. For walnuts, pick ones that are plump, not shriveled, and store them in an airtight container to maintain freshness.
🔪 Preparation Techniques
Before toasting, pat the walnuts dry with a paper towel; excess moisture can cause them to steam instead of toast. Use a silicone spatula to stir the chocolate mixture, as it won’t conduct heat and helps keep the temperature stable.
🌡️ Mastering the Cooking Process
Maintain the saucepan temperature between 45‑50 °C (113‑122 °F). This range prevents the chocolate from scorching while allowing the sugar to dissolve fully. If you notice any graininess, gently re‑heat and stir until the texture smooths out.
🍽️ Presentation & Service
For an elegant presentation, dust each square with a light sprinkle of cocoa powder or powdered sugar. Serve on a marble slab or a dark wooden board to accentuate the glossy chocolate. Pair with a small dollop of whipped cream or a scoop of vanilla ice cream for a luxurious dessert.
🏆 Pro Tips
Elevate your fudge from home‑cooked to bakery‑standard with these professional insights.
- 🎯 Control the Gloss: After pouring, run a hot, dry pastry brush lightly over the surface. The heat evaporates a thin layer of moisture, giving the fudge a mirror‑like shine.
- 🎯 Temperature Accuracy: Use an instant‑read thermometer. Chocolate sets best when the mixture reaches 31 °C (88 °F) before cooling.
- 🎯 Uniform Walnut Distribution: Toss the walnuts with a teaspoon of melted chocolate before folding them in. This coats each piece, preventing them from sinking.
- 🎯 Perfect Portioning: Use a ruler to mark the pan before it sets. This ensures each piece is the same size, ideal for gifting.
- 🎯 Salt Crystals Choice: Coarse sea salt creates a satisfying crunch, while fine fleur de sel can be used for a subtler flavor.
- 🎯 Storage Technique: Wrap each piece individually in parchment before placing them in an airtight container. This prevents them from sticking together.
"Chocolate is a perfect food, rich in flavor and endlessly adaptable. A well‑balanced fudge is the epitome of culinary chemistry." — Dominique Crenn, Chef & Restaurateur
🔄 Variations & Adaptations
Feel free to experiment with this base recipe to suit dietary preferences, flavor cravings, or seasonal themes.
🥬 Vegan / Plant‑Based Version
Swap dairy butter for a plant‑based margarine and replace heavy cream with coconut cream. Use a dark chocolate that is dairy‑free. The result retains the glossy texture while staying entirely vegan.
- Replace butter with 250 g vegan margarine.
- Use 200 ml coconut cream instead of heavy cream.
🌶️ Flavor Variations
Explore different flavor profiles by adding complementary ingredients.
Spicy Chili Version
Add ½ tsp cayenne pepper or finely chopped fresh chili to the chocolate mixture for a subtle heat that balances the sweetness.
Mediterranean Olive Oil Version
Replace 1 tbsp olive oil used for toasting walnuts with a drizzle of extra‑virgin olive oil after the fudge has set. This adds a fruity, peppery note.
Asian Matcha Version
Blend 1 tsp matcha powder into the chocolate for a vibrant green hue and a gentle tea flavor that pairs beautifully with the walnuts.
⚠️ Dietary Adaptations
Gluten‑Free
All ingredients are naturally gluten‑free. Ensure the chocolate you purchase is processed in a gluten‑free facility.
Lactose‑Free
Use lactose‑free butter and coconut cream in place of dairy butter and heavy cream.
Low‑Calorie
Reduce sugar by 50 g and replace half of the chocolate with a sugar‑free dark chocolate blend. Expect a slightly less sweet final product.
👶 Kid‑Friendly Version
For younger palates, substitute walnuts with chopped peanuts or omit the nuts entirely. Reduce sea‑salt to a light pinch, and serve with a drizzle of caramel sauce for extra appeal.
📦 Storage & Reheating
🧊 Conservation
Refrigerator
- Duration: 7‑10 days
- Container: Airtight plastic container or wrapped in parchment
- Tip: Keep the fudge in a single layer to avoid crushing the surface.
Freezer
- Duration: 2‑3 months
- Method: Wrap each square tightly in parchment, then place in a freezer‑safe zip‑lock bag.
- Defrost: Transfer to the refrigerator overnight before serving.
💡 For best texture, thaw at room temperature for 15‑20 minutes before unwrapping.
♨️ Reheating
Oven (Recommended)
- Preheat to 150 °C (300 °F).
- Cover with foil to retain moisture.
- Heat for 5‑7 minutes.
- Remove foil and let sit for 2‑3 minutes.
Microwave (Quick)
- Place a single square on a microwave‑safe plate.
- Cover with a microwave‑safe lid.
- Heat on medium power for 15‑20 seconds.
- Check and stir if needed, then heat another 10 seconds if still firm.
Stovetop
Gently melt a square in a non‑stick pan over low heat, stirring constantly, for a quick melt‑and‑serve option.
🍷 Perfect Pairings
🥗 Side Dishes
- Fresh Berry Salad: The acidity of mixed berries cuts through the richness of the fudge.
- Light Citrus Sorbet: A palate‑cleansing scoop balances the deep chocolate.
- Roasted Sweet Potatoes: Their natural sweetness complements the chocolate’s bitterness.
🍷 Wine & Beverage Pairings
- Port (Ruby): Its sweet, fruity profile mirrors the fudge while adding depth.
- Amarone: The wine’s velvety tannins enhance the chocolate’s richness.
- Non‑Alcoholic: A chilled glass of sparkling water with a twist of orange.
🍰 Complementary Courses
Serve the fudge after a light, herb‑infused appetizer such as a goat‑cheese crostini, and follow it with a silky vanilla panna cotta to round out the meal.
❓ Frequently Asked Questions
Q: Can I use milk chocolate instead of dark chocolate?
Yes, you can substitute milk chocolate, but reduce the added sugar by about 30 g because milk chocolate is sweeter. The final fudge will be milder and less bitter, which some people prefer.
Q: How do I know when the fudge is set?
The fudge is set when it feels firm to the touch and the surface is glossy. If you press lightly with a fingertip and the mixture does not give, it’s ready. Refrigerating for at least 2 hours ensures a clean cut.
Q: What if I don’t have a kitchen scale?
Use volume measurements: 500 g chocolate ≈ 2 cups, 250 g butter ≈ 1 cup, 300 g sugar ≈ 1½ cups, 200 ml cream ≈ ¾ cup. Accuracy improves with a scale, but the recipe tolerates slight variations.
Q: Why does my fudge turn grainy?
Graininess usually results from overheating or adding cold ingredients to hot chocolate. Keep the temperature low, and add sugar gradually while stirring constantly. If grainy, gently re‑heat and stir until smooth.
Q: Can I add other nuts or dried fruits?
Absolutely! Feel free to swap walnuts for almonds, pecans, or dried cranberries. Add them after the chocolate has cooled slightly to keep the texture pleasant.
Q: How far in advance can I prepare the fudge?
You can make the fudge up to 3 days ahead and store it in the refrigerator. For longer storage, freeze it as described in the conservation section.
🎉 Let’s Get Cooking!
Chocolate fudge with walnuts and sea salt is more than a dessert—it's a celebration of textures, flavors, and memories. The glossy chocolate, crunchy walnuts, and delicate salt crystals create a harmonious bite that will leave your guests asking for seconds. By following the detailed steps and pro tips, you’ll master a classic confection that can be adapted to any occasion.
Don't hesitate to experiment with the variations, share your creations on social media, and let the community inspire you with new ideas. Your kitchen is the perfect laboratory for flavor exploration—enjoy the process and savor every bite.
Have you tried this recipe?
Leave a comment and rating below! Share your photos on Instagram with #FudgeFiesta for a chance to be featured.
Chocolate Fudge with Walnuts and Sea Salt
A silky, indulgent fudge that balances rich chocolate with crunchy walnuts and a whisper of sea salt.
📝 Ingredients
Chocolate Base
Walnut Topping
Sea‑Salt Sprinkle
👨🍳 Instructions
- 1 Toast walnuts in a skillet with olive oil until golden, then set aside.
- 2 Line an 8‑inch square pan with parchment paper and grease lightly.
- 3 Melt chocolate, butter, and cream together over low heat, stirring constantly.
- 4 Add sugar and a pinch of sea salt; stir until fully dissolved.
- 5 Stir in vanilla extract and folded toasted walnuts.
- 6 Pour mixture into prepared pan, smooth the surface.
- 7 Sprinkle remaining walnuts and coarse sea salt on top.
- 8 Cool at room temperature, then refrigerate for at least 2 hours.
- 9 Cut into squares using a sharp knife.
- 10 Serve chilled or at room temperature, optionally with a scoop of vanilla ice cream.
🥗 Nutritional Information (per serving)
*Nutritional values are estimates based on ingredient amounts.