Picture this: the kitchen clock ticks past 9 pm, the fridge door is open, and you’re staring at a stack of chicken breasts that look like they’ve been waiting for a reason. You’re craving something that feels like a party in your mouth, something that balances tang, creaminess, and a bite of that classic pickle tang. I had a kitchen disaster that night— a burnt skillet, a soggy batch of tacos, and a friend’s “I dare you to taste this and not go back for seconds” challenge. That’s when I decided to rewrite the rules, to create a version that turns every bite into a celebration. This is the ultimate Dill Pickle Ranch Smash Chicke, and I’m about to walk you through every single step so that by the time the last taco is devoured, you’ll wonder how you ever made it any other way.
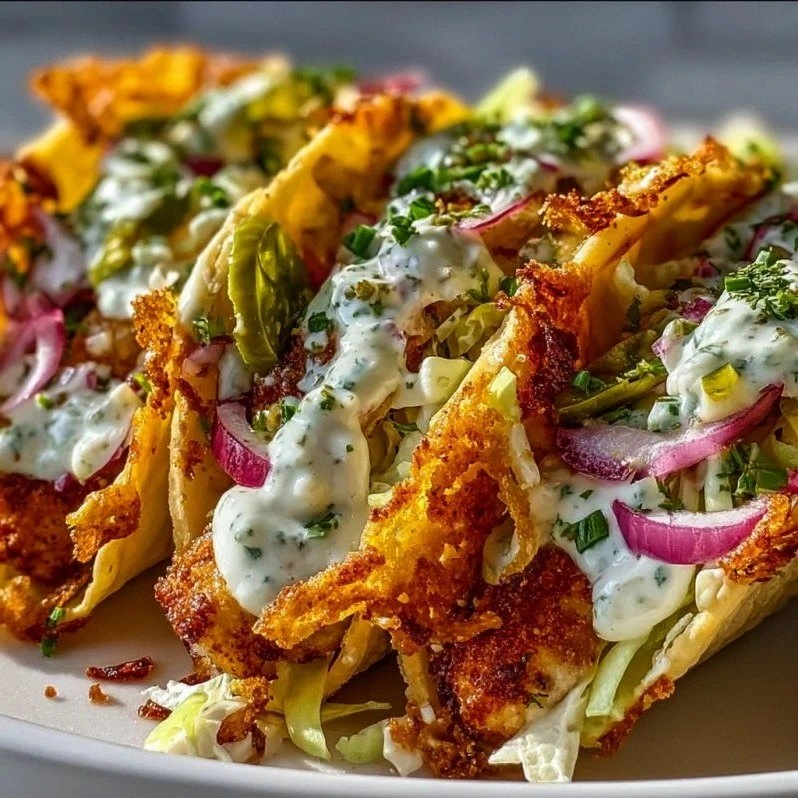
The first thing you’ll notice is the aroma: a sharp, citrusy note of dill pickle relish mingles with the buttery scent of melted cheddar, and the faint scent of roasted garlic rises from the skillet. The sound is unmistakable— the sizzle when the chicken hits the pan, the crackle of the tortillas as they crisp up. When you take your first bite, the crunch of the tortilla gives way to a creamy, tangy sauce that coats the chicken like velvet, followed by a burst of savory ranch that lingers on the palate. The texture is a dance of crispy edges and tender, juicy meat, all wrapped in a warm tortilla that feels like a hug. If you’re thinking this is just another chicken taco, think again. The twist is in the smash technique, the combination of dill pickle and ranch, and the final flourish of melted cheese that makes this dish unforgettable.
Why does this version stand out? It’s not just the flavor; it’s the sheer confidence with which the ingredients play together. The pickle brings a sharp, refreshing bite that cuts through the richness of the ranch and the cheese. The ranch dressing adds a creamy, herbaceous depth that feels like a summer breeze, even in winter. The chicken is smashed thin, so it cooks quickly and absorbs all the flavors, and the tortillas are toasted to a golden perfection that adds a satisfying crunch. It’s a dish that feels like a party in your mouth, a crowd-pleaser that will have everyone asking for seconds. And let’s be honest— if you’ve ever struggled to make a taco that isn’t soggy or bland, you’re not alone. I’ve got the fix.
There’s a secret ingredient that most people overlook: the “smash” technique. By flattening the chicken after it’s seared, you increase the surface area, allowing the flavors to penetrate deeper, and the result is a chicken that’s tender, juicy, and packed with flavor. And the next twist? A splash of pickle juice at the end of cooking. It adds a zing that elevates the entire dish. I’ll show you how to do it, step by step, so that you can recreate this masterpiece in your own kitchen. Let’s dive in.
What Makes This Version Stand Out
- Taste: The blend of dill pickle relish and ranch dressing creates a flavor profile that’s both tangy and creamy, with a hint of herbal freshness that lingers on the tongue.
- Texture: The smashed chicken is thin and tender, the tortillas are toasted to a crisp, and the melted cheddar creates a gooey, decadent layer that melts into every bite.
- Simplicity: With just a handful of pantry staples and a few fresh ingredients, you can achieve a dish that feels gourmet without the hassle.
- Uniqueness: The combination of pickle and ranch is rarely seen in tacos, giving this recipe a distinctive twist that sets it apart.
- Crowd Reaction: Friends and family will be amazed by how the flavors meld, and the “I dare you to taste this and not go back for seconds” challenge will be a reality.
- Ingredient Quality: Using fresh dill pickle relish and homemade ranch dressing (or a high-quality store brand) ensures depth and authenticity.
- Cooking Method: The smash technique and quick searing lock in juices and flavors, while the final cheese melt adds a luxurious finish.
- Make-Ahead Potential: The chicken can be pre-cooked and stored, the tortillas toasted ahead, and the sauce assembled in advance for a quick assembly later.
Alright, let’s break down exactly what goes into this masterpiece...
Inside the Ingredient List
The Flavor Base
At the heart of this dish is the dill pickle relish. It’s more than just a condiment; it’s the backbone of the tangy, refreshing bite that keeps the dish from becoming too heavy. The relish’s brine, which contains vinegar, sugar, and dill, provides a bright, acidic counterpoint to the richness of the ranch dressing. If you’re using a store‑bought relish, look for one with a good balance of sweet and sour; a too-sweet relish will drown out the other flavors.
The ranch dressing, on the other hand, brings creaminess and herbal depth. It’s typically made from buttermilk, mayonnaise, and a blend of herbs like dill, parsley, and chives. The buttermilk adds a subtle tang that pairs beautifully with the pickle, while the herbs bring a fresh, green note that elevates the entire flavor profile. If you’re making your own ranch, a splash of lemon juice will brighten it even more.
A pinch of smoked paprika adds a subtle smokiness that ties the dish together, giving it that warm, comforting undertone. The paprika’s earthy sweetness balances the acidity of the pickle and the creaminess of the ranch, creating a harmonious balance.
The Texture Crew
The chicken is the star of the show. Choosing boneless, skinless breasts allows for quick cooking and easy smashing. Slicing the chicken into thin, bite‑sized pieces ensures that each bite is juicy and absorbs the sauce fully. The smash technique—flattening the chicken with a heavy skillet or a rolling pin—creates a larger surface area, so the flavors penetrate deeper and the meat becomes tender.
Tortillas are the vehicle for all the flavors. Corn tortillas give a subtle sweetness and a slightly chewy texture that contrasts nicely with the crispy edges from toasting. If you prefer wheat tortillas, choose whole‑wheat for added nutrition and a nuttier flavor. Toasting the tortillas in a dry skillet before assembly gives them a golden crust that holds the fillings without becoming soggy.
Cheddar cheese is the final touch, melted over the warm chicken to create a gooey, melty layer that coats every bite. A sharp cheddar works best; its bite cuts through the richness, while the melt adds a comforting, velvety texture. A small amount of mozzarella can be added for extra stretch and gooeyness if you’re a cheese lover.
The Unexpected Star
The dill pickle itself is a surprise star. Many recipes rely on jalapeños or hot sauce for heat, but the dill pickle’s bright, vinegary flavor provides a clean, refreshing contrast to the creamy ranch. The pickle’s crunch adds a pleasant textural contrast that keeps the dish from feeling too uniform. The key is to use a relish that’s not too chunky, so it distributes evenly over the chicken.
If you’re feeling adventurous, a splash of pickle juice at the end of cooking adds a burst of acidity that brightens the dish. It’s a simple trick that can elevate the flavor profile and make the dish feel fresh and lively.
The Final Flourish
The final flourish is the combination of sour cream and chopped dill. The sour cream adds a cool, tangy counterpoint to the heat of the cheese and the richness of the chicken, while the fresh dill brings a bright, herbal note that ties the dish together. A sprinkle of chopped fresh dill on top adds a burst of color and aroma that makes the dish visually appealing.
Everything's prepped? Good. Let's get into the real action...
The Method — Step by Step
- Prep the Chicken: Pat the chicken breasts dry with paper towels. Slice each breast into 1‑inch thick pieces. Season both sides with salt, pepper, and smoked paprika. Let them sit for 10 minutes so the seasoning can penetrate. This step ensures that the chicken is flavorful from the inside out.
- Heat the Skillet: Place a cast‑iron skillet over medium‑high heat. Add 1 tablespoon of butter and let it melt, swirling the pan to coat the surface. The butter’s butter‑toasted aroma will signal that the skillet is ready for the chicken.
- Sear the Chicken: Lay the chicken pieces flat in the skillet, ensuring they’re not crowded. Let them sear for 2–3 minutes on each side until a golden crust forms. The sizzle is the soundtrack of flavor, and the crust locks in juices.
- Smash the Chicken: Once both sides are seared, use a spatula or a flat side of a rolling pin to gently flatten each piece to about 1/4 inch thickness. This increases surface area and ensures the chicken cooks evenly.
- Cook Through: Continue cooking the flattened pieces for 1–2 minutes per side until they’re cooked through and slightly crispy at the edges. The edges should start pulling away from the skillet, indicating a perfect sear.
- Combine the Sauces: In a small bowl, whisk together 1 cup of dill pickle relish, 1 cup of ranch dressing, 1/2 cup of mayonnaise, 1 tablespoon minced garlic, and 1 teaspoon onion powder. The mixture should be smooth and creamy, with a bright green hue from the relish.
- Coat the Chicken: Remove the skillet from heat and pour the sauce mixture over the chicken. Gently stir to coat each piece evenly. The sauce should coat the chicken like a glossy glaze, and the aroma should be instantly appetizing.
- Add the Cheese: Sprinkle 1 cup of shredded cheddar over the chicken. Return the skillet to low heat and cover for 2 minutes, allowing the cheese to melt into a gooey, golden layer. The cheese should be bubbly and slightly golden at the edges.
- Toast the Tortillas: While the chicken finishes, heat a dry skillet over medium heat. Place each tortilla on the skillet for 30 seconds per side, or until golden brown and slightly crisp. The tortillas should be warm and flexible, ready to hold the filling without tearing.
- Assemble the Tacos: Place a generous spoonful of the cheesy chicken onto each tortilla. Top with a dollop of sour cream, a sprinkle of chopped dill, and a final drizzle of pickle juice if desired. Fold the tortilla over and serve immediately.
That’s it — you did it. But hold on, I’ve got a few more tricks that’ll take this to another level. These insider tips will help you master the dish and avoid common pitfalls.
Insider Tricks for Flawless Results
The Temperature Rule Nobody Follows
Many people think that high heat is the key to a crispy taco, but the secret lies in the right balance. Start with medium‑high heat to sear the chicken, then lower to medium for the cheese melt. This prevents the cheese from burning while still ensuring a golden crust on the chicken. I’ve seen too many dishes where the cheese is scorched and the chicken remains undercooked; keep the heat controlled and you’ll avoid that disaster.
Why Your Nose Knows Best
When the chicken is searing, the aroma is a reliable indicator of doneness. A strong, buttery scent means the crust is forming, and a faint smell of raw chicken signals it’s not ready yet. Trust your nose; it’s the most accurate way to judge doneness without cutting into the meat.
The 5‑Minute Rest That Changes Everything
After cooking, let the chicken rest for five minutes before slicing or assembling. This allows the juices to redistribute, keeping the meat moist and tender. A friend once skipped this step and ended up with a dry taco that was a disappointment. The rest period is a simple habit that pays off big time.
The Quick Pickle Juice Splash
A splash of pickle juice at the end of cooking adds a bright, acidic kick that cuts through the richness of the cheese and ranch. It’s a small addition that makes the dish feel lively and fresh. Don’t be shy— a tablespoon or two can transform the flavor profile.
The Cheese Layer Technique
For an extra melty experience, sprinkle a thin layer of mozzarella over the cheddar before the cheese melts. The mozzarella adds stretch and a subtle sweetness that complements the sharp cheddar. I’ve found that this combination creates a gooey, decadent texture that elevates the entire taco.
Creative Twists and Variations
This recipe is a playground. Here are some of my favorite ways to switch things up:
Spicy Pickle Ranch
Add a pinch of crushed red pepper flakes or a dash of sriracha to the sauce mixture. The heat will contrast the tangy pickle and add a new layer of complexity. Great for those who love a kick.
Mediterranean Twist
Swap the cheddar for crumbled feta and add chopped olives and sun‑dried tomatoes. The briny olives and tangy feta create a Mediterranean vibe that’s fresh and bold.
BBQ Pickle Ranch
Mix in a tablespoon of barbecue sauce into the ranch mixture for a sweet, smoky flavor. The BBQ sauce’s molasses notes pair wonderfully with the pickle’s acidity.
Vegan Version
Replace the chicken with grilled tofu or tempeh, use a dairy‑free ranch dressing, and melt vegan cheddar. The tofu absorbs the flavors beautifully, and the vegan cheese adds a creamy, melty finish.
Breakfast Taco Surprise
Swap the chicken for scrambled eggs, add a sprinkle of chives, and serve with a side of hash browns. The creamy ranch and pickle will give your breakfast tacos a refreshing twist.
Crispy Pickle Ranch Chicken Nuggets
Cut the chicken into nugget‑sized pieces, coat them in the sauce, and bake until crispy. These nuggets make a fun snack or appetizer and can be served with a side of ranch‑pickle dipping sauce.
Storing and Bringing It Back to Life
Fridge Storage
Store the assembled tacos in an airtight container for up to 2 days in the refrigerator. Keep the tortillas separate in a paper bag to maintain crispness. When ready to eat, reheat the tacos in a skillet over medium heat for 2 minutes, or until heated through.
Freezer Friendly
For longer storage, keep the chicken, sauce, and cheese separate. Freeze the chicken in a single layer on a parchment sheet, then transfer to a freezer bag. The sauce can be frozen in an airtight container for up to 3 months. When ready to use, thaw the chicken in the fridge overnight and reheat with the sauce and cheese.
Best Reheating Method
To revive the tacos, place them on a preheated skillet over medium heat. Cover for 2 minutes, then flip and cover again for 1 minute. If the tortillas feel dry, add a splash of water to the skillet before covering to create steam that softens them.
Add a tiny splash of water before reheating — it steams back to perfection, keeping the tortillas pliable and the fillings moist. This simple trick ensures the tacos taste like they were just made.