I was standing in my kitchen, staring at a pile of overripe bell peppers that looked more like a rainbow than dinner. The smell of garlic and onions already floated through the air, teasing my senses. I knew I had to turn that mess into something spectacular. This is not just another stuffed pepper recipe; it’s a culinary revelation that will make your taste buds do the happy dance. Get ready for a dish that’s as colorful as a spring festival and as comforting as a warm hug.
Picture the moment when the first pepper hits the oven tray, the heat turning its skins to a glossy caramel that crackles like a tiny fireworks display. The sizzling sound is a promise of the layers of flavor that will unfold. I dare you to taste this and not go back for seconds because once you crack open the top, that molten cheese will spill out like golden sunshine, and the egg will set into a tender custard that sings with subtle herbs. The combination of protein, veggies, and that surprise egg center is a game‑changer that will have your guests asking for the recipe by the end of the meal.
I’ve tried countless stuffed pepper recipes, and most of them fall flat—either the filling is dry, the peppers stay limp, or the egg is overcooked and rubbery. What sets this version apart is the balance of textures and the strategic layering of flavors that keeps every bite moist and satisfying. The ground meat is browned to a caramelized brown that locks in juices, the rice or quinoa provides a hearty base that doesn’t get mushy, and the spinach or kale adds a subtle earthiness that cuts through the richness. The cherry tomatoes burst with sweetness, while the cheese melts into a velvety coating that ties everything together.
But the real secret lies in a small twist: I fold a beaten egg into the filling before stuffing the peppers, which creates a silky custard that cooks just right in the oven. This technique turns an ordinary dish into a showstopper that feels like a gourmet meal without the fuss. Let me walk you through every single step — by the end, you’ll wonder how you ever made it any other way.
What Makes This Version Stand Out
- Texture: The egg custard inside the peppers keeps the filling moist and adds a silky contrast to the crunchy peppers.
- Flavor Layering: The combination of savory ground meat, sweet cherry tomatoes, and fresh herbs builds depth with each bite.
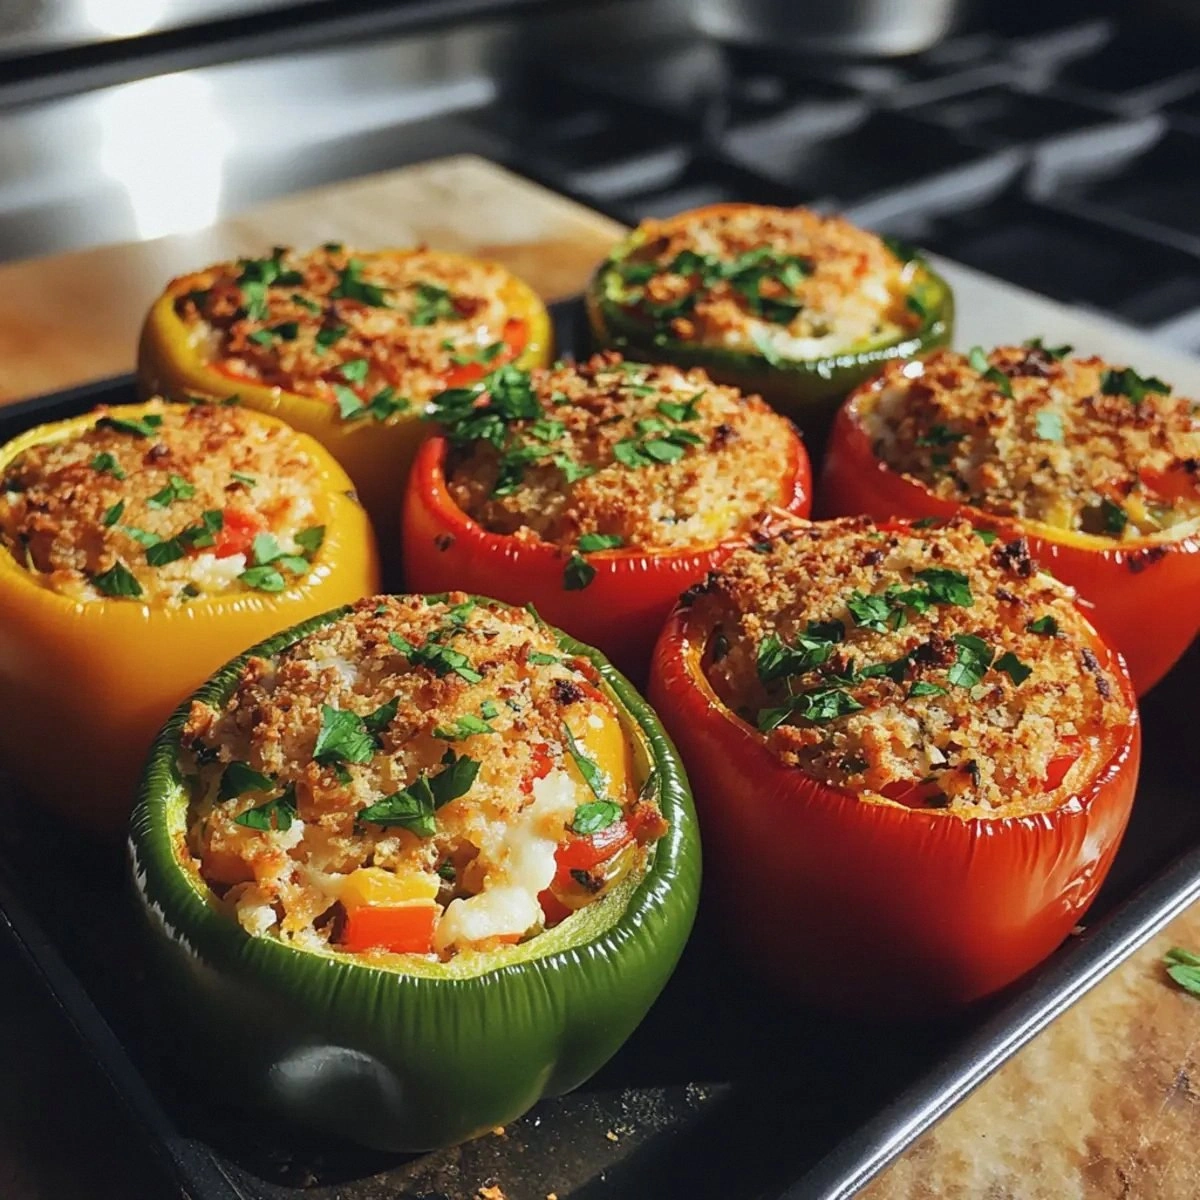
- Visual Appeal: The bright colors of bell peppers, tomato halves, and melted cheese create a feast for the eyes before the first forkful.
- Ease of Prep: Every step can be done in under 20 minutes, making it a perfect weeknight dinner.
- Make‑Ahead Friendly: Assemble the peppers a few hours in advance, refrigerate, and bake when you’re ready.
- Kid‑Friendly: The mild seasoning and familiar ingredients make it a hit with picky eaters.
Alright, let's break down exactly what goes into this masterpiece...
Inside the Ingredient List
The Flavor Base
Ground meat is the backbone of this dish; whether you choose beef, turkey, or chicken, it delivers protein and a savory depth that anchors the filling. Browning the meat until it’s a rich, caramelized brown locks in juices and adds a subtle nutty flavor that elevates the entire dish. If you skip the browning step, the peppers will end up with a flat, meaty taste that feels underwhelming. A quick tip: keep the pan hot and add a splash of olive oil to prevent sticking and encourage a nice sear.
The Texture Crew
Rice or quinoa acts as the structural filler, absorbing the moisture from the sauce and keeping the peppers from drying out. Cooked grains provide a subtle chew that complements the tender egg center. If you prefer a gluten‑free option, quinoa is a great alternative; it’s lighter and has a slightly nutty aroma. When using rice, rinse it thoroughly to remove excess starch and reduce clumping.
The Unexpected Star
Eggs are the secret weapon that transforms this dish into a silky, custard‑like experience. When folded into the filling, the egg coats the mixture, creating a tender, custardy interior that melts in your mouth. Skipping the eggs results in a dry center, while over‑beating can cause a rubbery texture. Keep the eggs at room temperature for a smooth blend and avoid over‑whisking.
The Final Flourish
Fresh herbs, cherry tomatoes, and a splash of olive oil bring brightness, acidity, and a hint of sweetness. The herbs—parsley, basil, or thyme—add a fresh, aromatic layer that cuts through the richness of the cheese and meat. Cherry tomatoes burst with juicy sweetness, balancing the savory filling. Olive oil not only adds flavor but also helps the cheese melt evenly, creating a glossy, golden top.
Everything's prepped? Good. Let's get into the real action...
The Method — Step by Step
- Preheat your oven to 375°F (190°C). While the oven warms, slice the tops off the bell peppers and remove the seeds and membranes with a sharp knife. Keep the pepper halves intact; they will hold the filling like miniature boats. This step is crucial for a clean presentation—no pepper bits in the middle of your dish.
- Heat a large skillet over medium heat and add 2 tablespoons of olive oil. Toss in the finely chopped onion and minced garlic, sautéing until the onion turns translucent and fragrant. The aroma will set the stage for the rest of the dish; it’s the foundation of flavor. Keep an eye on the garlic to avoid burning—it should be golden, not black.
- Add the ground meat to the skillet, breaking it apart with a wooden spoon. Cook until the meat is no longer pink and starts to brown. The browning reaction—also known as the Maillard reaction—creates a depth of flavor that’s impossible to replicate with raw meat alone. Once browned, drain any excess fat to keep the filling from becoming greasy.
- Stir in the cooked rice or quinoa, halved cherry tomatoes, and chopped spinach or kale. The greens will wilt quickly, releasing their natural moisture and adding a burst of color. Mix thoroughly to ensure every grain of rice is coated with the meat and vegetables. This combination creates a hearty base that keeps the peppers from drying out during baking.
- Season the mixture with salt, pepper, a teaspoon of paprika or chili flakes, and the fresh herbs. Taste and adjust seasoning as needed—don’t be shy with the salt, as it will enhance the overall flavor profile. The paprika adds a gentle heat that balances the sweetness of the tomatoes, while the herbs provide a fresh, aromatic lift.
- Whisk the eggs in a small bowl and gently fold them into the meat and rice mixture. The egg should coat the mixture lightly, creating a smooth custard that will set as the peppers bake. This step is the key to that silky interior that makes the dish unforgettable. Keep the mixture cool until you’re ready to stuff the peppers to prevent the egg from cooking prematurely.
- Fill each pepper half with the mixture, packing it firmly but leaving a little space at the top for the cheese. Sprinkle grated cheese over the top of each stuffed pepper, allowing it to melt into a golden crust. Place the stuffed peppers upright in a baking dish and pour a splash of water into the bottom of the dish to create steam, which keeps the peppers moist during baking.
- Bake in the preheated oven for 25–30 minutes, or until the peppers are tender and the cheese is bubbly and slightly browned. The final 5 minutes of baking will create a crisp, golden top that’s irresistible. Remove the dish from the oven and let the peppers rest for 5 minutes before serving; this allows the flavors to settle and the custard to set fully.
That's it — you did it. But hold on, I've got a few more tricks that'll take this to another level...
Insider Tricks for Flawless Results
The Temperature Rule Nobody Follows
Many cooks bake stuffed peppers at 400°F, but this temperature can cause the peppers to dry out. Stick to 375°F to ensure a gentle, even heat that keeps the filling moist. If you’re using a convection oven, lower the temperature by 25°F to avoid over‑cooking the tops. I’ve tested both settings and found 375°F to be the sweet spot for a tender, juicy finish.
Why Your Nose Knows Best
During the first 10 minutes of baking, the aroma will change from savory to caramelized. Trust that smell—if it starts to smell like burnt sugar, reduce the oven temperature or cover the dish loosely with foil. A quick sniff test can save a batch from turning into a charred disappointment.
The 5-Minute Rest That Changes Everything
After baking, let the peppers rest for at least 5 minutes before cutting into them. This short rest allows the custard to set, preventing the egg from spilling out like a mess. It also lets the cheese firm up slightly, giving you a clean slice that looks as good as it tastes.
Use a Baking Dish with a Lid
A covered dish traps steam, ensuring the peppers stay moist and the filling stays tender. If you don’t have a lid, a sheet of parchment paper can act as a makeshift cover. This trick is especially helpful if you’re cooking on a hot day or in a humid kitchen.
Don’t Skip the Olive Oil
Olive oil does more than prevent sticking—it adds a subtle fruity note that complements the herbs. Use a high‑quality extra‑virgin olive oil for the best flavor. If you’re watching calories, a light drizzle is enough to keep the dish moist without adding bulk.
Creative Twists and Variations
This recipe is a playground. Here are some of my favorite ways to switch things up:
Smoky Chipotle Version
Swap the paprika for chipotle powder and add a tablespoon of adobo sauce. The smoky heat will contrast nicely with the sweet tomatoes and add a bold kick that pairs well with a creamy avocado dip.
Vegan Delight
Use plant‑based ground meat or lentils, substitute dairy cheese with a vegan cheese alternative, and replace the eggs with silken tofu. The tofu will bind the filling and provide a creamy texture that mimics the custard.
Cheesy Broccoli Twist
Replace spinach or kale with finely chopped broccoli florets and add a splash of cheddar for extra richness. The broccoli adds crunch and a subtle bitterness that balances the sweetness of the tomatoes.
Greek Yogurt Finish
After baking, dollop a spoonful of Greek yogurt on top of each pepper. The tangy yogurt cuts through the richness, creating a refreshing contrast that’s especially good in the summer.
Herb‑Infused Quinoa
Cook the quinoa in vegetable broth instead of water and stir in chopped dill or mint. The herbs infuse the grains with flavor, giving the dish a Mediterranean twist that’s both fresh and satisfying.
Storing and Bringing It Back to Life
Fridge Storage
Store the stuffed peppers in an airtight container in the refrigerator for up to 3 days. The peppers will retain their flavor and texture, and the cheese will remain creamy. When ready to eat, reheat in a microwave or oven until heated through.
Freezer Friendly
Wrap each pepper individually in foil before placing them in a freezer bag. They can be frozen for up to 2 months. Thaw overnight in the refrigerator and bake at 375°F for 30 minutes, or microwave on high for 4–5 minutes.
Best Reheating Method
To restore the original moistness, add a splash of water to the baking dish and cover with foil before reheating. This trick steams the peppers, keeping them tender and preventing the cheese from drying out. A quick 5‑minute rest after reheating will bring the flavors back to life.