When I was a teenager, the kitchen smelled like a bustling Italian deli every Sunday because my grandmother would bake her famous chicken tenders. The crackle of the oven, the buttery aroma of garlic mingling with sharp Parmesan, and the anticipation of that first bite still brings a smile to my face. I remember stealing a few extra pieces, hiding them under my plate, and savoring the secret indulgence while the rest of the family chatted around the table.
This dish has its roots in classic American comfort food, but the baked method gives it a lighter profile without sacrificing the satisfying crunch. The combination of garlic, Parmesan, and a touch of herbs creates a flavor that feels both familiar and elevated.
In this article, you’ll learn how to achieve that perfect golden crust using simple pantry staples, why the baking technique locks in juiciness, and how to customize the recipe for different dietary needs. By the end, you’ll be confident enough to serve these tenders at family gatherings, game nights, or a quick weeknight dinner.
Let’s dive in and bring a touch of nostalgia to your modern kitchen!
🌟 Why This Recipe Will Capture Your Heart
From the first bite to the lingering aftertaste, this baked chicken tender delivers comfort, flavor, and a healthy twist that will keep you coming back.
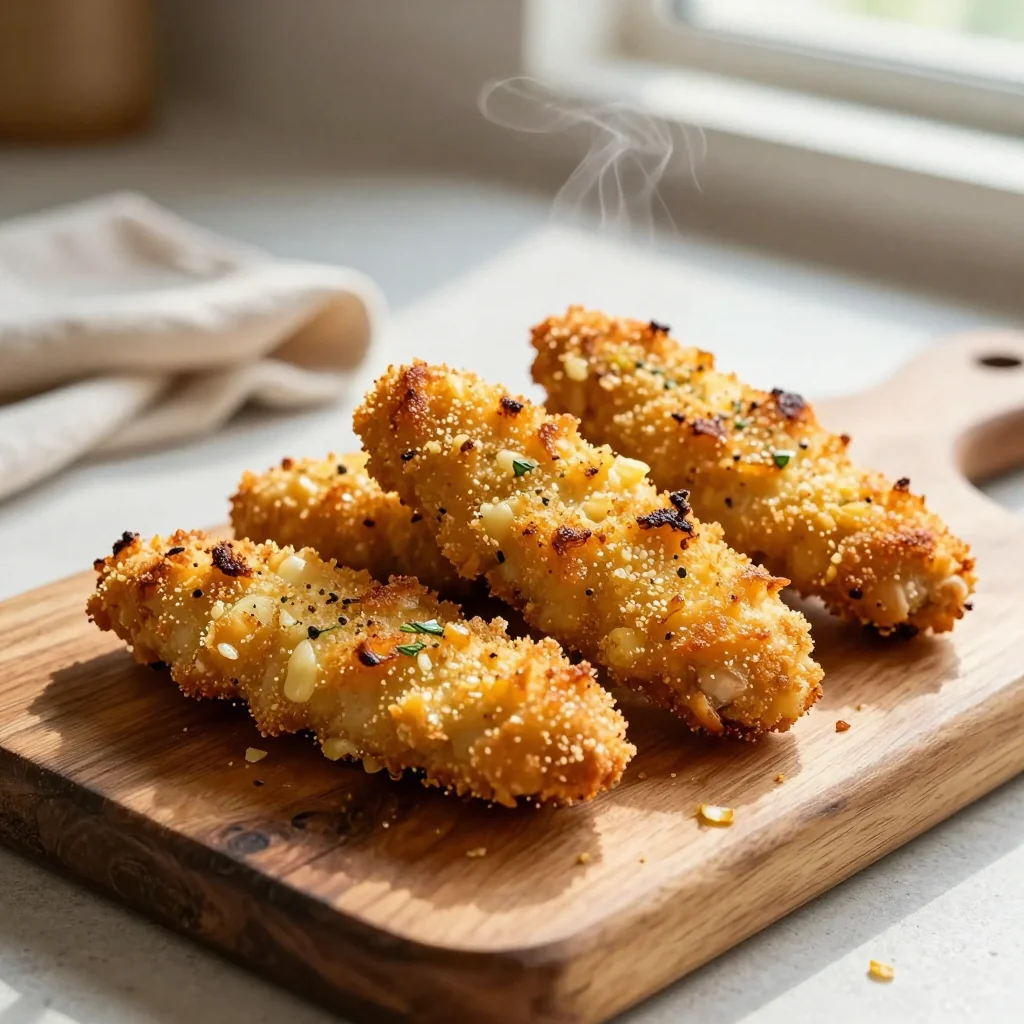
- ✨ Irresistible Crunch: The panko‑Parmesan coating creates a light, airy crunch that stays crisp even after cooling, thanks to the low‑fat baking method.
- ✨ Robust Garlic‑Parmesan Flavor: Fresh minced garlic and aged Parmesan combine to give a depth of flavor that’s both savory and aromatic.
- ✨ Healthier Than Fried: Baking reduces oil absorption by up to 70%, delivering fewer calories while preserving juiciness.
- ✨ Simple Ingredient List: All components are pantry‑friendly; no exotic spices or hard‑to‑find items are required.
- ✨ Versatile Pairings: Perfect with salads, pasta, or as a party finger food, the tenders adapt to any menu.
- ✨ Kid‑Approved: The mild seasoning and familiar texture make it a hit with children and picky eaters alike.
🥗 The Ingredients
📝 Complete Ingredient List
For the Chicken Tenders:
For the Dipping Sauce (Optional):
For Garnish:
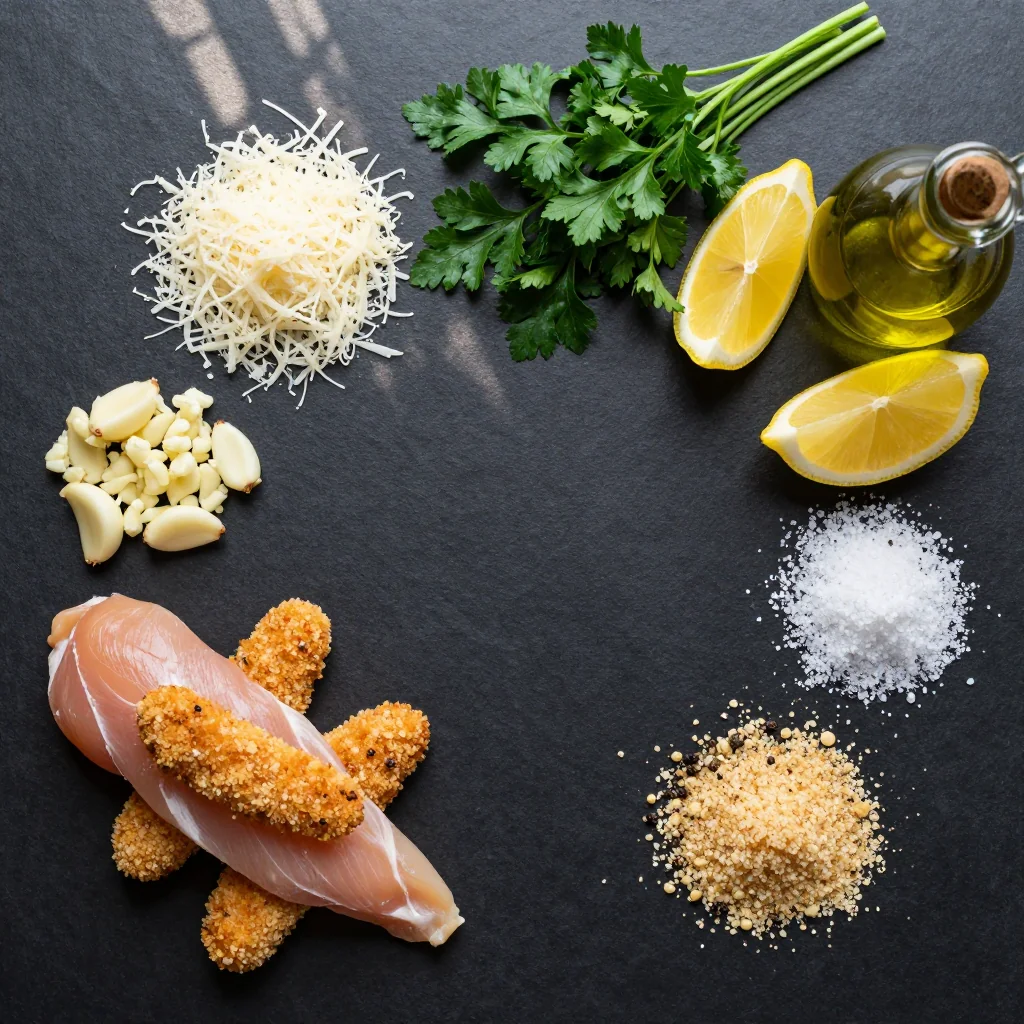
🔍 Focus on Key Ingredients
Chicken Breast Tenders
Chicken breast is a lean protein source that stays moist when cooked correctly. Look for tenders that are uniform in thickness; this ensures they bake evenly and prevents some pieces from drying out while others remain undercooked. If you purchase whole breasts, slice them into strips about 1‑inch thick, then gently pound them to an even thickness.
Panko Breadcrumbs
Panko, a Japanese-style breadcrumb, offers a lighter, airier crunch compared to traditional breadcrumbs. Its larger flakes trap less oil, making the coating crispier after baking. For an extra flavor boost, you can toast the panko lightly in a dry skillet before mixing with Parmesan.
Parmesan Cheese
Freshly grated Parmesan adds a nutty, salty depth that pairs beautifully with garlic. Choose a high‑quality Parmigiano‑Reggiano for the most aromatic result. The cheese also helps the coating brown evenly, creating those coveted golden specks.
🔄 Quick Substitutions
| If you don’t have… | Use instead… |
|---|---|
| Panko breadcrumbs | Regular breadcrumbs toasted lightly |
| Parmesan cheese | Grated Pecorino Romano |
| Butter | Olive oil (sprayed lightly) |
👨🍳 Step‑by‑Step Instructions
Follow these detailed steps to achieve perfectly baked, crunchy chicken tenders that retain their juiciness and flavor.
📋 Phase 1: Preparation & Mise en Place
Gather your tools and pre‑heat the oven while you prep the coating.
Preheat the Oven
Set your oven to 200°C (390°F) and position a rack in the middle. This temperature ensures the exterior crisps quickly while the interior stays juicy. Place a rimmed baking sheet on the rack and line it with parchment paper for easy cleanup.
Prepare the Coating Mixture
In a shallow bowl, combine the panko breadcrumbs, grated Parmesan, minced garlic, dried oregano, sea salt, and ground black pepper. Toss gently to distribute the garlic evenly; this prevents clumps and ensures each bite gets a burst of flavor.
Moisten the Chicken
Place the chicken tenders in a large mixing bowl. Drizzle the melted butter over them and toss until each piece is lightly coated. The butter helps the breadcrumb mixture adhere and adds richness without deep‑frying.
🔥 Phase 2: Coating & Baking
Create the crunchy crust and bake to golden perfection.
Dredge the Chicken
One by one, press each butter‑moistened chicken piece into the breadcrumb mixture, ensuring an even layer on all sides. Place the coated tenders on the prepared baking sheet, leaving a small gap between each so air can circulate.
Bake the Tenders
Slide the sheet into the preheated oven. Bake for 12 minutes, then flip each tender using tongs and bake for an additional 8‑10 minutes. The total time may vary slightly depending on the thickness of your chicken strips.
✨ Phase 3: Finishing Touches & Serving
Finalize the dish with garnish, sauce, and serving suggestions.
Check for Doneness
Insert an instant‑read thermometer into the thickest part of a tender; it should read at least 74°C (165°F). If you don’t have a thermometer, cut into the center—juices should run clear, not pink.
Garnish
Immediately after removing from the oven, sprinkle chopped fresh parsley and extra Parmesan shavings over the hot tenders. The residual heat will melt the cheese slightly, creating a glossy finish.
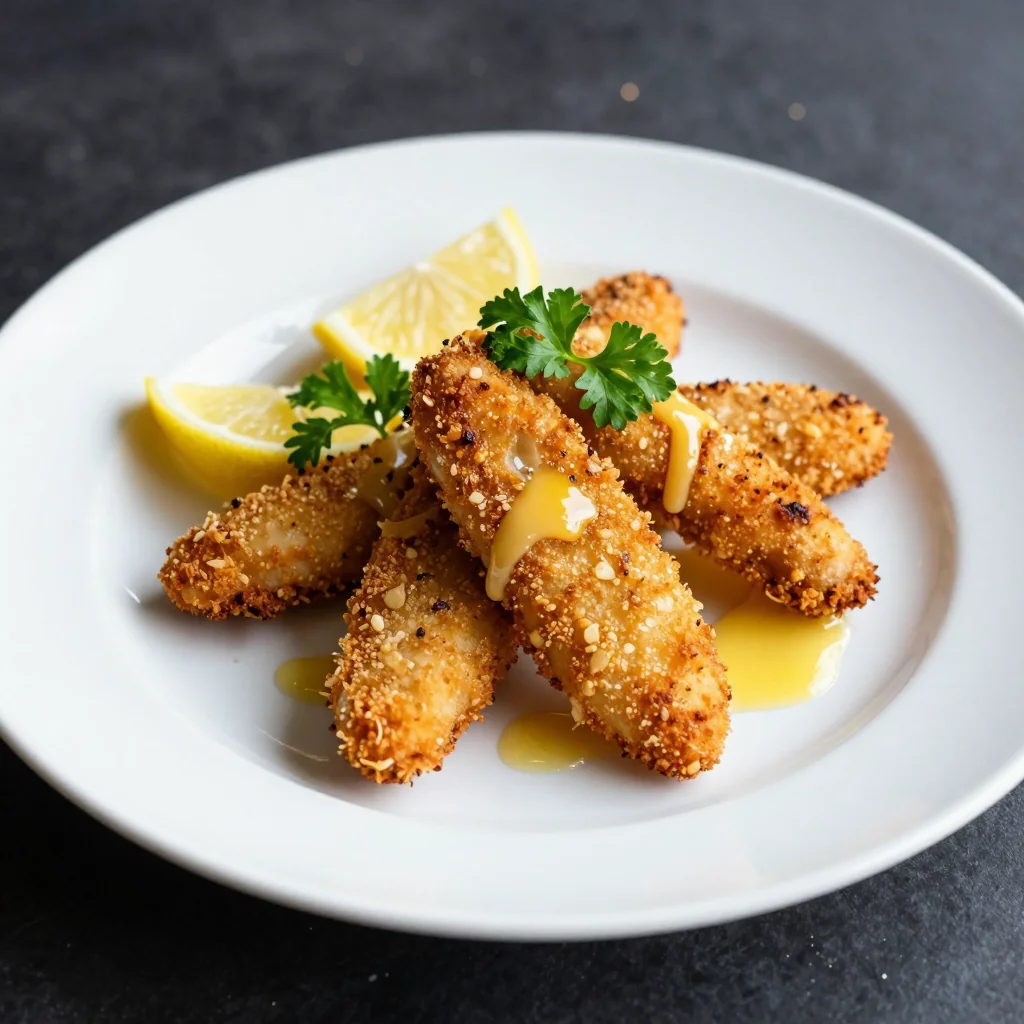
Prepare the Dipping Sauce (Optional)
In a small bowl, whisk together mayonnaise, grated Parmesan, lemon juice, garlic powder, and a pinch of paprika. Adjust seasoning to taste. Serve the sauce on the side for dipping.
Plate and Serve
Arrange the tenders on a serving platter, drizzle a thin line of extra melted butter if desired, and place a small bowl of dipping sauce in the center. Pair with a crisp green salad or roasted vegetables for a complete meal.
💡 Expert Tips & Tricks
🛒 Choosing the Right Ingredients
When selecting chicken, opt for fresh, organic breast meat if possible. Look for a uniform pink color with no gray spots. For the Parmesan, a block that you grate yourself yields a fresher flavor and better melt. Lastly, ensure your panko is not stale; a quick toast in a dry pan for 2 minutes revives its crunch.
🔪 Preparation Techniques
Pat the chicken dry with paper towels before coating; excess moisture hinders the breadcrumb adhesion. Use a shallow dish for the coating so you can press the mixture onto each piece without spilling. For a consistent coating thickness, lightly press the breadcrumb mixture with your fingertips rather than just shaking the chicken.
🌡️ Mastering the Cooking Process
Preheating the oven fully is crucial—an under‑heated oven will cause the chicken to steam rather than crisp. If you notice the coating browning too quickly, loosely cover the tenders with foil for the remaining cooking time. This protects the crust while allowing the interior to finish cooking.
🍽️ Presentation & Service
For a restaurant‑style presentation, arrange the tenders in a fan shape on a white plate, drizzle a thin line of melted butter, and sprinkle micro‑herbs. Serve the dipping sauce in a small ramekin with a decorative spoon. Adding a wedge of lemon on the side adds a bright contrast to the richness.
🏆 Pro Tips
Professional chefs focus on precision, flavor layering, and consistency. Below are six insider tricks to elevate your chicken tenders from good to unforgettable.
- 🎯 Brine for Moisture: Submerge the chicken tenders in a light brine (1 tablespoon salt per cup water) for 15 minutes before coating. The salt helps the muscle fibers retain water, resulting in juicier meat after baking.
- 🎯 Double‑Coat for Extra Crunch: After the first coating, dip the tenders briefly in a beaten egg white, then roll them in the breadcrumb mixture again. This creates a thicker, crunchier shell without adding excess calories.
- 🎯 Use a Wire Rack: Placing the coated chicken on a wire rack set over the baking sheet allows hot air to circulate around each piece, preventing sogginess on the bottom.
- 🎯 Add a Touch of Sweetness: Mix a teaspoon of honey into the melted butter before brushing. The caramelization adds a subtle sweet note that balances the savory garlic and cheese.
- 🎯 Finish with a Spray of Olive Oil: Lightly mist the tenders with olive oil spray halfway through baking. This boosts browning and adds a glossy finish without deep‑frying.
- 🎯 Rest Before Serving: Let the tenders rest for 3‑5 minutes after removing from the oven. This allows the juices to redistribute, preventing them from spilling out when cut.
"The secret to great fried‑style dishes lies not in the oil, but in the crust." — Chef Thomas Keller
🔄 Variations & Adaptations
The base recipe is flexible enough to accommodate a range of dietary preferences, flavor profiles, and cultural twists.
🥬 Vegetarian / Vegan Version
Replace chicken tenders with firm tofu strips or cauliflower florets. For tofu, press it to remove excess water, then marinate in soy sauce and garlic before coating. For cauliflower, steam the florets briefly to soften, then follow the same coating and baking steps.
- Substitution 1: 400 g firm tofu, sliced into strips – press and pat dry.
- Substitution 2: 1 large cauliflower head, broken into bite‑size pieces – steam 5 min.
🌶️ Flavor Variations
Play with herbs, spices, and sauces to create distinct taste experiences.
Spicy Version:
Add ½ teaspoon of cayenne pepper to the breadcrumb mixture and serve with a sriracha‑infused mayo for a heat‑loving twist.
Mediterranean Version:
Incorporate dried oregano, thyme, and a sprinkle of lemon zest into the coating. Pair with tzatziki sauce and a side of quinoa tabbouleh.
Asian Fusion Version:
Swap Parmesan for toasted sesame seeds, add grated ginger to the garlic, and finish with a drizzle of soy‑ginger glaze after baking.
⚠️ Dietary Adaptations
Gluten‑Free:
Use gluten‑free panko or finely ground almond flour as the coating base. Ensure all other ingredients, especially the sauce, are certified gluten‑free.
Lactose‑Free:
Replace Parmesan with a dairy‑free cheese alternative or nutritional yeast for a cheesy flavor without lactose.
Low‑Calorie:
Swap butter for a light cooking spray, reduce the amount of Parmesan by half, and serve with a low‑fat Greek yogurt dip instead of mayo.
👶 Family / Kid‑Friendly Version
Kids love mild flavors. Omit the garlic for a gentler taste, use a sweeter dipping sauce like honey‑mustard, and serve with carrot sticks or apple slices for a balanced meal.
📦 Storage & Reheating
🧊 Conservation
Refrigerator:
- Duration: 3 days
- Container: Airtight glass or BPA‑free plastic container
- Tip: Place a paper towel on top to absorb excess moisture.
Freezer:
- Duration: 2 months
- Method: Cool completely, then flash‑freeze on a tray before transferring to a zip‑lock bag.
- Defrosting: Transfer to the fridge overnight or use the microwave’s defrost setting.
💡 For best texture, reheat directly from frozen using the oven method.
♨️ Reheating
🔥 Oven (Recommended):
- Preheat to 180°C (350°F).
- Place tenders on a wire rack over a baking sheet.
- Cover loosely with foil and heat for 8 minutes.
- Remove foil and continue for 4‑5 minutes until crisp.
⚡ Microwave (Quick):
- Cover with a microwave‑safe lid.
- Heat on medium power for 1 minute.
- Check and stir; repeat in 30‑second intervals.
🍳 Stovetop:
Heat a non‑stick skillet over medium heat, add a drizzle of oil, and sauté the tenders for 2‑3 minutes per side until heated through and the crust regains its crunch.
🍷 Perfect Pairings
🥗 Side Dishes
- Mixed Green Salad: A light vinaigrette with lemon and olive oil cuts through the richness.
- Roasted Sweet Potatoes: Their natural sweetness balances the salty Parmesan.
- Steamed Asparagus: Lightly salted and drizzled with lemon butter.
🍷 Wine & Beverage Pairings
- Chardonnay (unoaked): The buttery notes complement the Parmesan without overwhelming.
- Pinot Noir: Its bright acidity and soft tannins enhance the garlic flavor.
- Non‑Alcoholic: Sparkling water with a splash of grapefruit juice adds a refreshing contrast.
🍰 Completing the Meal
Start with a simple bruschetta topped with ripe tomatoes and basil, then move to the chicken tenders as the main course. Finish with a lemon ricotta cheesecake or a fresh fruit tart to cleanse the palate.
❓ Frequently Asked Questions
Q: Can I use frozen chicken tenders?
Yes, but thaw them completely in the refrigerator before coating. Pat them dry to remove excess moisture; otherwise, the breadcrumb coating may slide off during baking.
Q: How do I make the coating gluten‑free?
Replace panko with gluten‑free breadcrumbs or finely ground almond flour. Ensure the Parmesan you use is not processed with any gluten‑containing additives.
Q: What’s the best way to keep the crust crispy after reheating?
Reheat in a preheated oven on a wire rack; the dry heat restores the crunch. Avoid microwaving unless you’re short on time, as it tends to soften the crust.
Q: Can I add herbs to the coating?
Absolutely! Fresh chopped rosemary, thyme, or even a pinch of smoked paprika can be mixed into the breadcrumb blend for additional aroma.
Q: How do I store the dipping sauce?
The sauce keeps well in an airtight container in the refrigerator for up to 5 days. Stir before serving to recombine any separated ingredients.
Q: Is it possible to make this recipe ahead of time?
Yes. Prepare the coated chicken and keep it on a tray in the fridge for up to 24 hours before baking. This can enhance flavor absorption and reduce prep time on the day of serving.
🎉 To Your Oven!
This Garlic Parmesan Chicken Tenders recipe brings together the comfort of a classic favorite with a healthier baking method, delivering a satisfying crunch and a burst of savory flavor in every bite. The straightforward ingredient list, clear step‑by‑step instructions, and flexible variations make it suitable for beginners and seasoned cooks alike. Whether you’re feeding a family, entertaining friends, or simply craving a tasty snack, these tenders will not disappoint.
Give the recipe a try, snap a photo of your golden masterpiece, and share your experience in the comments below. Your feedback helps the community grow, and your creativity might inspire the next variation!
Have you tried this recipe?
Leave a comment and rating below! Share your photos on Instagram with #GarlicParmesanTenders for a chance to be featured.
Garlic Parmesan Chicken Tenders Baked
Crispy baked chicken tenders with a fragrant garlic‑parmesan crust, perfect for any occasion.
📝 Ingredients
Chicken Tenders
Dipping Sauce (Optional)
👨🍳 Instructions
- 1 Preheat oven to 200°C (390°F) and line a baking sheet with parchment.
- 2 Melt butter and combine with minced garlic; set aside.
- 3 Mix panko, Parmesan, oregano, salt, and pepper in a shallow dish.
- 4 Toss chicken tenders in the butter‑garlic mixture until lightly coated.
- 5 Dredge each piece in the breadcrumb mixture, pressing gently.
- 6 Place coated tenders on the prepared sheet, spacing them evenly.
- 7 Bake 12 minutes, flip, then bake another 8‑10 minutes until golden.
- 8 While baking, whisk together sauce ingredients if using.
- 9 Remove tenders, garnish with parsley and extra Parmesan.
- 10 Serve hot with sauce and your choice of sides.
🥗 Nutritional Information (per serving)
*Values are approximate and based on standard ingredient brands.
📚 You Might Also Like
Crispy Baked Zucchini Fries
Lemon Herb Roasted Chicken
Parmesan Crusted Salmon


💬 Comments & Reviews
Leave a Comment
No comments yet. Be the first to share your thoughts!