I was standing in my kitchen at midnight, the only light coming from the flickering orange glow of a pumpkin lantern, when my roommate dared me to create a Halloween snack that would make even the most stubborn candy‑craver beg for mercy. I grabbed the first thing I could find—a frozen bag of meatballs, a can of crescent roll dough, a jar of marinara, and a handful of black olives—then I thought, “What if I could turn these bland basics into something that looks like a tiny, edible mummy?” The first attempt was a disaster: the dough tore, the olives floated like lost souls, and the meatballs refused to cooperate. That night I learned two things: first, the right technique can turn a kitchen calamity into a masterpiece; second, I was about to discover the most fun, finger‑friendly Halloween appetizer of my life.
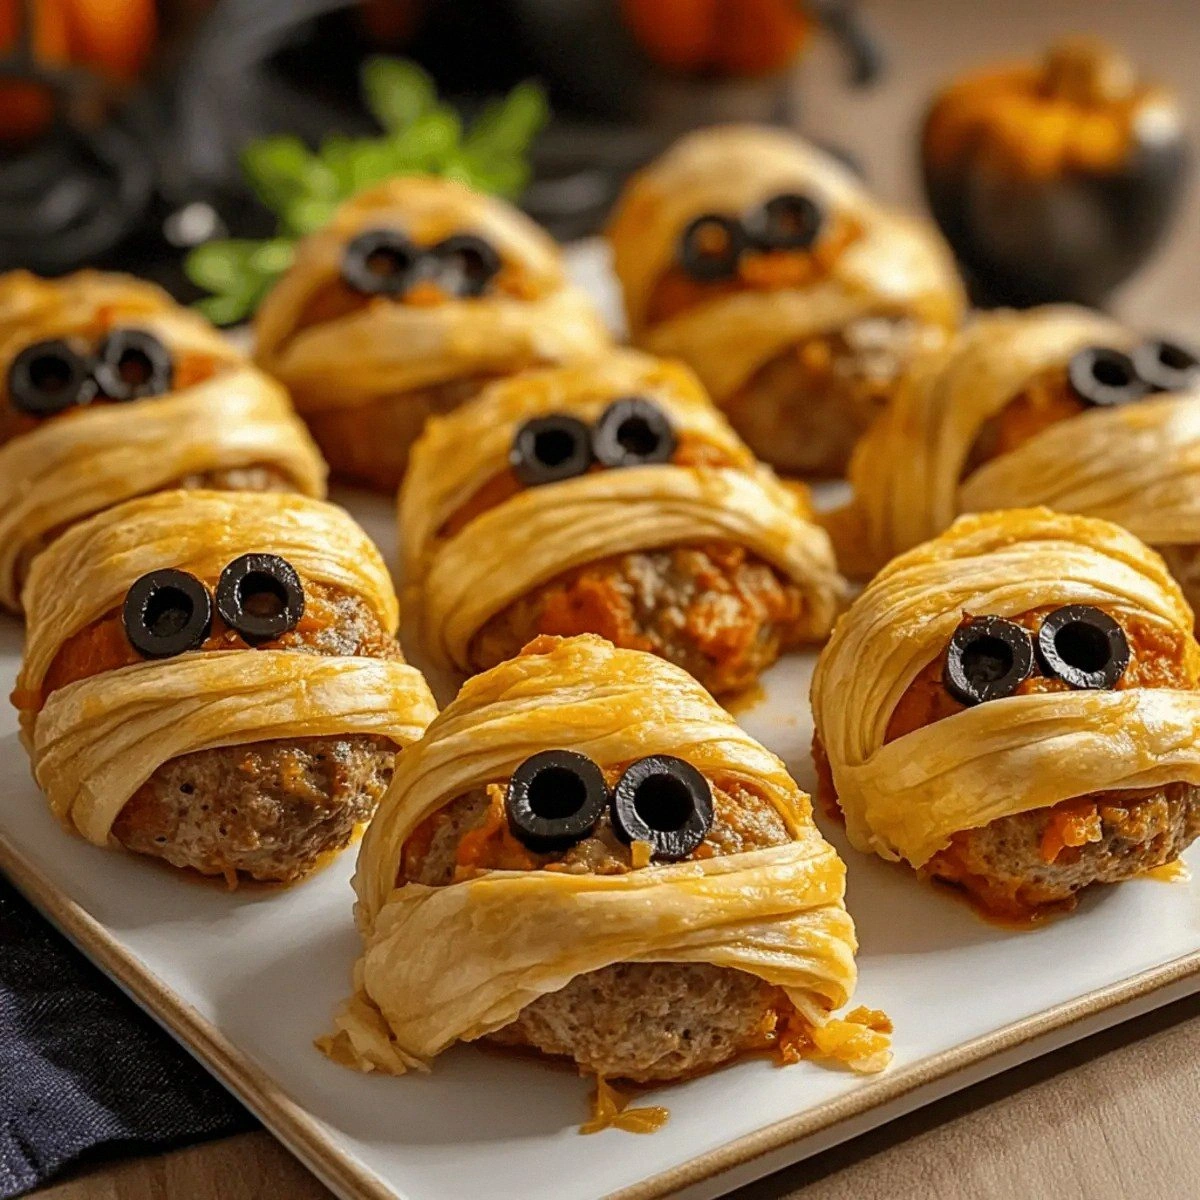
Picture this: a tray of plump, juicy meatballs wrapped in buttery, flaky crescent “bandages,” each topped with two glossy olive eyes that stare back at you like little undead monsters. The scent of simmering marinara swirls through the air, mingling with the buttery aroma of baked pastry, and you can hear the faint crackle of the dough as it puffs up in the oven—like tiny ghosts sighing in relief. When you bite into one, the first thing you notice is the crisp, golden crust that gives way to a tender, savory center; the sauce clings to the meatball like a velvety blanket, while the olives add a salty pop that makes you go “Mmm!” It’s the kind of snack that makes you forget the calories and focus entirely on the fun of the presentation.
Most mummy‑themed recipes out there either overcomplicate the process with homemade meatball mixtures or skimp on flavor by using cheap dough that turns soggy the second it meets the sauce. I’ve been there, and I know the frustration of ending up with a limp, unappetizing “mummy” that looks like a sad, wilted tissue. This version, however, flips the script: I use high‑quality frozen meatballs that are already perfectly seasoned, a can of crescent roll dough that puffs up into a buttery armor, and a quick‑mix marinara that adds just the right amount of acidity. The secret? A simple technique that creates a crisp seal around each meatball, locking in juices and preventing the sauce from making the dough soggy.
Okay, ready for the game‑changer? I’m going to walk you through every single step— from the moment you open that frozen bag to the triumphant moment you pull the final batch out of the oven, the whole kitchen smelling like a haunted bakery. By the end of this guide you’ll wonder how you ever made any other version of mummy meatballs, and you’ll be daring anyone to taste them and not go back for seconds. Let me walk you through every single step — by the end, you’ll wonder how you ever made it any other way.
What Makes This Version Stand Out
- Flavor Explosion: The marinara is simmered just long enough to develop a deep, caramelized sweetness that hugs the meatball like a warm blanket, while the crescent dough adds a buttery crunch that sings with each bite.
- Texture Contrast: You get a crisp, golden exterior that cracks like thin ice, a tender, juicy meatball interior, and a glossy olive eye that pops with briny surprise.
- Simplicity: No homemade meatball prep, no rolling dough by hand—just open, assemble, bake, and serve. Perfect for a last‑minute party or a lazy weekend.
- Visual Wow Factor: The “bandages” are instantly recognizable, making these bite‑size mummies the star of any Halloween spread without any elaborate sculpting.
- Crowd Reaction: Guests love the surprise of the hidden olive eyes, and the sweet‑savory balance keeps them reaching for more— I dare you to taste this and not go back for seconds.
- Ingredient Quality: Using frozen meatballs guarantees consistent seasoning, while a good brand of crescent dough provides that flaky lift you crave.
- One‑Pan Efficiency: Everything bakes on a single sheet, meaning cleanup is practically nonexistent— a true lifesaver after a Halloween party.
- Make‑Ahead Potential: Assemble the mummies ahead of time, refrigerate, then pop them in the oven when guests arrive; they’re still fresh, hot, and spooky.
Inside the Ingredient List
The Flavor Base
The marinara sauce is the heart of this dish. I use a store‑bought version that’s already seasoned with garlic, basil, and a hint of oregano, then I simmer it for five minutes with a splash of olive oil to deepen the flavor. This extra step transforms a simple sauce into a velvety coating that clings to each meatball like a second skin. If you skip the simmer, you’ll end up with a watery glaze that can make the dough soggy—trust me, you don’t want that.
The Texture Crew
Frozen meatballs provide a reliable, juicy core that’s already seasoned to perfection. Because they’re pre‑cooked, you only need to heat them through, which means the meat stays moist and the flavor stays locked in. The crescent roll dough is the crunchy “bandage” that puffs up in the oven, creating a buttery, flaky crust that contrasts beautifully with the soft interior. If you use puff pastry instead, you’ll get a lighter texture but lose that buttery richness that makes the mummies feel indulgent.
The Unexpected Star
Black olives are the tiny, eerie eyes that give each mummy its spooky personality. Their salty, briny flavor cuts through the richness of the meat and dough, providing a perfect palate cleanser between bites. If you’re allergic to olives or prefer a milder taste, try diced sun‑dried tomatoes or small mozzarella pearls; they’ll still give you that “eye‑catching” effect while adding a different flavor twist.
The Final Flourish
A light drizzle of extra‑virgin olive oil before baking helps the dough achieve that golden, glossy finish that makes the mummies look like they’ve just risen from a grave. Sprinkle a pinch of dried oregano or Italian seasoning on top for a subtle herb aroma that wafts through the kitchen as they bake. This final touch is what separates a good appetizer from a show‑stopping one— it’s the little whisper of flavor that tells your guests you actually put thought into this.
Everything's prepped? Good. Let's get into the real action...
The Method — Step by Step
Preheat your oven to 400°F (200°C). While the oven heats, line a large baking sheet with parchment paper; this prevents the dough from sticking and makes cleanup a breeze. I like to set a timer for the preheat because the moment the oven hits 400°, the kitchen fills with a warm, anticipatory hum that tells you the magic is about to begin.
Open the package of frozen meatballs and spread them out on a clean surface. If they’re stuck together, give them a quick tap with a spatula; you’ll hear a faint “pop” that signals they’re ready to be separated. This step is crucial—if the meatballs clump, the dough won’t wrap evenly and you’ll end up with uneven mummies.
Unroll the crescent roll dough and separate it into the pre‑cut triangles. Using a sharp knife, cut each triangle into thin strips about ½ inch wide. This is the moment of truth—the strips become the bandages, so keep them uniform for a tidy look.
Take a meatball and place it in the center of a small pile of dough strips. Wrap the strips around the meatball, overlapping them slightly to create a criss‑cross pattern that resembles mummy wrappings. Press the ends gently so they stick together; the heat of the oven will seal them in place. Pro tip: Leave a small gap at the top where you’ll later insert the olive eyes.
Slice the black olives in half lengthwise. Place two olive halves on each mummy, pressing them lightly into the dough so they stay put during baking. The olives should look like tiny, sinister eyes peering out from the bandages. Watch Out: If you press too hard, the olives can sink into the dough and lose their “eye” effect.
Arrange the assembled mummies on the prepared baking sheet, spacing them about 2 inches apart. Drizzle each one with a light brush of olive oil; this will give the dough a glossy, golden finish. If you want extra flavor, sprinkle a pinch of dried oregano over the top now.
Place the sheet in the preheated oven and bake for 12‑15 minutes, or until the dough is puffed, golden brown, and the meatballs are heated through. You’ll know they’re done when the edges of the dough start pulling away from the meatball like tiny, caramelized ribbons. This next part? Pure magic.
While the mummies bake, warm the marinara sauce in a small saucepan over low heat. Stir occasionally and add a splash of water if it looks too thick; you want a sauce that coats the back of a spoon but doesn’t pool.
When the mummies are out of the oven, let them rest for two minutes—this allows the steam to settle and the bandages to firm up. Then, using a spatula, transfer each mummy to a serving platter and drizzle generously with the warm marinara. The sauce should pool around the base, creating a “bloody” effect that’s perfect for Halloween.
That's it — you did it. But hold on, I've got a few more tricks that'll take this to another level...
Insider Tricks for Flawless Results
The Temperature Rule Nobody Follows
Most home cooks bake at 350°F for pastries, but the higher 400°F heat creates a rapid puff in the crescent dough, locking in moisture and giving you that coveted crispy‑on‑the‑outside, tender‑on‑the‑inside texture. I once tried baking at 350°F and the dough stayed limp, turning the whole batch into a soggy mess. The lesson? Crank that heat up and trust the dough to rise quickly.
Why Your Nose Knows Best
Don’t rely solely on a timer—use your sense of smell. When the mummies are about 10 minutes in, you’ll start to smell a buttery, toasted aroma that signals the dough is reaching that perfect golden stage. If the scent turns a bit nutty, pull them out early; over‑baking leads to a dry, brittle bandage that cracks when you bite.
The 5‑Minute Rest That Changes Everything
After baking, let the mummies sit for exactly five minutes before adding the sauce. This short rest allows the interior steam to redistribute, keeping the meatball juicy and preventing the sauce from soaking through the dough. I once skipped this step and the sauce made the bandages soggy—never again.
Olive Placement Precision
If you want the eyes to stay perfectly centered, use a tiny dab of the warm marinara as “glue” before placing the olives. The sauce acts like edible mortar, holding the olives in place while the dough bakes. A friend tried skipping this and ended up with eyes sliding off—let’s just say the “mummies” looked more like abstract art.
Batch‑Prep Blueprint
Assemble all the mummies ahead of time, place them on a tray, and cover loosely with foil. Store in the refrigerator for up to 12 hours; when you’re ready to serve, just pop the tray straight into the oven (no need to thaw). This trick saved me during a Halloween party when the guests arrived earlier than expected.
Creative Twists and Variations
This recipe is a playground. Here are some of my favorite ways to switch things up:
Spicy Scream
Add a teaspoon of crushed red pepper flakes to the marinara sauce for a subtle heat that tingles the palate. The heat pairs wonderfully with the cool, briny olives, creating a “fire‑and‑ice” sensation that will make your guests gasp.
Cheesy Ghoul
Mix shredded mozzarella into the marinara sauce just before serving. The cheese melts into the sauce, adding a creamy layer that makes the mummies extra indulgent—perfect for cheese lovers who can’t get enough dairy.
Herb‑Infused Mummies
Replace the black olives with sliced green olives and sprinkle fresh chopped basil over the finished dish. The herbaceous notes brighten the overall flavor profile, giving the dish a fresh, garden‑like twist.
Sweet‑And‑Savory Treat
Swap the marinara for a honey‑glazed BBQ sauce and use pineapple chunks as the “eyes.” The sweet glaze caramelizes on the dough, creating a sticky, caramel‑like crust that’s surprisingly addictive.
Vegan Vampires
Use plant‑based meatballs and vegan crescent dough, and replace the olives with sliced roasted red peppers for a colorful, cruelty‑free version. The flavor remains bold, and the visual impact is just as spooky.
Storing and Bringing It Back to Life
Fridge Storage
Place cooled mummies in an airtight container and store them in the refrigerator for up to 3 days. To keep the dough from getting soggy, line the container with a paper towel to absorb excess moisture.
Freezer Friendly
If you want to make a big batch, freeze the assembled (but unbaked) mummies on a tray, then transfer them to a zip‑top bag. They’ll keep for up to 2 months. When you’re ready to serve, bake them straight from the freezer, adding an extra 3‑4 minutes to the baking time.
Best Reheating Method
Reheat leftovers in a preheated 350°F oven for 8‑10 minutes, or until the dough is crisp again. Add a tiny splash of water to the pan before reheating; the steam helps the dough regain its flaky texture without drying out the meat.