I’ve spent a decade in kitchens that range from the cramped, humming kitchen of a college dorm to the polished, high‑pressure brigade of a Michelin‑star restaurant. Yet, no matter the setting, the most memorable mornings have always been the ones that started with something that feels both comforting and daring. That morning, I was chasing the perfect breakfast treat after a night of late‑night pizza and a sudden craving for something sweet, fluffy, and utterly irresistible. I stared at the pantry, counted the ingredients, and realized I could turn a simple pancake batter into a bite‑sized, oven‑baked wonder that would leave everyone begging for more.
Picture this: the kitchen lights flicker on, the aroma of butter and vanilla lingers in the air, and the sound of a timer ticking away is the only music in the background. The batter, a glossy, golden mixture, slides into a silicone muffin tin, forming little domes that promise a light, airy interior and a crisp, caramelized edge. The moment the poppers hit the oven, the scent of toasted sugar and butter rises, mingling with the faint hint of chocolate if you’ve chosen to add it. You can almost hear the crackle of the batter as it expands, and feel the heat radiating from the tin, making your hands itch to taste the first bite.
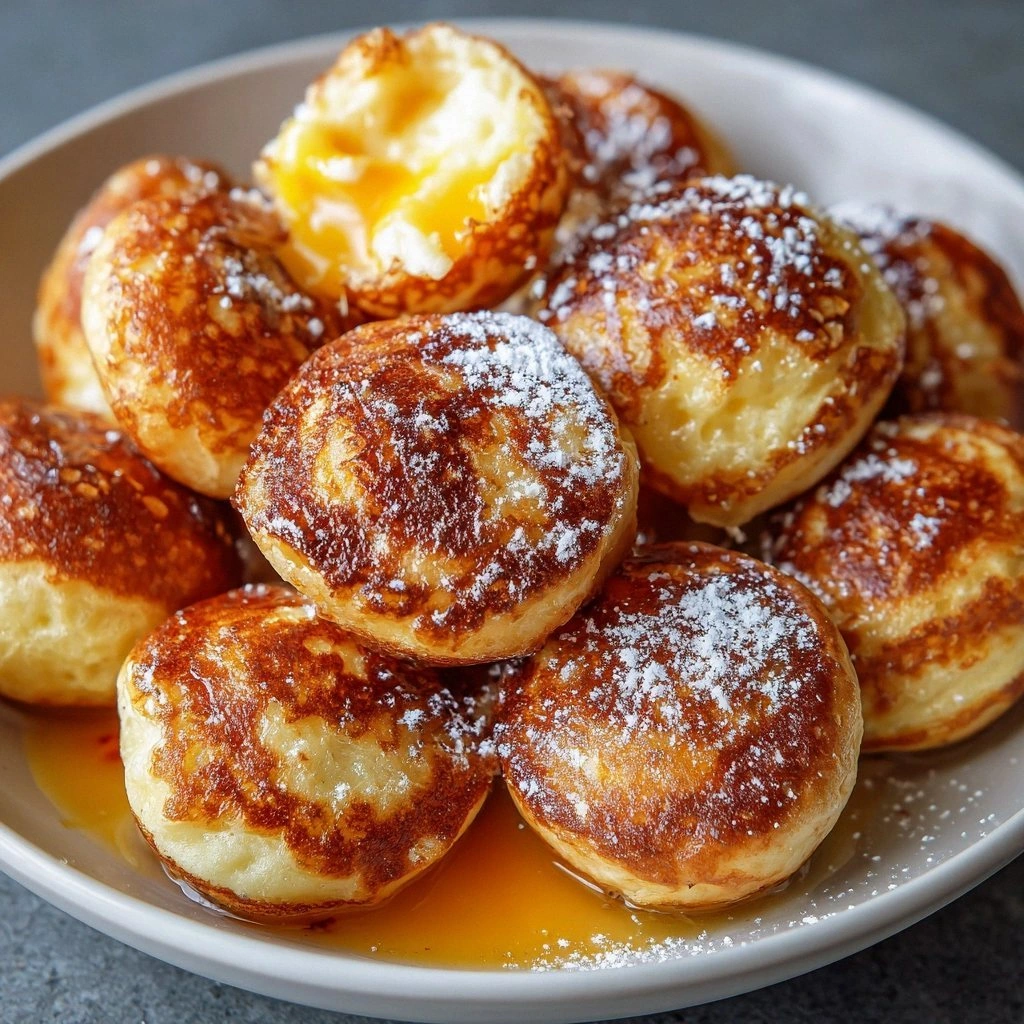
What makes this version of breakfast poppers stand out is that it’s not just a variation on a pancake; it’s a complete sensory experience. The batter is thick enough to hold its shape but thin enough to puff like a cloud. The edges brown to a perfect golden brown while the center stays moist and tender. The optional chocolate chips create a delightful burst of sweetness that contrasts beautifully with the subtle vanilla undertone. It’s a dish that feels like a hug in the morning, a playful twist on a classic comfort food, and a crowd‑pleaser that works for kids and adults alike.
I dare you to taste these poppers and not go back for seconds. I’ve already eaten a handful before anyone else even saw the finished product. If you’ve ever tried a pancake that was too dense or a muffin that was too dry, you’ll understand why this recipe feels like a revelation. The secret lies in the balance of leavening, the gentle folding of the batter, and the precise oven temperature that allows the poppers to rise without collapsing.
Picture yourself pulling this out of the oven, the whole kitchen smelling incredible, and seeing a tray of golden, bite‑sized pancakes that look like little edible pillows. The first bite is a burst of warm, buttery flavor, followed by a gentle, airy texture that melts in your mouth. The chocolate chips, if added, give a delightful surprise of gooey sweetness. It’s a breakfast that feels indulgent yet wholesome, and it’s so simple that you can make it on a lazy Sunday or a busy weekday morning.
And now, the fun part: the step‑by‑step guide that turns this dream into reality. I’ll walk you through every single step, from mixing the batter to the final golden finish, so you can create the same mouth‑watering experience in your own kitchen. By the end, you’ll wonder how you ever made pancakes or muffins any other way.
What Makes This Version Stand Out
- Texture: The batter’s consistency is key—thick enough to hold shape, yet thin enough to puff. The result is a popper that’s airy inside and has a crisp, caramelized edge that satisfies every bite.
- Flavor: A splash of vanilla and a pinch of salt bring depth, while optional chocolate chips add a playful, sweet surprise. The batter’s gentle sweetness is balanced perfectly by the buttery undertone.
- Simplicity: With only nine ingredients, this recipe is a breeze to whip up. No fancy tools or hard‑to‑find items—just pantry staples you already have.
- Make‑ahead Potential: You can assemble the poppers up to an hour before baking, cover them, and pop them in the oven when you’re ready. They stay fresh and golden for several hours.
- Visual Appeal: The golden domes look like miniature, bite‑sized pancakes that are instantly Instagram‑worthy. The poppers sit together like a row of tiny, fluffy pillows.
- Adaptability: Swap the chocolate chips for dried fruit, nuts, or spices, and you’ll have a new flavor profile each time.
- Crowd Reaction: Friends and family will be amazed at how light and fluffy they are. They’re the perfect snack for brunch or a sweet treat after a workout.
- Ingredient Quality: Using high‑quality butter and fresh eggs elevates the flavor, making each bite buttery and rich.
Alright, let’s break down exactly what goes into this masterpiece…
Inside the Ingredient List
The Flavor Base
All‑purpose flour: It’s the backbone of our poppers, giving them structure and that classic pancake texture. Without it, the batter would collapse and lose its shape. Using a slightly higher protein flour can make the poppers a bit chewier, while a lower protein flour yields a lighter bite. If you prefer a gluten‑free version, try a 1:1 blend of rice flour and tapioca starch.
Sugar: Just a touch of sweetness to balance the flavors and make them irresistible. It also helps the batter brown to a lovely golden hue. If you’re watching your sugar intake, a tablespoon of honey or maple syrup can substitute, though the flavor profile will shift slightly. For a richer caramel note, use brown sugar.
The Texture Crew
Baking powder: This little powerhouse helps our poppers rise, making them light and fluffy. It reacts twice—once when wet and again when heated—ensuring even lift. If you don’t have baking powder, a mix of baking soda and cream of tartar will work, but adjust the quantities carefully.
Salt: A pinch enhances all the flavors, bringing everything together beautifully. Salt also balances sweetness and amplifies the butter’s richness. Too much salt will taste harsh; too little and the poppers will taste flat.
The Unexpected Star
Milk: Adds moisture and richness, making each bite tender and delicious. Whole milk gives a creamier texture, while 2% or skim works if you’re watching calories. If you’re lactose‑free, oat or almond milk can be a great alternative, though the batter may be slightly thinner.
Egg: This binds the ingredients and adds a lovely richness to the batter. The yolk’s fat content also contributes to the tender crumb. If you’re vegan, a flax egg or mashed banana can replace the egg, but the texture will differ.
The Final Flourish
Melted butter: For that buttery flavor and to keep our poppers moist. Butter also creates a golden, crisp exterior when baked. If you’re vegan, coconut oil or vegan butter works, though the flavor will shift slightly.
Vanilla extract: A splash of this adds warmth and depth to the flavor profile. Pure vanilla extract gives a richer taste than imitation vanilla. A vanilla bean would give an even more intense flavor, but it’s a bit more work to extract the seeds.
Chocolate chips (optional): Because who doesn’t love a little chocolate in the morning? Feel free to skip them if you prefer a classic taste. If you do add them, use dark chocolate chips for a slightly bittersweet finish, or milk chocolate for a classic sweet bite. For a healthier option, try dark chocolate chips with at least 70% cacao.
Everything's prepped? Good. Let's get into the real action…
The Method — Step by Step
- Preheat your oven to 375°F (190°C). Set a timer for 20 minutes. The oven must be preheated to ensure the poppers rise evenly. While the oven is heating, grab your silicone muffin tin and lightly grease it with butter or spray to prevent sticking.
- Whisk the dry ingredients together. In a large bowl, combine the flour, sugar, baking powder, and salt. Stir until the mixture is uniform; this ensures the leavening agents are evenly distributed. A quick sift can also help aerate the flour for an extra light crumb.
- Blend the wet ingredients. In a separate bowl, beat the egg, then add the milk, melted butter, and vanilla extract. Whisk until the mixture is smooth and slightly frothy. The frothy texture will help the batter rise during baking.
- Combine the wet and dry mixtures. Pour the wet mixture into the dry mixture gradually, stirring gently with a spatula. Stop mixing once the batter is just combined; over‑mixing can create a dense, tough texture. The batter should be slightly lumpy but free of large dry pockets.
- Fold in chocolate chips. If using chocolate chips, gently fold them into the batter, ensuring even distribution. This step is crucial for a balanced chocolate experience. Avoid over‑mixing; you want the chips to remain distinct and not melt into the batter.
- Fill the muffin tin. Spoon the batter into the prepared tin, filling each cup about ¾ full. The batter will expand as it bakes, so don’t overfill. The poppers should sit level and look like small domes.
- Bake the poppers. Place the tin in the preheated oven and bake for 18–20 minutes. The edges should turn a golden brown, and the tops will have a slight sheen. If you like a crispier top, broil for an additional 1–2 minutes.
- Cool and serve. Remove the tin from the oven and let the poppers cool on a wire rack for 5 minutes. This step allows the interior to set and prevents them from breaking apart. Serve warm with a drizzle of maple syrup or a dollop of whipped cream for an extra indulgence.
- Enjoy the experience. Take a bite and feel the contrast between the airy interior and the crisp, caramelized exterior. The vanilla and chocolate notes should dance on your palate. This is the moment you’ll remember for days.
That's it — you did it. But hold on, I've got a few more tricks that'll take this to another level. Keep reading to discover how to elevate the flavor, texture, and presentation even further.
Insider Tricks for Flawless Results
The Temperature Rule Nobody Follows
Most people bake at 400°F, but 375°F gives a gentler rise and a more even browning. The lower temperature allows the batter to expand slowly, preventing a cracked top. If you prefer a crispier top, finish with a brief broil, but watch closely to avoid burning.
Why Your Nose Knows Best
The aroma is the first indicator that the batter is rising properly. A sweet, buttery scent signals a well‑balanced batter. If you notice a sour or metallic smell, the batter may be over‑mixed or the oven too hot.
The 5-Minute Rest That Changes Everything
After removing the poppers from the oven, let them rest on a wire rack for exactly five minutes. This allows the steam to escape, preventing sogginess. A quick rest also lets the flavors meld, creating a richer taste.
Use a Silicone Mat for Even Baking
A silicone baking mat ensures even heat distribution across the tin. This eliminates hot spots that could cause uneven browning. If you’re using a metal tin, place the mat inside to reduce direct contact.
Add a Touch of Citrus Zest
A tablespoon of lemon or orange zest adds a bright, fresh note that cuts through the richness. It also enhances the vanilla flavor, creating a more complex profile. Sprinkle the zest over the batter before baking for an aromatic finish.
Serve with a Light Sauce
A simple drizzle of honey or a dollop of Greek yogurt can elevate the poppers. The yogurt adds tanginess that balances the sweetness, while honey intensifies the buttery flavor. Try both for a contrast of textures.
Creative Twists and Variations
This recipe is a playground. Here are some of my favorite ways to switch things up:
Maple‑Glazed Popcorn
Swap the chocolate chips for a handful of popcorn kernels. After baking, drizzle maple syrup over the poppers for a sweet, crunchy twist. The popcorn adds a delightful texture contrast, while the maple enhances the vanilla undertone.
Spiced Cinnamon Swirl
Add a teaspoon of ground cinnamon and a pinch of nutmeg to the batter. The warm spices complement the buttery flavor and give the poppers a cozy, autumnal feel. Sprinkle a pinch of brown sugar on top before baking for extra caramelization.
Berry Burst
Fold in fresh blueberries or raspberries into the batter. The berries burst with juice when bitten, creating a juicy surprise. Serve with a dusting of powdered sugar and a squeeze of fresh lemon to brighten the flavors.
Almond Joy Delight
Replace the chocolate chips with chopped almonds and shredded coconut. The almonds provide crunch, while the coconut adds tropical sweetness. A drizzle of coconut milk after baking gives a silky finish.
Savory Herb Edition
Omit the sugar and add finely chopped fresh herbs like chives or rosemary. The herbs infuse the poppers with a savory depth, making them perfect as a brunch side or appetizer. Serve with a dollop of herbed cream cheese.
Vegan Dream
Use plant‑based milk, flax egg, and vegan butter. Swap the chocolate chips for dark chocolate suitable for vegans. The result is a fluffy, dairy‑free treat that still delivers all the flavor.
Storing and Bringing It Back to Life
Fridge Storage
Cool the poppers completely, then store them in an airtight container at room temperature for up to 3 days. The poppers retain their fluffiness when kept in a cool, dry spot. Avoid the fridge if you want to preserve the crisp edges.
Freezer Friendly
Place the cooled poppers in a freezer‑safe zip‑lock bag, removing as much air as possible. They stay fresh for up to 2 months. Freeze before the edges fully set to prevent them from becoming soggy.
Best Reheating Method
Reheat in a toaster oven at 300°F for 5 minutes, or in a conventional oven at 250°F for 8 minutes. Add a tiny splash of water to the bottom of the tin to steam the poppers back to perfection. This restores the moisture and crispness.