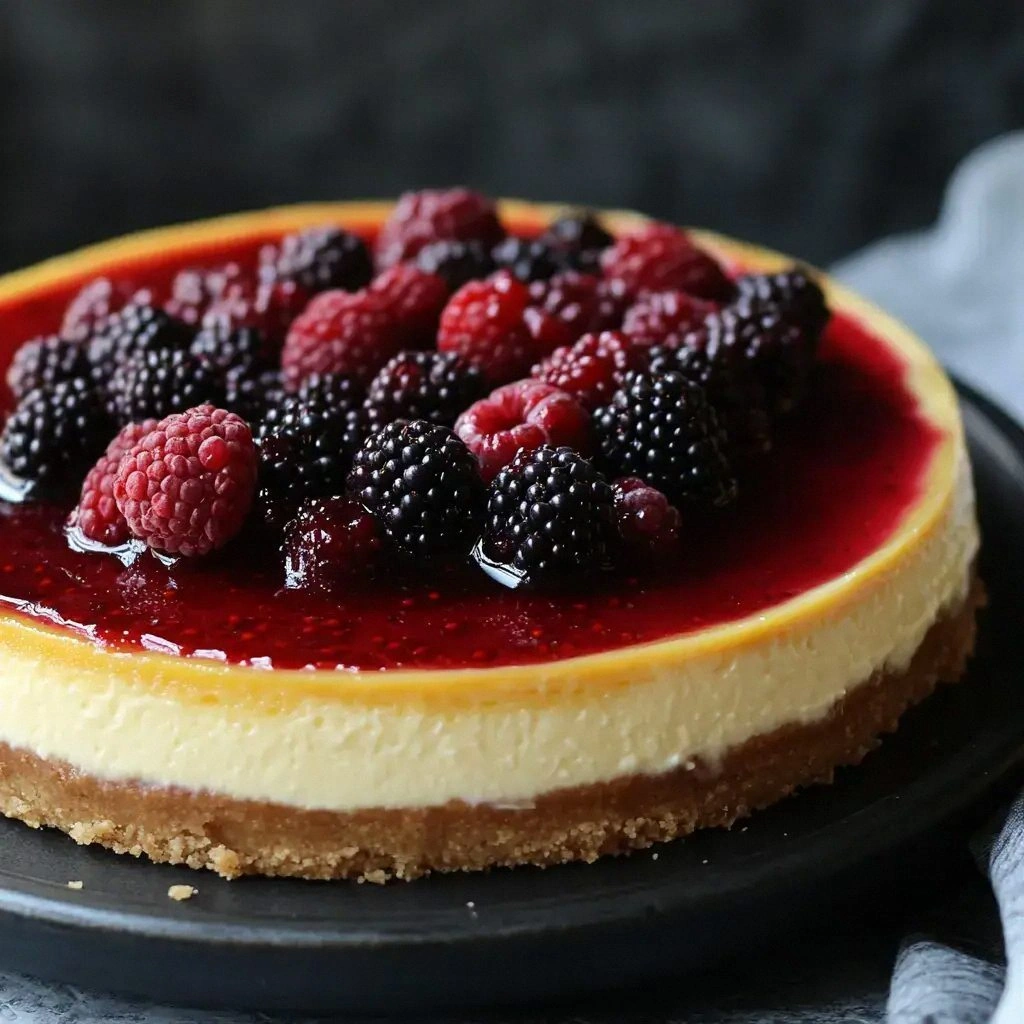
I remember the night my friend dared me to make a cheesecake that would make her taste buds dance. The kitchen was a battlefield of flour, sugar, and a single, stubborn cream cheese that refused to soften. I laughed at the chaos, but the promise of a silky, cloud‑like center kept me going. This recipe is the culmination of that dare, the ultimate cheesecake that will make you question every other version you’ve tried. The result is a dessert that feels like a cloud on a summer afternoon, with a bright berry crown that sings in the mouth.
Picture yourself pulling this out of the oven, the whole kitchen smelling incredible, and the first bite feeling like a soft, buttery hug. The crust crackles just enough to give a satisfying snap, while the filling is smooth, airy, and utterly creamy. The berries add a burst of tartness that cuts through the richness, creating a perfect harmony of flavors. If you’ve ever struggled to find the right balance between sweet and tang, this is the answer you’ve been searching for. Trust me, I’ve tasted it, and I dare you to taste this and not go back for seconds.
I’ve spent countless hours tweaking the ratio of cream cheese to sugar, testing different baking temperatures, and experimenting with various crusts. The final version emerged from a process of trial, error, and a bit of culinary intuition. I’ve learned that the key to a flawless cheesecake lies in the temperature of the ingredients, the precision of the baking time, and the patience to let it cool properly. The result is a cheesecake that feels like a piece of art, with every slice looking as good as it tastes. This is hands down the best version you’ll ever make at home.
The moment you cut into it, the filling should release a gentle, buttery aroma that makes you pause. The texture is like velvet, and the berries are bright, juicy, and slightly glossy from a light glaze. You’ll notice a subtle lemon tang that lifts the entire dessert, making it feel fresh and lively. I’ll be honest — I ate half the batch before anyone else got to try it. But the real magic happens when you share it, and the reactions are worth every ounce of effort.
What Makes This Version Stand Out
- Taste: The flavor profile is a delicate balance of creamy, tangy, and sweet, with a bright berry finish that keeps the palate refreshed. The subtle lemon zest lifts the richness without overpowering the cream cheese base.
- Texture: The filling is silky and airy, achieved through precise temperature control and gentle mixing. The crust provides a contrasting crunch that enhances the overall mouthfeel.
- Simplicity: Despite its elegant taste, the recipe requires only a handful of pantry staples and a few fresh ingredients. No fancy equipment or advanced techniques are necessary.
- Uniqueness: A quick cornstarch glaze gives the berries a glossy sheen and a slightly caramelized bite that sets this cheesecake apart from ordinary berry toppings.
- Crowd Reaction: Friends who’ve tried this version rave about how it’s the “cheesecake that doesn’t feel heavy.” They’re amazed by the lightness and the vibrant berry crown.
- Ingredient Quality: Using high‑fat cream cheese and fresh berries ensures the richest flavor and best texture, turning a simple dessert into a gourmet experience.
Alright, let's break down exactly what goes into this masterpiece. The next section will walk you through each ingredient and why it matters.
Inside the Ingredient List
The Flavor Base
Cream cheese is the heart of any cheesecake, providing that dense, velvety texture that melts on the tongue. For this recipe, I use 2 cups (about 8 ounces) of full‑fat cream cheese, which delivers a rich, buttery flavor that’s hard to beat. If you prefer a lighter version, you can swap in a low‑fat cream cheese, but the result will be noticeably less creamy. The key is to let the cream cheese soften to room temperature before mixing; this ensures a smooth blend without lumps. A perfectly blended base is the foundation of a flawless cheesecake.
The next cornerstone is the eggs. They act as the binder, giving the cheesecake structure and a subtle, airy lift. I use three large eggs, which provide enough protein to set the filling while still maintaining a silky mouthfeel. If you’re short on eggs, you can replace one with a tablespoon of sour cream, but the texture will shift slightly. The eggs also carry the vanilla and lemon flavors, so they’re essential for depth. Remember to take them out of the fridge about 30 minutes before you start to avoid shocking the batter with a temperature difference.
The Texture Crew
Granulated sugar is the sweetener that balances the tang of the cream cheese and the tartness of the berries. I use one cup of sugar, which is enough to sweeten without overwhelming the natural flavors. Brown sugar is added to the crust for a subtle caramel note; it also helps the crust brown evenly. Butter is the secret to a tender, cohesive crust, and I use half a cup (about six tablespoons). The butter melts into the crushed graham crackers, creating a buttery, slightly crumbly base that holds the filling together. The combination of butter, brown sugar, and crackers gives the crust a perfect bite.
Sour cream adds a slight tang and extra moisture to the filling, preventing it from drying out during baking. Half a cup of sour cream is sufficient, and it also helps the filling stay light. Lemon zest adds brightness and a subtle citrus note that cuts through the richness. I use one teaspoon of zest, which is enough to provide a noticeable lift. Together, these ingredients create a texture that’s creamy, smooth, and perfectly balanced.
The Unexpected Star
The berries are the showstopper of this cheesecake, offering a burst of color, juiciness, and acidity that contrasts beautifully with the creamy filling. I use a mix of strawberries, blueberries, and raspberries for a vibrant, multi‑layered flavor. Two cups of fresh berries provide a generous topping that’s both sweet and tart. If you’re using frozen berries, thaw them first and pat them dry to avoid excess liquid. The berries are then tossed with a light cornstarch glaze that gives them a glossy finish and a slightly caramelized bite.
Cornstarch is the unsung hero that thickens the berry glaze without adding heaviness. I use one tablespoon of cornstarch, which thickens just enough to cling to the berries. Lemon juice adds acidity and helps the cornstarch set. The glaze not only looks appealing but also prevents the berries from becoming soggy during baking. This glaze is a simple trick that elevates the entire dessert.
The Final Flourish
The graham cracker crust is the foundation that supports the cheesecake and adds a delightful crunch. I crush 1½ cups of graham crackers and mix them with the melted butter, brown sugar, and a pinch of salt. The mixture is pressed firmly into a springform pan, forming an even layer. The crust should be compact yet tender, ready to hold the creamy filling. A well‑made crust adds structure and a contrasting texture that enhances the overall experience.
Once the crust is set, it’s ready for the filling. The filling is poured over the crust and smoothed with a spatula. I then bake the cheesecake at 325°F (165°C) for 30 minutes, or until the edges are set and the center still has a slight wobble. After baking, the cheesecake cools in the oven with the door slightly ajar, preventing cracks from forming. Finally, it’s chilled in the fridge for at least four hours before serving. This meticulous process ensures the cheesecake is silky, airy, and perfectly balanced.
Everything's prepped? Good. Let's get into the real action.
The Method — Step by Step
- Preheat your oven to 325°F (165°C). Line a 9‑inch springform pan with parchment paper, ensuring the paper extends a few inches beyond the rim. This will make removal easier and keep the crust from sticking. Let the oven heat fully for at least 10 minutes so the temperature is stable when you put the pan in. A hot oven ensures an even bake and prevents cracks.
- In a medium bowl, combine the crushed graham crackers, melted butter, brown sugar, and a pinch of salt. Mix until the crumbs are evenly coated and the mixture looks like wet sand. Press the mixture firmly into the bottom of the prepared pan, using the back of a spoon to create an even layer. The crust should be compact but still tender when you press it.
- Allow the crust to set in the fridge for 15 minutes while you prepare the filling. This step is crucial because a chilled crust will hold the filling better and prevent it from sliding off. The cooling time also helps the butter solidify, giving the crust a better texture.
- While the crust chills, take the cream cheese out of the refrigerator and let it sit at room temperature for at least an hour. If you’re in a hurry, cube the cream cheese and microwave it for 10–15 seconds, checking to ensure it doesn’t melt. A softened cream cheese blends smoothly, preventing lumps in the batter.
- In a large mixing bowl, beat the softened cream cheese on medium speed until it’s pale and fluffy. Add the sugar, vanilla extract, and lemon zest, and continue beating until everything is well incorporated. The batter should be smooth and free of streaks. This is the moment of truth; if it’s not smooth, the final cheesecake will be grainy.
- Add the eggs one at a time, beating well after each addition. The eggs bind the mixture and give it structure. Be careful not to overmix; you want to maintain the airy texture. Once all the eggs are incorporated, fold in the sour cream gently until the mixture is silky.
- Pour the batter over the chilled crust, smoothing the top with a spatula. Tap the pan gently on the counter to release any air bubbles. Place the pan in the preheated oven and bake for 30 minutes. The edges should be set, and the center should have a slight wobble when you shake the pan.
- After baking, turn off the oven and leave the cheesecake inside with the door slightly ajar. Let it cool for 1 hour. This gradual cooling prevents sudden temperature changes that can cause cracks. Once it’s at room temperature, wrap the cheesecake in plastic wrap and refrigerate for at least 4 hours, preferably overnight.
- While the cheesecake chills, prepare the berry glaze. In a small saucepan, combine the berries, lemon juice, sugar, and cornstarch. Cook over medium heat, stirring constantly, until the mixture thickens and the berries release their juices. Let it simmer for 2–3 minutes, then remove from heat and let it cool slightly.
- When the cheesecake is fully chilled, remove it from the pan and spread the berry glaze evenly over the top. The glaze should cling to the berries, giving them a glossy, slightly caramelized finish. Let the glaze set for about 15 minutes before slicing. Serve immediately, or refrigerate covered until ready to serve.
That's it — you did it. But hold on, I've got a few more tricks that'll take this to another level.
Insider Tricks for Flawless Results
The Temperature Rule Nobody Follows
Most bakers bake cheesecakes at 350°F, but this temperature is too high for a smooth center. I always set the oven to 325°F, which allows the cheesecake to set slowly and evenly. This lower heat keeps the edges from overcooking while the middle stays creamy. The result is a cheesecake that feels like a cloud in your mouth.
Why Your Nose Knows Best
A simple way to gauge doneness is by smell. When the cheesecake is done, it should emit a warm, sweet aroma, not a raw or chemical scent. If you smell a faint, sweet smell, the cheesecake is ready. This sensory checkpoint saves you from overbaking.
The 5-Minute Rest That Changes Everything
After you remove the cheesecake from the oven, leave it in the closed oven for 5 minutes before opening the door. This trick allows the heat to continue cooking the center gently, preventing a sudden collapse. It also gives the cheesecake a smooth, glossy finish.
Letting the Crust Set Properly
Press the crust firmly into the pan and let it chill for 15 minutes before pouring the batter. A chilled crust holds the filling better and prevents it from sliding off during baking. The extra chill time also ensures the crust stays crisp.
Preventing Cracks on the Top
If you notice the top cracking, it’s often due to overbaking or a sudden temperature drop. Keep the oven door closed and avoid opening it during the first 20 minutes. A gentle, slow bake at 325°F is the secret to a crack‑free top.
Creative Twists and Variations
This recipe is a playground. Here are some of my favorite ways to switch things up:
Chocolate Swirl
Fold melted dark chocolate into half of the batter before baking. The chocolate creates a decadent swirl that pairs beautifully with the berry topping. The result is a chocolate‑berry cheesecake that satisfies any sweet tooth.
Orange Zest and Poppy Seeds
Add orange zest to the batter and sprinkle poppy seeds into the crust. The citrus brightens the flavor, while the seeds add a subtle crunch. This variation feels like a summer brunch dessert.
Almond Crust
Replace graham crackers with almond flour for a nutty, gluten‑free crust. The almond flavor complements the berries and adds a chewy texture. It’s a perfect option for those looking to reduce carbs.
Maple Syrup Sweetener
Swap the granulated sugar for maple syrup to give the cheesecake a subtle caramel note. The maple flavor enhances the berries, creating a warm, comforting dessert. This is ideal for a cozy fall gathering.
Mint‑Infused Berry Topping
Add a few fresh mint leaves to the berry glaze for a refreshing twist. The mint adds a cool contrast to the creamy cheesecake and bright berries. It’s a great choice for a summer party.
Espresso‑Infused Cheesecake
Stir a shot of espresso into the batter for a coffee‑kissed flavor. The espresso adds depth and a subtle bitterness that balances the sweetness. This variation is perfect for coffee lovers who want a sophisticated dessert.
Storing and Bringing It Back to Life
Fridge Storage
Store the cheesecake in the refrigerator for up to five days. Keep it wrapped in plastic wrap to prevent it from drying out. The cheesecake stays moist and creamy, and the berries retain their juiciness.
Freezer Friendly
To freeze, wrap the cheesecake tightly in plastic wrap, then in foil. It will keep well for up to three months. Thaw in the refrigerator overnight before serving. The texture remains smooth, and the berries stay vibrant.
Best Reheating Method
If you need to warm the cheesecake, set the oven to 300°F (150°C). Place the cheesecake on a baking sheet and heat for 10–12 minutes until warmed through. Add a tiny splash of water before reheating to create steam, which keeps the cheesecake from drying out.