Picture this: a cold December night, the house humming with the low thrum of holiday music, and you standing in the kitchen with a half‑finished batch of cookie dough that looks more like a sticky snowdrift than anything edible. I was in the middle of a frantic scramble to get the last‑minute desserts ready for my family’s Christmas Eve gathering when I realized my usual sugar‑sprinkled shortbread was turning into a soggy mess. The scent of butter and vanilla was trying desperately to break through the chaos, but the dough kept clumping like a stubborn snowball refusing to roll. I swear I heard my oven sigh in disappointment as I stared at the dough, wondering if I’d ever salvage this culinary crisis.
Then, in a moment of sheer desperation (and a dash of holiday daring), I tossed a handful of bright red and green sprinkles into the mix, thinking maybe a little festive flair could distract my taste buds from the texture disaster. The moment those tiny jewels hit the dough, something magical happened: the sugar crystals sparked like fireworks against a midnight sky, and the dough instantly brightened, both in color and in spirit. I decided to press the dough into mini muffin tins, creating tiny cups that could hold a surprise filling, and the result was an unexpected burst of crunchy, buttery goodness that sang with a whisper of caramelized edges.
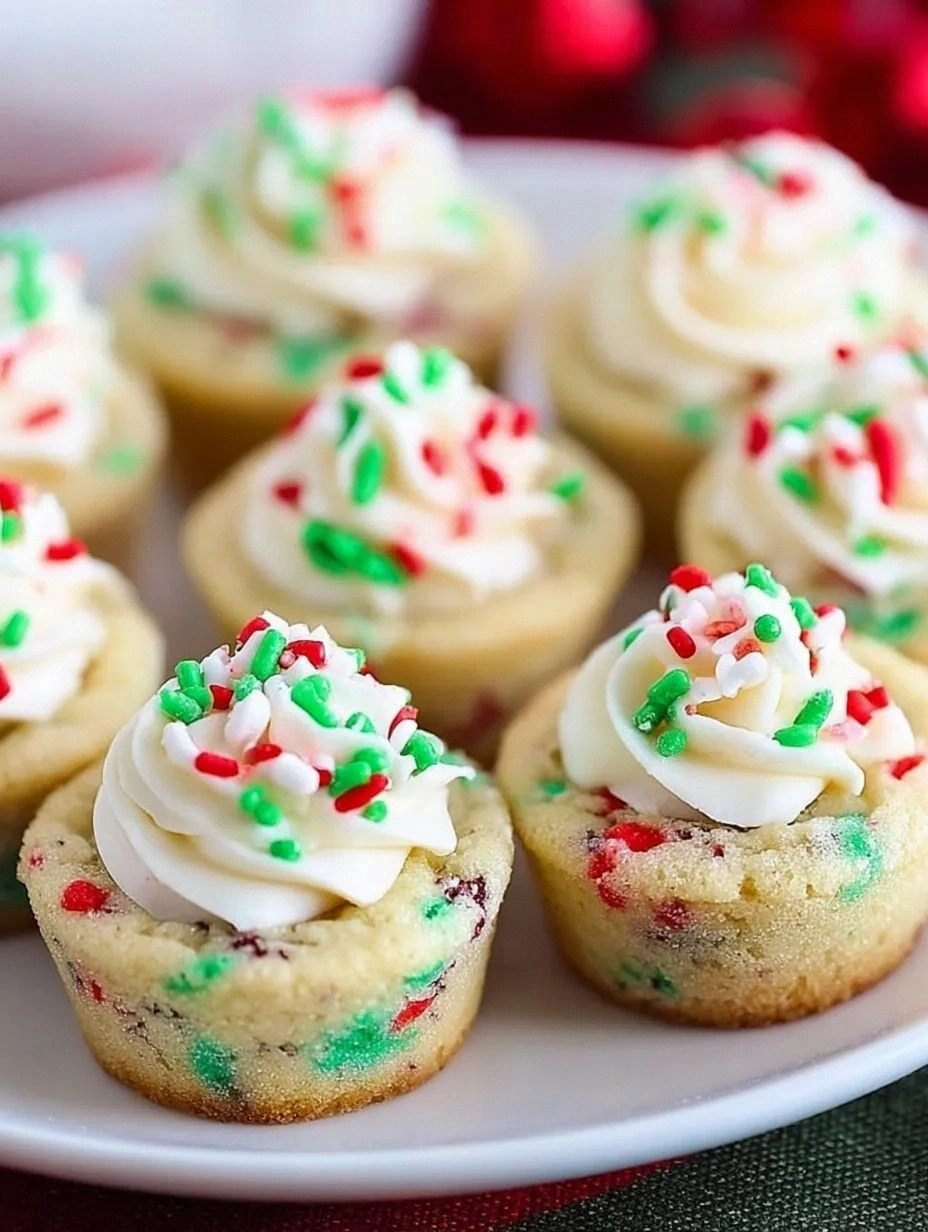
Fast forward to today, and I’ve refined that happy accident into what I confidently call the ultimate festive bite‑sized delight. This isn’t just another cookie recipe; it’s a handheld celebration that captures the sparkle of holiday lights and the comforting hug of a warm kitchen. The secret? A precise balance of crisp butter‑laden dough, a sprinkle‑infused crust that crackles like fresh snow underfoot, and a silky cream cheese frosting that melts in your mouth like a soft snowfall on a pine branch. Most recipes get the texture wrong—either too soft or too crumbly—but this version nails that perfect snap that makes you want to bite again and again.
And here’s the kicker: I’m about to reveal the tiny technique that transforms ordinary sprinkles into a crunchy, caramelized crown that no store‑bought cookie can rival. Trust me, once you master this, you’ll wonder how you ever settled for plain sugar dust. Let me walk you through every single step — by the end, you’ll wonder how you ever made it any other way.
What Makes This Version Stand Out
- Flavor Explosion: The buttery dough is layered with a subtle vanilla undertone, while the sprinkles caramelize during baking, adding a sweet‑to‑toasty contrast that feels like a festive fireworks show in your mouth.
- Texture Triumph: Each cup boasts a crisp, buttery edge that shatters like thin ice, paired with a melt‑in‑your‑mouth creamy center that balances the crunch perfectly.
- Simplicity Redefined: With just a handful of pantry staples and a 30‑minute bake, you get a professional‑grade dessert without any fancy equipment or obscure ingredients.
- Unique Visual Appeal: The sprinkles don’t just sit on top; they fuse into the crust, creating a glittering rim that looks as dazzling as a Christmas tree after lights are strung.
- Crowd‑Pleaser Factor: These bite‑sized wonders disappear faster than cookies at a holiday party, prompting endless requests for seconds and a chorus of “What’s the secret?” from guests.
- Ingredient Quality: Using real butter (not margarine) and pure vanilla extract ensures a depth of flavor that cheap shortcuts simply can’t replicate.
- Cooking Method Magic: Baking in mini muffin tins guarantees uniform shape and size, while the high heat caramelizes the sprinkles without burning the dough.
- Make‑Ahead Potential: Once cooled, the cups store beautifully, letting you prep them ahead of the festivities and spend more time mingling than whisking.
Inside the Ingredient List
The Flavor Base
Unsalted Butter (2 cups, softened): Butter is the soul of these cups, delivering that rich, melt‑in‑your‑mouth mouthfeel. Using unsalted lets you control the salt level precisely, ensuring the sweet‑sprinkle contrast shines. If you skip the butter and use oil, you’ll lose that tender crumb and end up with a greasy texture that never snaps.
Granulated Sugar (¾ cup): Sugar sweetens and helps create a slightly crisp exterior as it caramelizes with the sprinkles. For a deeper flavor, you can substitute half with light brown sugar, which adds a subtle molasses note.
Vanilla Extract (2 tsp): Pure vanilla adds aromatic depth that makes the butter flavor sing. I always use a high‑quality extract; cheap imitation can taste flat and ruin the festive vibe.
The Texture Crew
All‑Purpose Flour (2 cups): Flour provides the structure, and the amount is crucial for that perfect snap. Using cake flour will make the cookies too tender, while bread flour can make them tough. Measure by spooning into the cup and leveling off for accuracy.
Baking Powder (1 tsp): A modest lift helps the cups rise just enough to form a delicate dome without becoming cake‑like. Too much, and you’ll get a puffy, uneven texture that defeats the crisp goal.
Salt (½ tsp): A pinch of salt amplifies the sweetness and balances the buttery richness. Skipping salt is a common mistake that leaves the flavor flat and one‑dimensional.
The Unexpected Star
Holiday Sprinkles (½ cup, mixed red, green, and white): These aren’t just for show; they caramelize into a crunchy, sweet crust that adds both visual sparkle and textural contrast. If you’re feeling adventurous, try a blend of non‑pareve and chocolate sprinkles for a surprise pop of flavor.
Cream Cheese (8 oz, softened): The filling’s silky smoothness counterbalances the crisp cup, creating a luxurious bite. Using full‑fat cream cheese ensures a rich, creamy consistency; low‑fat versions can become grainy.
Powdered Sugar (¼ cup): Sweetens the cream cheese filling without adding extra moisture, keeping the texture light and airy.
The Final Flourish
Fresh Lemon Zest (1 tsp): A whisper of citrus lifts the overall flavor, cutting through the richness and adding a bright, festive note. If you’re not a fan of lemon, orange zest works just as well.
Heavy Cream (2 tbsp): Incorporating a splash of cream into the filling makes it extra smooth and helps it set nicely once chilled.
Optional Edible Glitter (pinch): For those who want an extra wow factor, a tiny sprinkle of edible glitter on the finished cups adds a magical sparkle that catches the light at any holiday gathering.
Everything's prepped? Good. Let's get into the real action...
The Method — Step by Step
Begin by preheating your oven to 350°F (175°C). While the oven warms, line a 12‑cup mini muffin tin with paper liners or lightly grease it. This step ensures the cups release cleanly later, preventing any heartbreaking breakage.
Kitchen Hack: If you’re short on paper liners, lightly dust the tins with flour after greasing; this creates a non‑stick barrier that releases the cups effortlessly.In a large mixing bowl, cream together the softened butter and granulated sugar until the mixture is pale, fluffy, and smells like a summer kitchen—this should take about 3 minutes on medium speed. The air you incorporate now is the secret to that delicate crumb later.
Add the vanilla extract and lemon zest, beating just until combined. The zest will release aromatic oils that mingle with the butter, giving each bite a subtle zing that brightens the overall profile.
In a separate bowl, whisk together the flour, baking powder, and salt. This dry blend ensures even distribution of leavening and prevents any pockets of flour that could cause uneven baking.
Gradually add the dry ingredients to the butter‑sugar mixture, mixing on low speed until a cohesive dough forms. It should feel slightly sticky but manageable—if it feels too wet, sprinkle in a tablespoon of flour at a time.
Watch Out: Over‑mixing at this stage can develop gluten, resulting in a tough cookie. Stop as soon as the dough comes together.Fold in the holiday sprinkles, making sure they are evenly distributed throughout the dough. As the sprinkles coat the dough, they’ll begin to release a faint caramel scent—a sign that the magic is about to happen.
Divide the dough evenly among the prepared muffin cups, pressing each portion down firmly with the back of a spoon or your fingertips. Aim for a uniform thickness of about ¼ inch; this ensures each cup bakes evenly and develops that coveted crisp edge.
Kitchen Hack: Use a small cookie scoop to portion the dough; this guarantees consistent size and speeds up the process.Place the tin in the preheated oven and bake for 12‑15 minutes, or until the edges turn a light golden brown and you can smell the sweet caramelization of the sprinkles. The tops should look set but not overly dark; a subtle amber hue is perfect.
While the cups are cooling, whip the cream cheese, powdered sugar, and heavy cream together until smooth and fluffy—about 2 minutes on high speed. The mixture should be thick enough to pipe but still soft enough to spread with a spoon.
Once the cookie cups have cooled completely (this is crucial—if they’re warm, the filling will melt), gently remove them from the tin. Spoon or pipe a dollop of the cream cheese filling into each cup, smoothing the top with the back of a small spatula.
For an extra festive touch, sprinkle a pinch of edible glitter or a few extra sprinkles on top of the filling. This final flourish adds visual sparkle that will catch the eye of every guest.
Refrigerate the assembled cups for at least 20 minutes before serving. This brief chill sets the filling and sharpens the cookie’s crispness, delivering that perfect bite‑size contrast we promised.
That's it — you did it. But hold on, I've got a few more tricks that'll take this to another level...
Insider Tricks for Flawless Results
The Temperature Rule Nobody Follows
Never bake these cups straight from a warm kitchen. Cold dough yields a tighter crumb and prevents spreading, which is why I always chill the dough for at least 15 minutes before pressing. I once tried to skip this step in a rush, and the cups flattened into a sad, chewy mess that never recovered. The rule of thumb: cooler dough = sharper edges.
Why Your Nose Knows Best
When the sprinkles start to caramelize, you’ll notice a sweet, buttery aroma that fills the kitchen. Trust that scent as your cue—once the fragrance turns nutty, the cookies are on the brink of perfection. Relying on visual cues alone can be deceptive; the nose is the most reliable timer.
The 5‑Minute Rest That Changes Everything
After baking, let the cups sit on a wire rack for exactly five minutes before removing them from the tin. This short rest allows the steam to escape, preventing the bottoms from getting soggy. Skipping this pause can lead to a gummy base that ruins the snap.
Butter Temperature Tactics
Softened butter should be pliable but not melted. If it’s too soft, the dough spreads too much; if it’s too firm, the dough won’t come together. The sweet spot is when you can press a finger into the butter and leave a shallow indentation that springs back slowly.
Filling Consistency Command
The cream cheese filling should be smooth but not runny. If it looks too thick, add a splash of milk or extra heavy cream, one teaspoon at a time. Conversely, if it’s too loose, a quick chill in the fridge will firm it up without compromising flavor.
Sprinkle Placement Perfection
For an even caramelized rim, press the sprinkles gently into the dough before baking, ensuring they’re not just sitting on top. This technique creates a crunchy border that stays attached even after cooling, giving each bite a consistent texture.
Creative Twists and Variations
This recipe is a playground. Here are some of my favorite ways to switch things up:
Chocolate Dream
Swap half of the all‑purpose flour for cocoa powder and replace the vanilla extract with almond extract. Add a drizzle of melted dark chocolate over the cream cheese filling for a decadent, holiday‑ready treat that satisfies any chocolate lover.
Nutty Noel
Fold finely chopped toasted pecans or walnuts into the dough, and sprinkle a few extra on top before baking. The nuts add a buttery crunch that pairs beautifully with the sweet sprinkles, creating a sophisticated flavor profile.
Spiced Citrus
Incorporate a pinch of ground cinnamon and a dash of orange zest into the dough. The warm spice melds with the citrus to evoke the scent of mulled wine, perfect for a cozy winter gathering.
Vegan Velvet
Replace butter with coconut oil, use a plant‑based cream cheese alternative, and swap powdered sugar for a fine coconut sugar blend. The result is a dairy‑free version that still delivers that crisp‑and‑creamy experience.
Mini Ice‑Cream Cones
After the cups have cooled, fill them with a scoop of vanilla bean ice cream and top with a drizzle of caramel sauce. The cold‑cream contrast against the warm cookie creates an instant crowd‑pleasing dessert.
Holiday Savory Twist
Omit the sprinkles and instead fold in finely grated Parmesan and a pinch of rosemary into the dough. Fill with a savory herb goat cheese spread for a festive appetizer that breaks the sweet‑only tradition.
Storing and Bringing It Back to Life
Fridge Storage
Place the cooled cookie cups in an airtight container lined with parchment paper. They’ll stay fresh for up to five days, maintaining their crispness thanks to the sealed environment that prevents moisture absorption.
Freezer Friendly
Wrap each cup individually in plastic wrap, then stack them in a freezer‑safe zip‑top bag. They freeze beautifully for up to three months. When you’re ready to serve, let them thaw at room temperature for 20 minutes, then pop them in a 300°F oven for five minutes to revive the crunch.
Best Reheating Method
To restore that just‑baked snap, preheat your oven to 300°F and bake the cups for 3‑4 minutes. Adding a tiny splash of water to the baking tray creates a gentle steam that re‑hydrates the interior without sogging the crust, delivering a perfect balance of soft filling and crisp shell.