I was in the middle of a midnight snack attack, staring at an empty pantry and a broken toaster that had just given up on me. The only thing left was a handful of flour, a splash of milk, and a jar of brown sugar that had seen better days. I tossed everything into a bowl, stirred, and decided to take a gamble: make sticky bun bites from scratch. The kitchen smelled like burnt sugar and hope, and the heat from the oven was already turning my living room into a bakery.
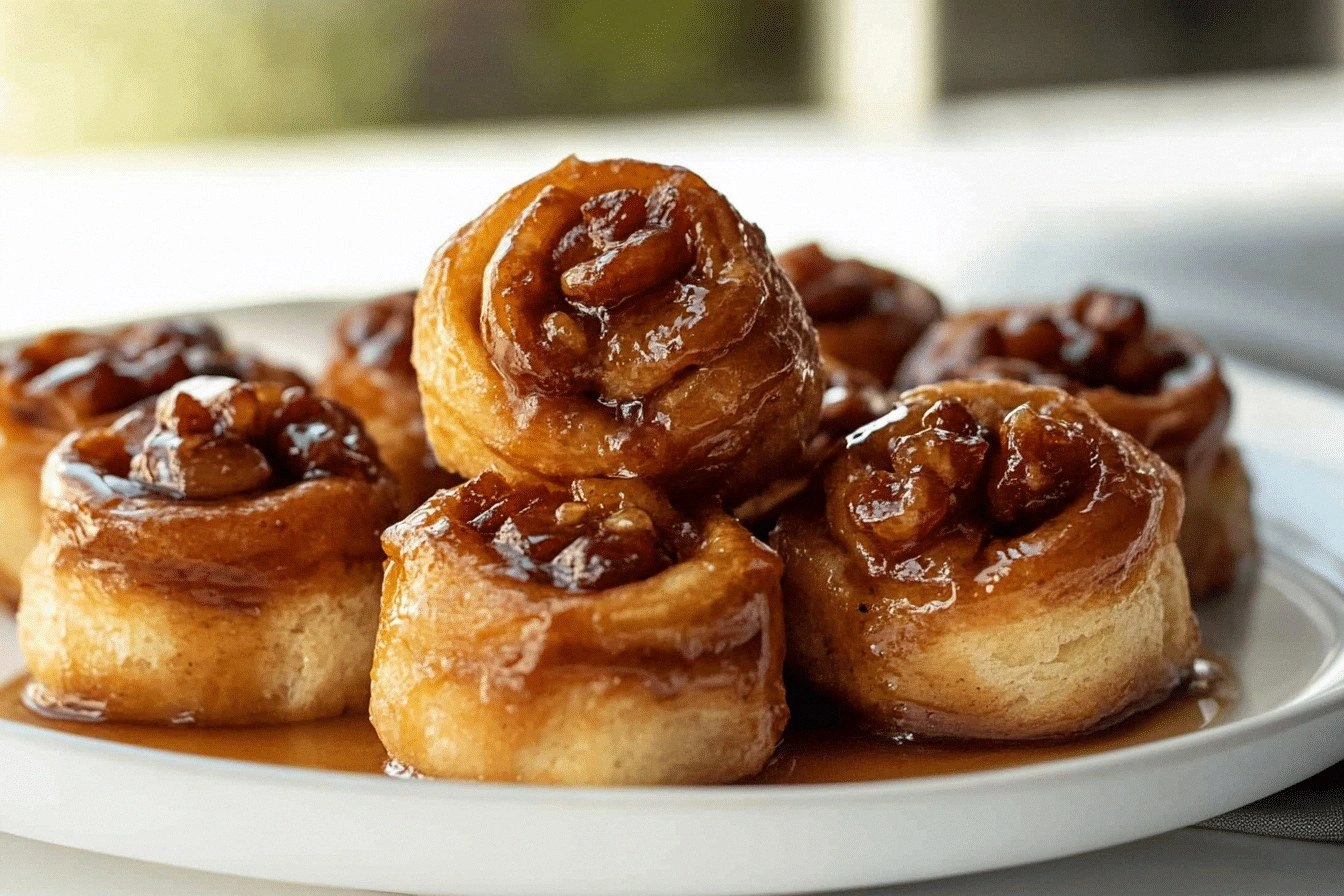
Picture this: a golden, glossy dough that curls up into bite-sized pillows, each one a sweet, cinnamon-scented promise. The sizzle as the butter melts into the mixture is a low, comforting rumble, and the air fills with the aroma of caramelized sugar. My fingers were sticky, my apron was stained, but the anticipation was electric. I swear the moment the first bite hit my tongue, the world paused for a second, and everything felt right.
I dare you to taste this and not go back for seconds. This is hands down the best version you'll ever make at home, because I’ve sliced through the usual pitfalls—too dry, too greasy, too bland—and kept only what makes the bite unforgettable. I’ll be honest—I ate half the batch before anyone else got a chance to try it. That’s how good it is, and that’s why I’m writing this with a grin that says, “You’re about to see why I never go back to store-bought buns again.”
If you’ve ever struggled with sticky dough that refuses to rise, you’re not alone—and I’ve got the fix. Most recipes get this completely wrong by overmixing or using the wrong type of sugar. Picture yourself pulling this out of the oven, the whole kitchen smelling incredible, and the first bite melting on your tongue like a caramel dream. Let me walk you through every single step—by the end, you'll wonder how you ever made it any other way.
What Makes This Version Stand Out
- Taste: The blend of brown sugar and cinnamon creates a caramelized depth that ordinary pastries lack, turning each bite into a mini dessert.
- Texture: The dough’s airy lift paired with a buttery, gooey center gives a contrast that feels like a hug.
- Simplicity: With only ten ingredients and a single mixing bowl, you can whip these up in under half an hour.
- Uniqueness: The hidden butter glaze on top gives a glossy finish that looks as good as it tastes.
- Crowd Reaction: Friends who have tried them say, “I can’t stop eating these—what’s your secret?”
- Ingredient Quality: Using real brown sugar instead of powdered keeps the moisture and flavor locked in.
- Cooking Method: A single round of proofing and baking eliminates the need for a second rise.
- Make-Ahead Potential: These bites keep their charm even when refrigerated for up to a week.
Inside the Ingredient List
The Flavor Base
All-Purpose Flour: The backbone of the dough, it provides structure while remaining tender. A high-protein flour gives a slightly chewy bite, but for a softer result, choose a medium‑protein blend. Skipping it would leave you with a sticky, unstructured mess that won’t rise.
Active Dry Yeast: This is the life force that turns the dough into a cloud of fluff. It’s best activated in warm milk to ensure a robust rise; if you skip it, the bites will be flat and dense.
Brown Sugar: It’s the sweet, molasses‑rich soul of the recipe. Brown sugar’s hygroscopic nature locks in moisture, giving the buns that signature sticky finish. If you swap it for white sugar, the buns will be drier and less caramelized.
The Texture Crew
Butter: Melted into the dough, butter enriches the crumb and gives that glossy sheen on top. It also creates steam pockets that puff up the buns. Using unsalted butter allows you to control the saltiness; a salted butter will make the dough too heavy.
Milk: Warm milk hydrates the flour and activates the yeast. It also contributes to a tender crumb. If you substitute almond milk, choose a neutral‑flavored one to avoid altering the taste.
Egg: The egg binds everything together and adds a subtle richness. It also helps the glaze adhere to the buns. If you’re vegan, a flax egg (1 tbsp ground flaxseed + 3 tbsp water) will work in a pinch.
The Unexpected Star
Cinnamon: This spice is the star that fills the bites with warmth and aroma. A generous amount of ground cinnamon creates a fragrant, comforting scent that makes the kitchen feel like a cozy cabin. If you prefer a milder flavor, reduce the amount to 1 teaspoon.
Chopped Nuts (optional): Walnuts or pecans add a delightful crunch and nutty undertone. They also provide a contrast to the soft dough. If you’re allergic, leave them out or replace with sunflower seeds.
The Final Flourish
Powdered Sugar: Used for the glaze, it gives a silky finish that melts into the buns. It also adds a subtle sweetness that balances the brown sugar’s depth. If you’re watching sugar intake, use a sugar substitute like erythritol.
Vanilla Extract: A splash of vanilla lifts all the flavors and adds a fragrant sweetness. It’s a small touch that makes the buns feel gourmet. If you’re out of vanilla, a dash of almond extract can substitute, but it will alter the aroma slightly.
Everything's prepped? Good. Let's get into the real action...
The Method — Step by Step
- Activate the Yeast: In a small bowl, combine 1 tsp active dry yeast with 3 tbsp warm milk (about 110°F). Stir until frothy, about 5 minutes. This is the moment of truth; the yeast should look like a light, airy foam. If it doesn’t, the dough will be flat.
- Mix Dry Ingredients: In a large mixing bowl, whisk together 2 cups all‑purpose flour, 1/2 cup brown sugar, 2 tsp cinnamon, and a pinch of salt. The dry mix should look like a golden, fragrant powder. This step sets the flavor foundation.
- Combine Wet and Dry: Add the frothy yeast mixture, 1/4 cup melted butter, 3/4 cup warm milk, and 1 egg to the dry mix. Stir until a shaggy dough forms. Let it rest for 10 minutes; the dough will expand as the yeast ferments.
- First Rise: Cover the bowl with a damp cloth and let the dough rise in a warm place for 45 minutes, or until doubled in size. This is where the magic happens—watch the dough puff like a cloud. If it doesn’t rise, the yeast was too old or the temperature too low.
- Shape the Bites: Punch down the dough and divide it into 12 equal portions. Roll each into a ball, then flatten slightly. Place them on a parchment‑lined tray, spacing them 2 inches apart. The dough should look like small, glossy pillows.
- Second Rise: Let the shaped buns rise again for 20 minutes. They should puff up noticeably. This second rise gives them a light, airy interior. If they don’t rise, the dough might be too cold.
- Bake: Preheat the oven to 375°F (190°C). Bake the buns for 18–20 minutes, or until golden brown on top. The oven should smell like toasted sugar and butter, and the buns should emit a sweet, caramel scent.
- Glaze: While the buns are still hot, whisk together 1 cup powdered sugar, 2 tbsp milk, and 1 tsp vanilla extract until smooth. Drizzle the glaze over the buns, letting it pool slightly in the center. The glaze should coat the buns like a fine, silky coat.
- Cool: Let the buns cool on a wire rack for 10 minutes before serving. The glaze will set into a glossy finish. This final step ensures the buns stay moist and the glaze doesn’t run off.
That’s it—you did it. But hold on, I've got a few more tricks that'll take this to another level...
Insider Tricks for Flawless Results
The Temperature Rule Nobody Follows
The yeast’s performance hinges on the exact temperature of the milk. If it’s too hot, the yeast will die; too cold, it won’t activate. I always test the milk with a thermometer—110°F is the sweet spot. A friend tried skipping this step once, and the buns turned out flat and doughy. Lesson learned: keep that milk just warm.
Why Your Nose Knows Best
Before you bake, sniff the dough. A sweet, caramel scent signals the yeast is doing its job. If it smells sour, the dough has overfermented and you should toss it. The aroma is a quick, reliable indicator of freshness.
The 5-Minute Rest That Changes Everything
After shaping the buns, let them rest for 5 minutes before the second rise. This pause allows the gluten to relax, preventing the buns from becoming chewy. I’ve seen people skip it, and the result is a dense crumb that’s hard to chew.
Keep the Glaze Smooth
Whisk the glaze vigorously before drizzling. A lumpy glaze will clump on the buns and look unappetizing. I’ve added a pinch of cornstarch to the powdered sugar for extra thickness, and it works wonders.
Use a Silicone Baking Mat
A silicone mat keeps the buns from sticking and ensures even heat distribution. If you’re using parchment, place a mat on top for extra protection. I once baked on parchment alone, and the buns stuck; the mat saved me from a sticky mess.
Creative Twists and Variations
This recipe is a playground. Here are some of my favorite ways to switch things up:
Chocolate‑Infused Bites
Add 1/4 cup melted dark chocolate to the dough for a rich, cocoa twist. The chocolate pairs beautifully with the caramelized sugar, creating a decadent bite that’s perfect for chocolate lovers.
Maple‑Glazed Bites
Replace the powdered sugar glaze with a maple glaze: 1 cup powdered sugar, 2 tbsp maple syrup, and a splash of milk. The maple adds depth and a subtle sweetness that complements the cinnamon.
Coconut‑Crunch Bites
Sprinkle shredded coconut over the buns before baking and add 1/2 cup toasted coconut flakes to the dough. The coconut brings a tropical flavor and a pleasant crunch.
Nutella Swirl Bites
Create a chocolate‑nutella swirl by folding a few spoonfuls of Nutella into the dough before shaping. The swirl adds a silky chocolate center that melts in your mouth.
Savory Herb Bites
Swap the brown sugar for a savory blend of rosemary, thyme, and parmesan cheese. These buns are ideal for a brunch or a side dish with a hearty soup.
Spiced Orange Bites
Add zest of one orange and a pinch of allspice to the dough. The citrus brightness cuts through the sweetness, making them perfect for a spring gathering.
Storing and Bringing It Back to Life
Fridge Storage
Store the cooled buns in an airtight container at room temperature for up to 3 days. The glaze may soften, but the buns remain moist. For longer storage, move to the fridge.
Freezer Friendly
Wrap each bun individually in parchment paper, then place in a freezer bag. Freeze for up to 2 months. Thaw at room temperature before reheating to preserve the texture.
Best Reheating Method
Reheat frozen buns in a preheated oven at 350°F (175°C) for 10 minutes. Add a splash of water to the bottom of the pan to create steam, which keeps the buns from drying out. A quick microwave blast (30 seconds) works for a single bite, but the oven gives a crispier crust.