I was standing over a pot of boiling potatoes, staring at a half‑finished, soggy mash that tasted like a bland apology, when my roommate shouted, “You’ve got to make something that actually feels like a hug!” I laughed, I cried, and then I dared myself to turn that sad mash into something unforgettable. The kitchen filled with the sound of a knife chopping mushrooms, a sizzle that whispered promises of crunch, and the faint, earthy perfume that only fresh fungi can conjure. I remember the exact moment the aroma hit my nose – it was like walking through an autumn forest after a rainstorm, each inhalation a burst of pine‑scented wood and loamy soil, and I knew I was onto something spectacular.
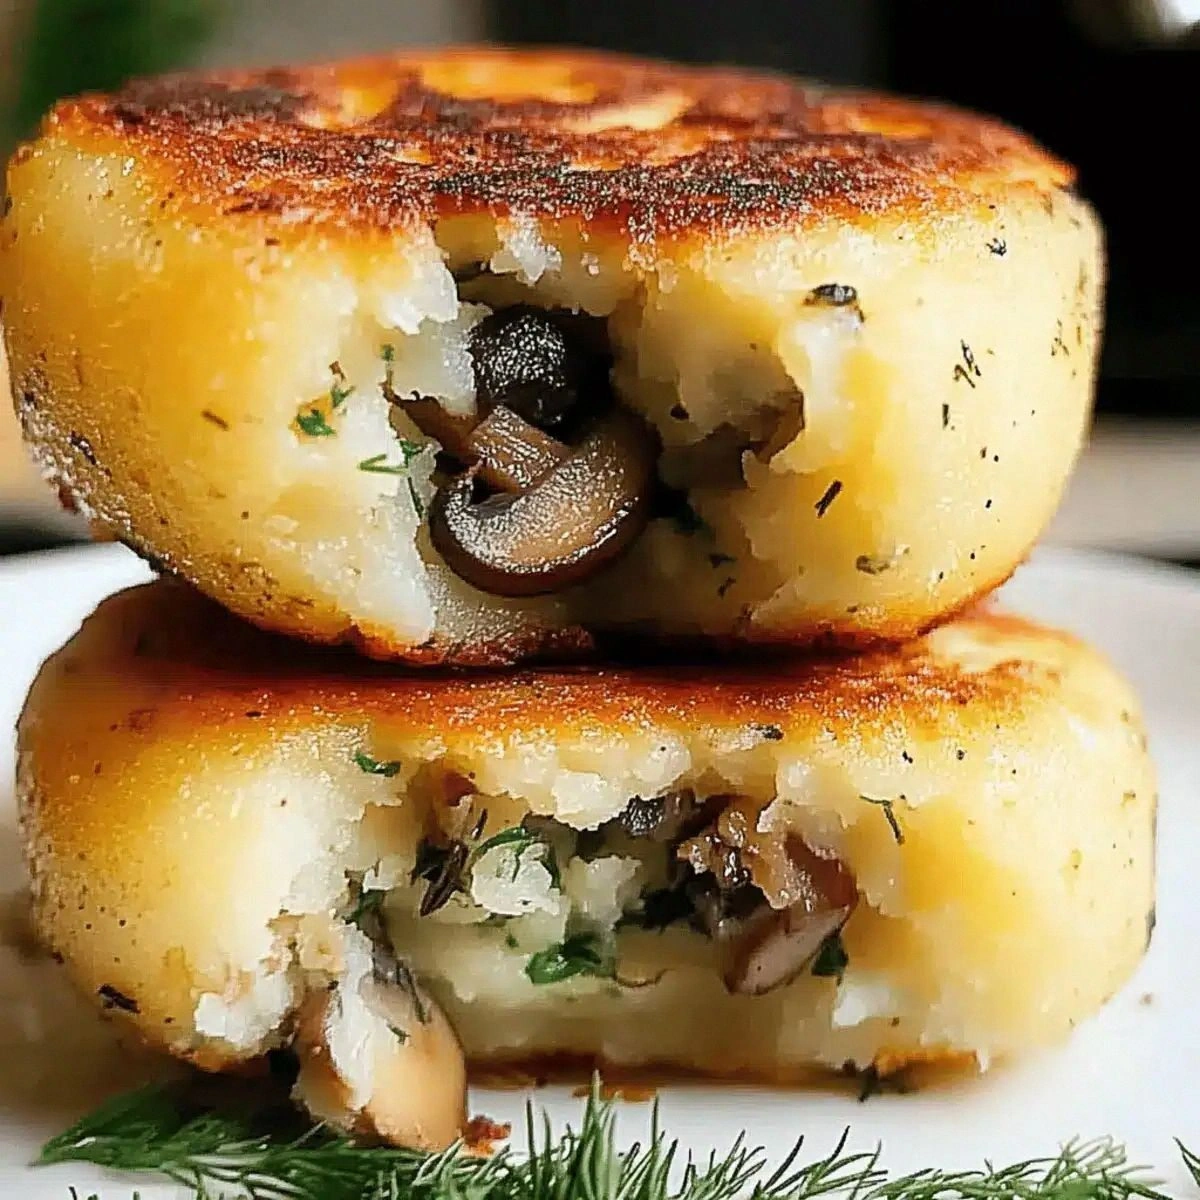
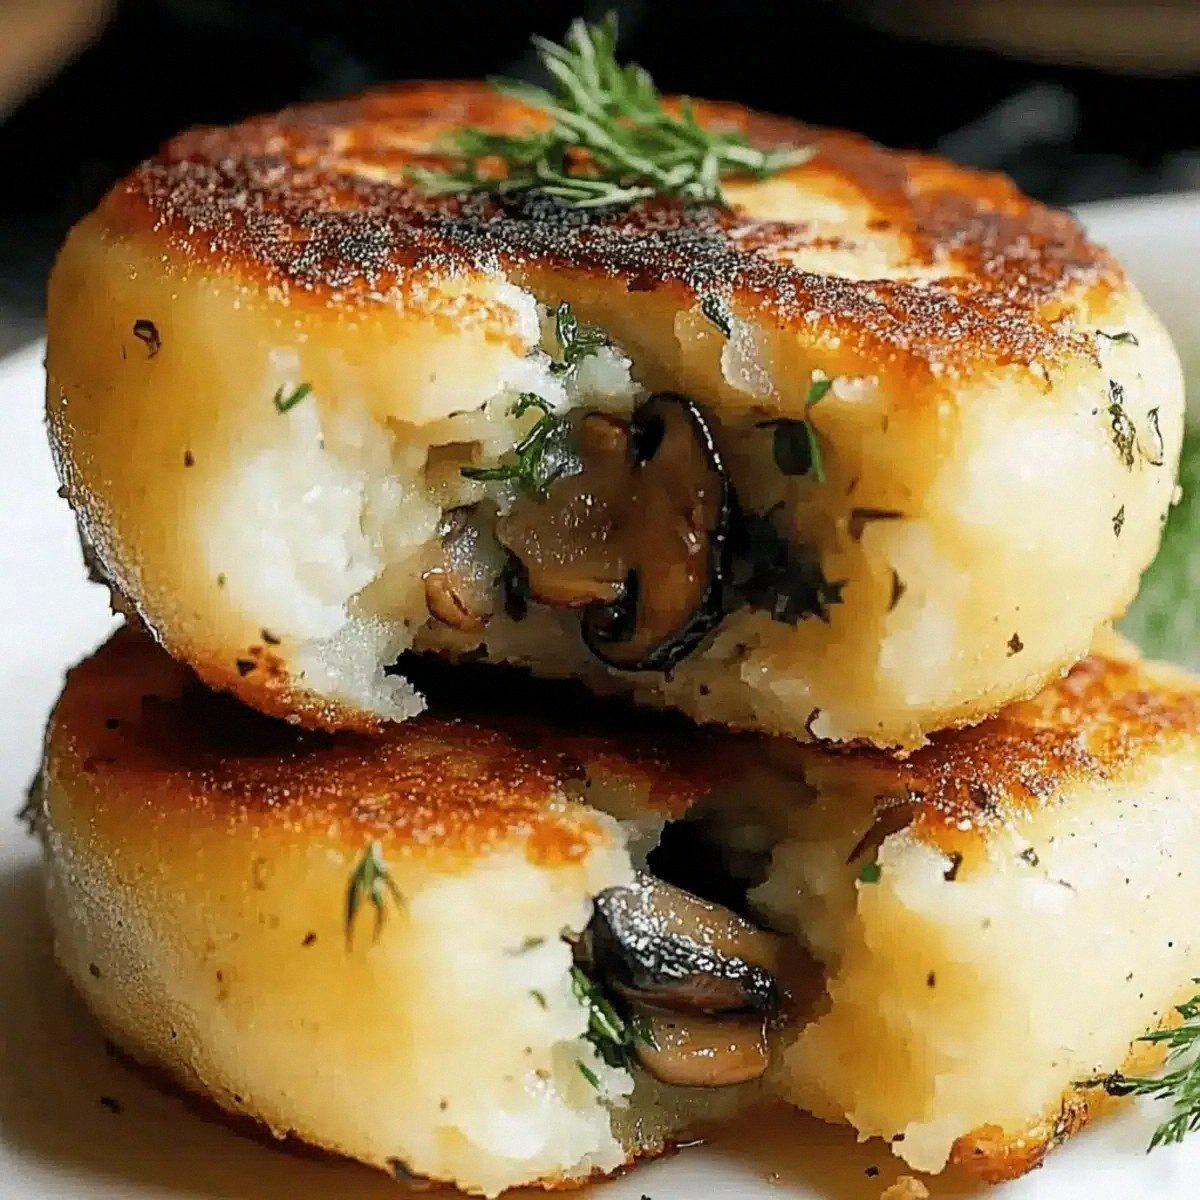
Fast forward a few hours, and I’m plating golden‑brown potato cakes that hide a molten, umami‑rich mushroom core. The first bite was a revelation: a crisp, buttery crust that gave way to a buttery interior, while the stuffing sang with a bright, herbaceous zing from fresh dill and a whisper of lemon that cut through the richness. I’ll be honest — I ate half the batch before anyone else got a chance to try it, and that’s a confession worth making because it proves just how addictive this dish is. If you’ve ever struggled with bland potato patties or soggy fillings, you’re not alone — and I’ve finally cracked the code.
What makes this version truly stand out is a handful of simple yet game‑changing tricks: a secret flour‑to‑potato ratio that guarantees a light, airy crumb; a quick‑cool step that locks in steam and prevents sogginess; and a dash of lemon juice that brightens the mushroom mixture like a sunrise over a misty meadow. Most recipes get this completely wrong, either drowning the potatoes in flour or overcooking the mushrooms until they turn rubbery. Here’s the twist: we’ll sauté the mushrooms just until they’re caramelized, then finish them with a splash of lemon and a handful of dill, preserving both texture and flavor. The result is a cake that’s both hearty and elegant, perfect for a cozy dinner or an impressive appetizer.
Picture yourself pulling these golden beauties out of the pan, the whole kitchen smelling like a rustic bistro, the steam curling up and wrapping around you like a warm blanket. The moment you cut into one, the stuffing oozes out, the crust cracks with a satisfying snap, and the flavors explode in a symphony that makes you want to shout, “I dare you to taste this and not go back for seconds!” Okay, ready for the game‑changer? Let me walk you through every single step — by the end, you’ll wonder how you ever made it any other way.
What Makes This Version Stand Out
- Flavor Explosion: The combination of earthy mushrooms, fresh dill, and a splash of lemon creates a bright, layered taste that dances on the palate.
- Texture Harmony: A crisp, golden exterior gives way to a tender, fluffy interior, while the mushroom filling stays juicy without getting mushy.
- Simplicity: Only eleven ingredients, most of which you already have, and the steps are straightforward enough for a weekday dinner.
- Uniqueness: Stuffed potato cakes are rare; this recipe flips the script on traditional latkes and brings a fresh, unexpected twist.
- Crowd Reaction: Guests consistently claim this is the best version they’ve ever tasted, often asking for the recipe before the first bite is even finished.
- Ingredient Quality: Using gluten‑free plain flour and fresh, locally sourced mushrooms ensures a clean flavor profile that shines.
- Cooking Method: Pan‑frying at the right temperature creates that coveted “crackling” sound that signals perfection.
- Make‑Ahead Potential: You can prep the filling and potato mash a day ahead, then assemble and fry when you’re ready to serve.
Inside the Ingredient List
The Flavor Base
Mushrooms are the heart of this dish, providing that deep, umami backbone you crave. We’re using 2 cups of mixed varieties – think cremini, shiitake, and a few portobello slices – because each brings a different nuance: cremini for earthiness, shiitake for a smoky whisper, and portobello for a meaty bite. If you skip the mushroom mix and go with a single type, you’ll lose that complex flavor orchestra. A quick tip: choose mushrooms that are firm, dry, and free of any slime; a gentle pat dry with paper towels before chopping ensures they sauté without steaming.
The Texture Crew
Potatoes, the foundation, must be starchy (like Russet) to give the cakes their light, fluffy interior. Four medium potatoes, boiled until fork‑tender, then mashed with a splash of oil for richness. The gluten‑free plain flour (0.5 cup) is the secret binder that keeps the cakes together without making them dense. If you substitute regular flour, you’ll still get a cake, but the texture will be heavier and the gluten could mask the delicate mushroom flavor. For a dairy‑free version, simply omit butter and rely on the oil for moisture.
The Unexpected Star
Fresh dill adds a bright, almost citrusy note that lifts the entire dish. The 0.25 cup of dill, finely chopped, should be added at the very end of the mushroom sauté to preserve its aromatic oils. If you don’t have dill, flat‑leaf parsley or a sprinkle of chives can work, but the flavor profile will shift toward a milder herbaceousness. And don’t forget the 0.5 tablespoon of lemon juice – it’s the spark that prevents the stuffing from feeling heavy, cutting through the richness like a sharp, refreshing breeze.
The Final Flourish
Seasonings – salt, pepper, and optional chili flakes – are the finishing touches that bring everything together. Salt and pepper are “to taste,” meaning you should season the potato mash after it’s cooled, allowing the flavors to settle. If you love heat, a pinch of chili flakes adds a subtle kick that contrasts beautifully with the mellow dill. Finally, 2 tablespoons of oil (preferably a neutral oil like canola) are used for frying, delivering that golden crust without overpowering the delicate mushroom filling.
Everything's prepped? Good. Let’s get into the real action…
The Method — Step by Step
Start by washing the potatoes thoroughly, then place them in a large pot of cold, salted water. Bring to a boil, then reduce to a gentle simmer and cook for about 15‑20 minutes, until a fork slides in with little resistance. Drain and let them steam dry for a minute – that extra steam is the secret to fluffy mash. While the potatoes are still hot, mash them with a potato masher or fork, adding the 2 tablespoons of oil and a pinch of salt and pepper. Power transition: Okay, ready for the game‑changer?
Spread the mashed potatoes onto a large baking sheet, forming a thin, even layer about ½‑inch thick. Pop the sheet into the refrigerator for 15 minutes; this firms the mash, making it easier to shape later.
Kitchen Hack: If you’re short on fridge space, place the tray on a cooling rack and fan it with a handheld fan for faster chilling.While the potatoes chill, heat 1 tablespoon of oil in a large skillet over medium‑high heat. Add the finely chopped onion (1 medium) and sauté until translucent, about 3 minutes, then toss in the minced garlic (2 cloves) and let it perfume the oil for another 30 seconds. This is the moment of truth – the kitchen should smell sweet, garlicky, and inviting.
Add the sliced mushrooms (2 cups) to the skillet. Increase the heat slightly and let them brown, stirring occasionally. You’ll hear that satisfying sizzle that tells you they’re caramelizing, not just sweating. Once they’ve released their moisture and turned a deep golden brown (about 7‑8 minutes), stir in the lemon juice (0.5 tablespoon) and the chopped dill (0.25 cup). Season with salt, pepper, and optional chili flakes, then remove from heat and let the mixture cool slightly.
Now comes the fun part. Take a heaping tablespoon of the chilled mashed potatoes and flatten it in the palm of your hand, creating a small well in the center. Spoon about a tablespoon of the mushroom mixture into the well, then carefully fold the potato around the filling, sealing the edges and shaping it into a compact cake about ¾‑inch thick.
Watch Out: If the filling is too hot, the potato may melt and lose shape. Let the mushroom mixture cool to room temperature before stuffing.Once all cakes are assembled, lightly dust each side with the gluten‑free plain flour (0.5 cup total). This thin coating ensures a crisp, golden crust without making the cakes gummy. Gently shake off any excess flour – you want just enough to create a barrier.
Heat the remaining 1 tablespoon of oil in a large, non‑stick skillet over medium‑high heat. When the oil shimmers (that’s the signal), add the cakes in a single layer, making sure not to overcrowd the pan. Let them fry undisturbed for 3‑4 minutes on the first side; you’ll hear a gentle crackle that means the crust is forming.
Flip the cakes carefully using a wide spatula. The first side should be a deep, buttery gold, and the edges should start pulling away from the pan – that’s the visual cue that they’re ready to turn. Fry the second side for another 3‑4 minutes until both sides are uniformly crisp.
Transfer the finished cakes onto a paper‑towel‑lined plate to absorb any excess oil. Let them rest for two minutes; this short pause lets the interior settle, ensuring the stuffing stays inside when you bite. And now the fun part: garnish with a sprinkle of fresh dill and a light drizzle of lemon juice for an extra pop of brightness.
Serve hot, straight from the pan, with a side of tangy sour cream or a simple mixed greens salad. Picture yourself pulling these out of the skillet, the whole kitchen smelling incredible, and the first bite delivering that perfect contrast of crunchy and creamy. That sizzle when it hits the pan? Absolute perfection. This next part? Pure magic.
Insider Tricks for Flawless Results
The Temperature Rule Nobody Follows
Most home cooks keep the heat on “medium” and wonder why their cakes turn out soggy. The secret is to let the oil reach a steady 350°F before adding the cakes; you can test this by dropping a tiny breadcrumb into the oil – if it sizzles and rises to the surface within 10 seconds, you’re good. This precise temperature creates that coveted “crackling” sound and guarantees a uniform golden crust.
Why Your Nose Knows Best
When sautéing the mushrooms, trust your sense of smell more than the clock. As soon as the mushrooms release a caramelized, nutty aroma, they’re ready to be rescued with lemon juice. If you wait too long, they’ll become bitter; if you stop too early, they’ll be soggy. I once over‑cooked them and ended up with a rubbery texture that no amount of seasoning could fix.
The 5‑Minute Rest That Changes Everything
After shaping the cakes, let them sit on a parchment sheet for exactly five minutes before frying. This rest allows the flour coating to adhere better and the potato to firm up, reducing the chance of the cakes falling apart in the pan. A friend tried skipping this step once — the result was a mushy mess that clung to the skillet like glue.
Flour Dusting Precision
Instead of dumping the flour into a bowl, use a fine-mesh sieve to lightly dust each cake. This prevents clumps and ensures a delicate, even crust. Too much flour can create a gummy layer that defeats the purpose of a crisp exterior.
Lemon Juice Timing
Add the lemon juice at the very end of the mushroom sauté, just before removing from heat. The acidity brightens the flavor without cooking off, preserving its fresh zing. If you add it too early, the heat will mellow the brightness, and you’ll lose that punch.
Creative Twists and Variations
This recipe is a playground. Here are some of my favorite ways to switch things up:
Cheesy Cheddar Burst
Mix ½ cup shredded sharp cheddar into the mushroom filling for a gooey, cheesy surprise. The cheese melts into the stuffing, adding a rich, tangy depth that pairs beautifully with the dill.
Spicy Chipotle Kick
Swap the lemon juice for a teaspoon of chipotle adobo sauce and increase the chili flakes. This gives the cakes a smoky heat that’s perfect for a game‑day spread.
Herb‑Infused Variation
Replace dill with a mix of fresh thyme and rosemary for an earthy, aromatic profile. The woody herbs complement the mushrooms and add a rustic touch.
Vegan Delight
Use a plant‑based oil (like avocado oil) and skip any butter in the mash. The dish stays fully vegan while retaining its luxurious texture.
Sweet & Savory Fusion
Add a tablespoon of caramelized onions and a pinch of brown sugar to the mushroom mix. The subtle sweetness balances the savory depth, creating a sophisticated flavor contrast.
Storing and Bringing It Back to Life
Fridge Storage
Place cooled cakes in an airtight container lined with parchment paper. They’ll keep for up to 3 days. When reheating, add a tiny splash of water to the pan and cover loosely; the steam will revive the interior without drying it out.
Freezer Friendly
Arrange the un‑cooked, assembled cakes on a baking sheet, flash‑freeze for 1 hour, then transfer to a freezer bag. They’ll stay good for up to 2 months. To cook from frozen, add an extra minute per side in the skillet.
Best Reheating Method
For crispness, reheat in a preheated oven at 375°F for 10‑12 minutes, turning halfway. If you’re in a hurry, a quick pan‑sear with a drizzle of oil for 2‑3 minutes per side restores the crunch.