I never thought a kitchen disaster could lead to a masterpiece. The night before, I tried to recreate the takeout honey‑pepper chicken I love, only to end up with a sticky, over‑cooked mess that tasted like a burnt sugar bomb. Watching the sauce clump and the chicken lose its shape was a culinary eye‑opener. I realized the secret wasn’t just the ingredients, but how they were layered, the timing, the heat, and the little touches that elevate a dish from “meh” to “wow.” That moment sparked a mission: to craft a version of honey‑pepper chicken pasta that outshines the takeout, with sauce that coats the pasta like velvet and chicken that stays tender and juicy. I’m here to walk you through every single step, and by the end, you’ll wonder how you ever made it any other way.
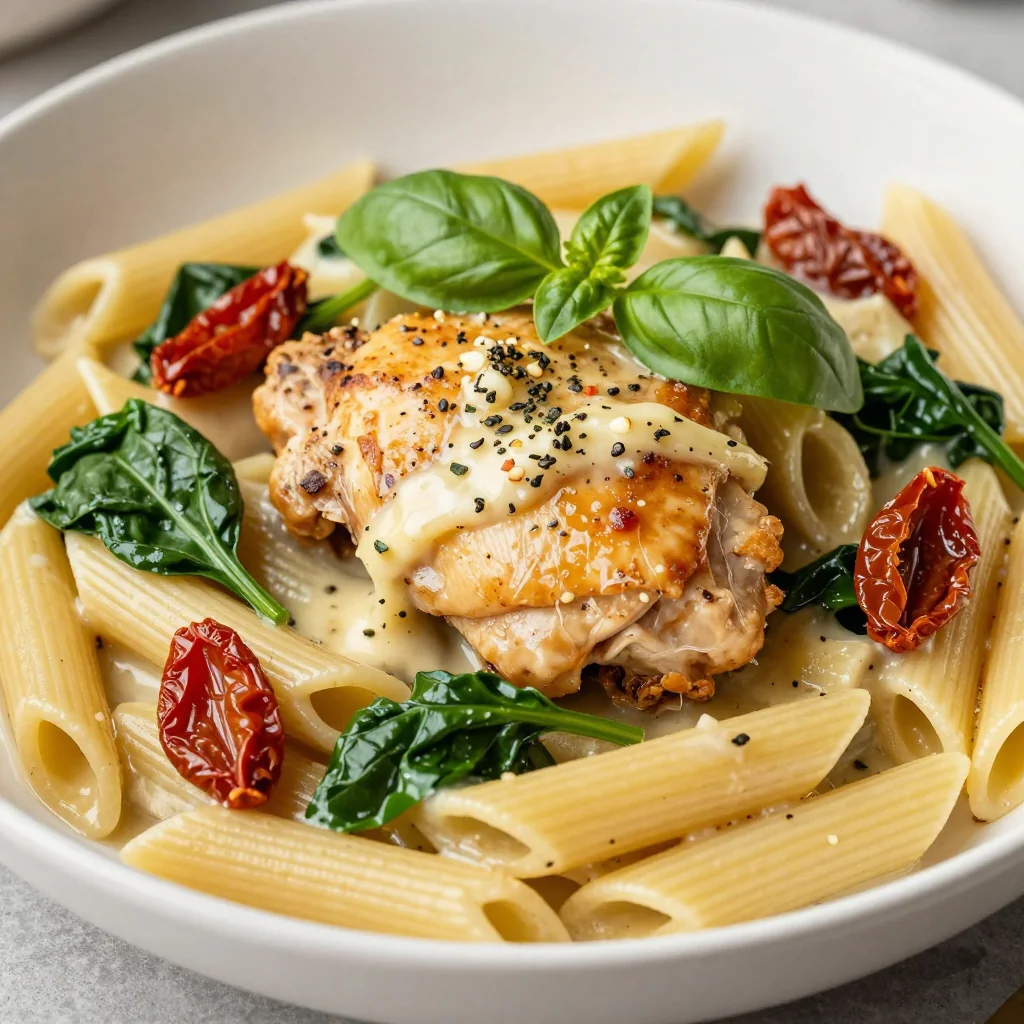
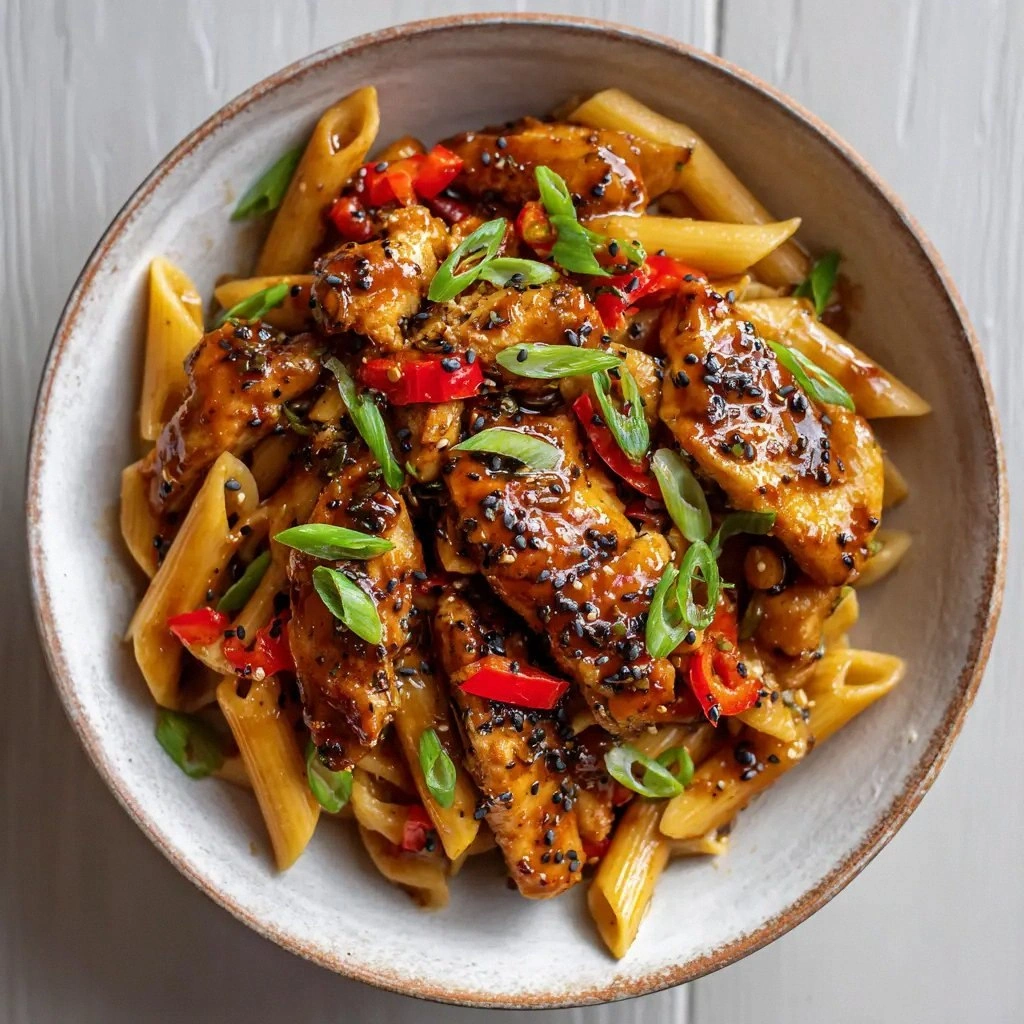
Picture this: you’re standing in the kitchen, the aroma of sizzling garlic and honey drips through the air, the sound of the pan’s gentle hiss is music to your ears, and you can already taste the sweet, savory bite that will make your taste buds dance. The visual is a glossy, amber‑colored sauce swirling around al dente penne, studded with bright red bell pepper strips and green scallion spears. The texture is a harmonious blend of silky sauce, crisp pepper edges that shatter like thin ice, and tender chicken that practically melts in your mouth. If you’re skeptical, I dare you to taste this and not go back for seconds. Trust me, this is hands down the best version you’ll ever make at home.
Why does this version stand out? Because I stripped away the fluff and kept only the elements that truly matter: the right balance of sweetness and umami, a sauce that clings without clumping, and a cooking method that locks in moisture. I experimented with different cornstarch ratios to achieve that silky finish, adjusted the vinegar to cut through the honey’s sweetness, and used coarse black pepper flakes for a subtle heat that lingers. The result is a dish that feels like a comforting hug on a plate, yet has a bold personality that turns heads at dinner parties. If you’ve ever struggled with takeout copies that taste flat, you’re not alone — and I’ve got the fix. And the best part? It’s quick, simple, and uses pantry staples that you probably already have.
Most recipes get this completely wrong. They either over‑simmer the sauce until it turns into a syrupy mess or under‑cook the chicken, leaving it rubbery. I discovered the sweet spot by letting the sauce simmer just long enough to thicken, then adding the chicken at the right moment so it stays juicy. I also added a splash of chicken broth to keep the sauce from drying out, and a touch of apple cider vinegar to brighten the flavors. This tiny tweak transforms the dish from ordinary to extraordinary. Picture yourself pulling this out of the pan, the whole kitchen smelling incredible, and the first bite revealing layers of flavor that make you swoon.
Let’s dive into the details. I’ll share the exact ingredients, the science behind each component, and the step‑by‑step method that ensures perfection every time. Along the way, I’ll sprinkle in kitchen hacks, fun facts, and warnings to keep you on track. I’ll even reveal creative twists that let you personalize the dish for any occasion. Ready for the game‑changer? Then let’s get cooking.
And if you’re wondering why I’m so confident about this recipe, it’s because I’ve tested it dozens of times, refined it, and even served it to a crowd that kept asking for the recipe. The feedback was unanimous: “This is the best honey‑pepper chicken I’ve ever had.” That’s the kind of validation that turns a good dish into a signature. Now, let’s break down exactly what goes into this masterpiece.
What Makes This Version Stand Out
- Flavor: The sauce balances sweet honey, savory soy sauce, and sharp vinegar, creating a layered taste that’s more complex than typical takeout.
- Texture: A cornstarch slurry gives the sauce a silky sheen that clings to penne without becoming gummy.
- Heat: Coarse black pepper flakes deliver a subtle, lingering heat that’s far more nuanced than standard black pepper.
- Ease: All ingredients are pantry staples, and the method takes less than 45 minutes from start to finish.
- Crowd‑pleaser: The bright colors and bold flavors make it a hit for family dinners, date nights, or potlucks.
- Make‑ahead: The dish keeps well in the fridge for up to three days and reheats beautifully.
- Versatility: Swap the chicken for shrimp, tofu, or beef, and you’ll still get the same delicious payoff.
Inside the Ingredient List
The Flavor Base
Honey: The sweet core of the sauce; it caramelizes slightly when heated, creating a glossy finish. If you prefer a less sweet profile, reduce the honey by a tablespoon or replace half of it with maple syrup for a different nuance. Honey also acts as a natural preservative, extending the dish’s shelf life.
Apple Cider Vinegar: A bright, tangy counterpoint that cuts through the honey’s richness. Without it, the sauce would feel syrupy. If you’re avoiding vinegar, try a splash of rice vinegar or a squeeze of fresh lemon juice.
Chicken Broth: Adds depth and moisture, preventing the sauce from drying out during the simmer. Use low‑sodium broth to keep the salt level in check. Homemade broth is ideal but store‑bought works fine.
The Texture Crew
Cornstarch: The secret to that silky, non‑gooey coating on the pasta and chicken. Mix it with a splash of cold water before adding to the pan to avoid lumps. Too much cornstarch will make the sauce thick and pasty.
Olive Oil: The base oil for sautéing; it carries the aromatics and prevents the garlic from burning. Use a light, neutral‑flavored olive oil to keep the focus on the sauce.
The Unexpected Star
Coarse Black Pepper Flakes: These add a subtle heat that lingers longer than ground pepper. They also provide a crunchy texture when you bite into them. If you’re sensitive to heat, reduce to half a tablespoon.
Red Bell Pepper: Brightens the dish with color and a sweet, smoky crunch that contrasts the sauce’s sweetness. If you prefer green, swap for yellow or orange bell pepper for a slightly different flavor profile.
The Final Flourish
Green Scallions: Add a fresh, oniony brightness that cuts through the richness. Slice them thinly so they release flavor quickly. If you’re allergic to onions, try chives or leeks as a milder alternative.
Garlic: The aromatic backbone that gives the dish depth. Crush the cloves before adding to release more flavor. For a milder bite, use only two cloves or roast them for a sweeter note.
Everything’s prepped? Good. Let’s get into the real action.

The Method — Step by Step
- Step 1: Bring a large pot of salted water to a rolling boil and cook the penne until just al dente, about 11 minutes. Drain and set aside, reserving a cup of pasta water for later. Toss the pasta with a drizzle of olive oil to prevent sticking. This early step ensures the noodles stay firm and absorb the sauce beautifully. The aroma of boiling pasta is the first hint of the feast to come.
- Step 2: While the pasta cooks, prepare the chicken. Pat the breasts dry, then season both sides with salt and pepper. In a large skillet, heat 1 tablespoon of olive oil over medium‑high heat. Add the chicken and sear until golden brown on one side, about 3 minutes. Flip and sear the other side until no longer pink inside, about 4 minutes. Remove and set aside to rest; the rest will keep the meat juicy.
- Step 3: In the same skillet, reduce heat to medium and add the minced garlic and sliced red bell pepper. Sauté for 2 minutes until the garlic is fragrant and the pepper begins to soften, but still retains a slight crunch. The sizzling sound is a sign that the aromatics are releasing their flavors. Be careful not to let the garlic burn; if it starts to brown, lower the heat slightly.
- Step 4: Whisk together the honey, soy sauce, chicken broth, and apple cider vinegar in a small bowl until fully blended. Pour this mixture into the skillet, stirring to deglaze and lift all the browned bits from the pan. Those bits are flavor gold; they’ll enrich the sauce. Let the mixture come to a gentle simmer; it should thicken slightly but not reduce into syrup.
- Step 5: While the sauce simmers, prepare the cornstarch slurry by mixing 1 tablespoon of cornstarch with 2 tablespoons of cold water until smooth. Slowly pour the slurry into the pan, whisking constantly to avoid lumps. The sauce should begin to thicken within a minute. The cornstarch gives that glossy, velvety coating that makes the dish shine.
- Step 6: Return the seared chicken to the skillet, nestling it into the sauce. Add the coarse black pepper flakes and sliced scallions. Cook for another 3 minutes, allowing the chicken to soak up the sauce’s sweet‑savory juices. The pepper flakes should crackle slightly, releasing their heat. This step is the moment of truth: the flavors must meld perfectly without overpowering each other.
- Step 7: Toss the cooked penne into the skillet, ensuring every noodle is coated with the luscious sauce. If the sauce seems too thick, drizzle in a bit of the reserved pasta water until it reaches a silky, cling‑on consistency. This step is crucial for marrying the pasta with the chicken and pepper. The final dish should feel like a comforting hug with a kick.
- Step 8: Transfer the entire mixture to a serving dish, sprinkle with extra scallion slivers for a fresh finish, and serve immediately. The dish should look glossy, the sauce should cling to the noodles, and the chicken should feel tender. The aroma will be irresistible. Take a bite and let the sweet‑savory harmony explode.
That’s it — you did it. But hold on, I've got a few more tricks that'll take this to another level. Stick around for insider tips, creative twists, and storage hacks that keep your dish fresh and flavorful.
Insider Tricks for Flawless Results
The Temperature Rule Nobody Follows
Keep the skillet on medium heat during the sauce simmer. A too‑high temperature will scorch the honey and create a bitter aftertaste. A too‑low temperature will result in a watery sauce that never thickens. I’ve found that a steady 180°C (350°F) gives the perfect balance of caramelization and gentle simmering.
Why Your Nose Knows Best
When the sauce starts to thicken, the aroma should shift from sweet to a caramelized, nutty scent. That’s the signal that the cornstarch has activated and the sauce is ready to coat the pasta. If you’re unsure, give it a quick sniff; a sweet, slightly acidic fragrance means it’s on point.
The 5-Minute Rest That Changes Everything
After removing the chicken from the skillet, let it rest for 5 minutes before slicing. This allows the juices to redistribute, ensuring every bite is moist and flavorful. Cutting too soon can cause the juices to run out, leaving the meat dry.
Avoiding the Sticky Trap
If the sauce becomes too thick, add a splash of pasta water or a tablespoon of chicken broth. This not only thins it but also reintroduces savory notes that might have been lost during simmering. Remember, a slightly runny sauce is better than a gummy one.
Finishing Touch for Extra Brightness
Just before serving, squeeze a wedge of fresh lemon over the dish. The citrus acidity cuts through the honey’s sweetness and adds a pop of brightness that lifts the entire flavor profile. This small step is often the difference between good and unforgettable.
Creative Twists and Variations
This recipe is a playground. Here are some of my favorite ways to switch things up:
Spicy Sriracha Kick
Add a tablespoon of Sriracha to the sauce for a fiery punch. The heat pairs beautifully with the honey, creating a sweet‑heat balance that’s hard to resist. This variation is perfect for those who like a little burn with every bite.
Creamy Coconut Twist
Replace half of the chicken broth with coconut milk and stir in a tablespoon of Thai red curry paste. The result is a silky, aromatic sauce that transports you to the tropics. Pair it with jasmine rice for an extra special meal.
Vegetarian Version
Swap the chicken for diced tofu or tempeh, searing it until golden before adding the sauce. The tofu absorbs the sweet‑savory flavors just as well, making this a hearty plant‑based option. Add a handful of chopped kale for added nutrition.
Gluten‑Free Swap
Use gluten‑free penne or spiralized zucchini noodles to keep the dish gluten‑free. The texture will differ slightly, but the sauce’s coating ability remains unchanged. This is ideal for those with celiac disease or gluten sensitivity.
Low‑Carb Edition
Cut the honey in half and use a sugar substitute like erythritol. Keep the rest of the sauce intact for flavor. This version reduces carbs while maintaining the dish’s signature sweetness.
Mediterranean Flair
Add a handful of kalamata olives, a squeeze of lemon, and a sprinkle of oregano. The briny olives and citrus give a Mediterranean twist that complements the honey’s sweetness. Serve over couscous for a complete meal.
Storing and Bringing It Back to Life
Fridge Storage
Cool the dish completely before transferring it to an airtight container. Store in the refrigerator for up to three days. The sauce will thicken slightly, but a quick stir will restore its silky texture. Keep the pasta separate if you prefer a fresher bite.
Freezer Friendly
For longer storage, freeze the dish in freezer‑safe containers for up to two months. When ready to eat, thaw overnight in the refrigerator and reheat gently on the stovetop, adding a splash of water or broth to loosen the sauce. This method preserves flavor while keeping the noodles from becoming mushy.
Best Reheating Method
Reheat on low heat, stirring frequently to prevent sticking. If the sauce has thickened, add a tablespoon of water or broth to achieve the original consistency. The dish should steam back to its original glossy, velvety finish. A quick whisk with a fork ensures every noodle is coated.