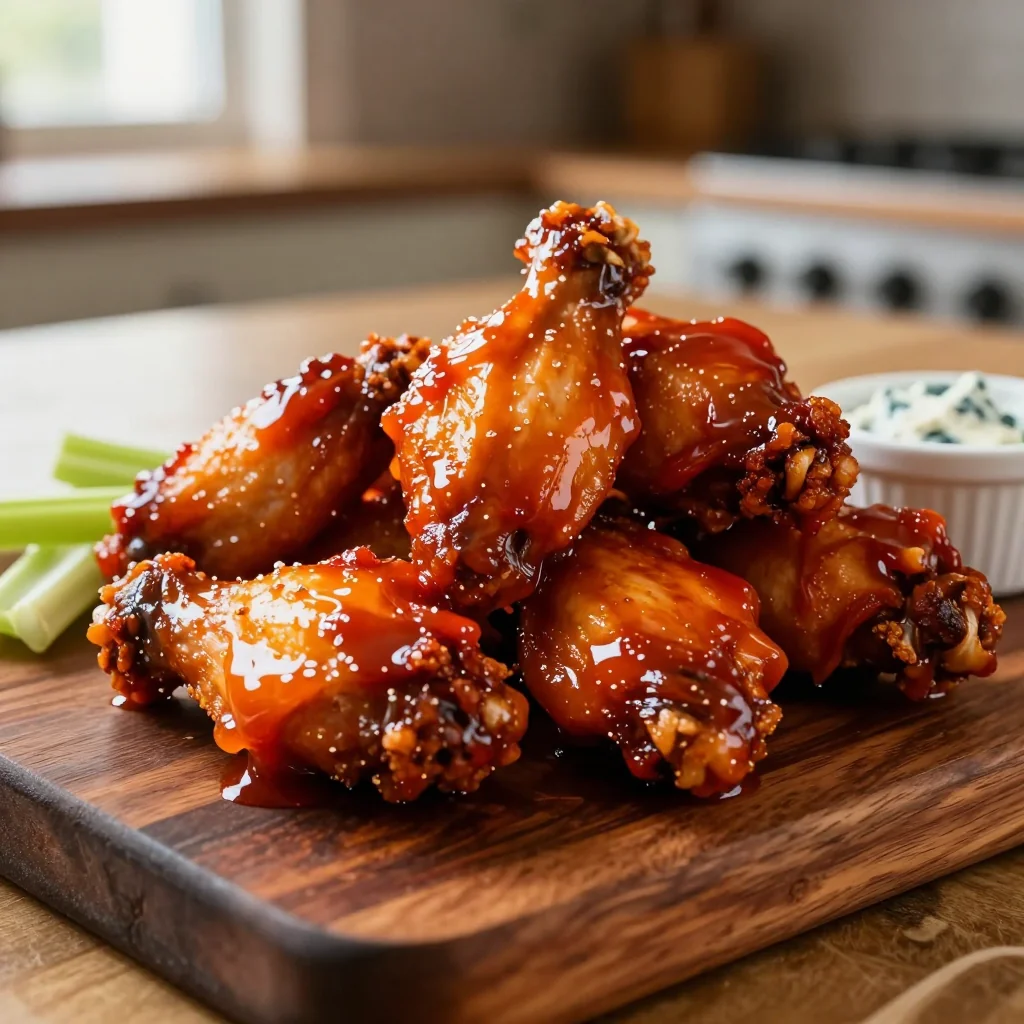
Crispy, fiery wings that bring the spirit of a classic American bar right to your kitchen.
It was a sweltering summer night in Kansas City when I first tasted a wing so perfectly balanced between heat and buttery richness that it felt like a revelation. The sizzle of the fryer, the aroma of hot sauce mingling with melted butter, and that first bite that left a lingering, satisfying burn – that memory has stayed with me ever since.
Buffalo wings originated in the modest bars of Upstate New York in the 1960s, a simple snack that quickly became a national obsession. Over the decades, cooks have experimented with everything from honey-glazed to garlic-infused versions, yet the core of a great wing remains the same: a crispy exterior, a juicy interior, and a sauce that clings lovingly to every crevice.
In this article, I’ll walk you through the exact steps that turn ordinary chicken wings into a crowd‑pleasing masterpiece. You’ll learn how to achieve that coveted crunch without deep‑frying, how to balance the sauce’s heat with creamy butter, and how to customize the flavor for any palate.
Ready to bring the heat? Let’s get started and make wings that will have everyone reaching for seconds.
🌟 Why This Recipe Will Win Your Heart
From game night to casual brunch, these Buffalo wings deliver flavor, texture, and a touch of culinary confidence that will impress any guest.
- ✨ Perfect Crunch Without Deep‑Frying: A light coating of seasoned flour and a brief bake create a golden crust that stays crispy even after saucing.
- ✨ Balanced Heat and Butter: The classic hot‑sauce‑butter blend is calibrated to give a moderate kick that’s never overwhelming.
- ✨ Easy Ingredient Swaps: Whether you’re gluten‑free or dairy‑free, the recipe includes straightforward alternatives that keep the flavor profile intact.
- ✨ One‑Pan Cleanup: Baking the wings on a wire rack over a sheet pan captures drips, making cleanup a breeze.
- ✨ Versatile Serving Options: Serve with celery sticks, carrot ribbons, or a cool blue‑cheese dip – the possibilities are endless.
- ✨ Scalable for Any Crowd: The built‑in portion‑adjuster lets you multiply or halve the recipe without re‑calculating every measurement manually.
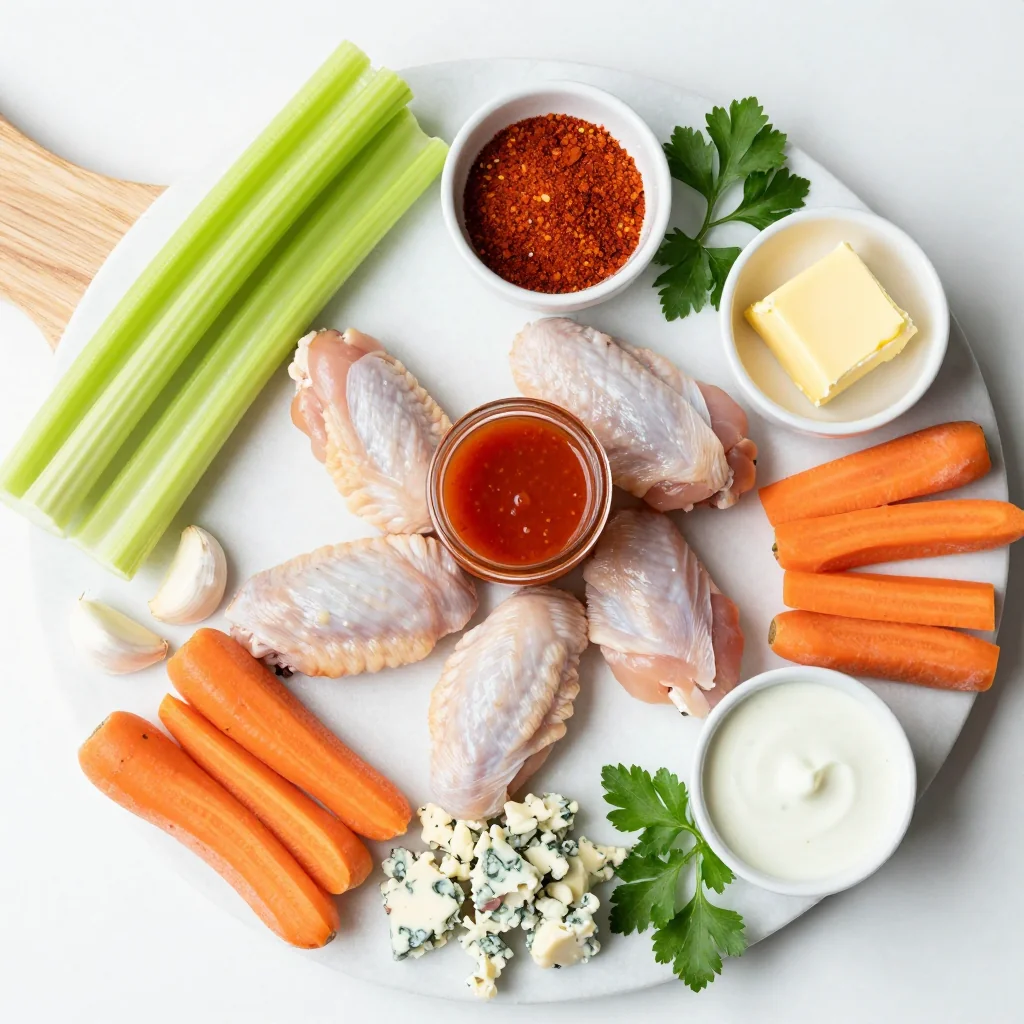
🥗 Ingredients
📝 Complete Ingredient List
For the Wings:
For the Buffalo Sauce:
For Garnish & Serving:
🔍 Focus on Key Ingredients
Chicken Wings
Chicken wings are a perfect vehicle for bold flavors because their skin contains a natural layer of fat that crisps up beautifully when baked. Choose wings with a good meat‑to‑skin ratio; too much skin can become rubbery, while too little may dry out. Pat them dry with paper towels before seasoning to ensure the coating adheres well.
Hot Sauce (Frank’s RedHot)
Frank’s RedHot is the gold standard for Buffalo sauce, offering a 450‑Scoville heat level that delivers a tangy kick without overwhelming heat. Its vinegar base cuts through the richness of butter, creating a balanced sauce that clings to the wing surface.
Butter
Butter adds a velvety mouthfeel and mellows the sharpness of the hot sauce. Using unsalted butter gives you precise control over the salt level, and melting it gently prevents scorching, preserving its natural sweetness.
🔄 Quick Substitutions
| If you don’t have... | Use instead... |
|---|---|
| Buttermilk | 1 cup milk + 1 tbsp lemon juice (let sit 5 min) |
| Hot sauce | Homemade blend of cayenne, paprika, vinegar, and garlic powder |
| Unsalted butter | Salted butter (reduce added salt by ¼ tsp) |
👨🍳 Step‑by‑Step Instructions
Follow these detailed steps to achieve perfectly crisp, sauce‑laced wings that will have everyone reaching for more.
📋 Phase 1: Preparation & Mise en Place
Start by creating a seasoned coating and marinating the wings.
Season the Wings
Pat the chicken wings dry with paper towels. In a large bowl, combine salt, black pepper, and garlic powder. Toss the wings until every piece is evenly coated. This dry seasoning will enhance the flavor of the meat and help the flour adhere later.
Prepare the Flour‑Buttermilk Dredge
In a shallow dish, whisk together the flour and a pinch of extra salt. In another bowl, pour the buttermilk. Dip each wing first into the buttermilk, allowing excess to drip off, then roll it in the flour mixture, ensuring a light, even coating. Place the coated wings on a wire rack set over a baking sheet.
🔥 Phase 2: Baking & Sauce Assembly
Bake the wings to crispness, then toss them in the signature Buffalo sauce.
Bake the Wings
Preheat the oven to 425°F (220°C). Arrange the coated wings on the wire rack, ensuring they don’t touch. Bake for 25 minutes, flipping halfway through, until the coating turns golden‑brown and the internal temperature reaches 165°F (74°C). The high heat creates a crunchy exterior while keeping the meat juicy.
Make the Buffalo Sauce
While the wings bake, melt the butter in a saucepan over low heat. Add the hot sauce, white vinegar, Worcestershire sauce, cayenne pepper, and smoked paprika. Stir continuously for 3‑4 minutes until the sauce is glossy and the spices are fully incorporated.
Toss Wings in Sauce
Transfer the baked wings to a large mixing bowl. Pour the hot Buffalo sauce over them and toss gently until each wing is thoroughly coated. The sauce should cling without pooling; if it looks thin, let the wings sit for a minute to absorb more.
✨ Phase 3: Finishing Touches & Plating
Add garnish, check doneness, and serve.
Check Doneness
Insert a meat thermometer into the thickest part of a wing; it should read at least 165°F (74°C). The skin should be crisp and the meat should be opaque. If any wing feels soft, give it an extra 2‑3 minutes in the oven.
Garnish & Serve
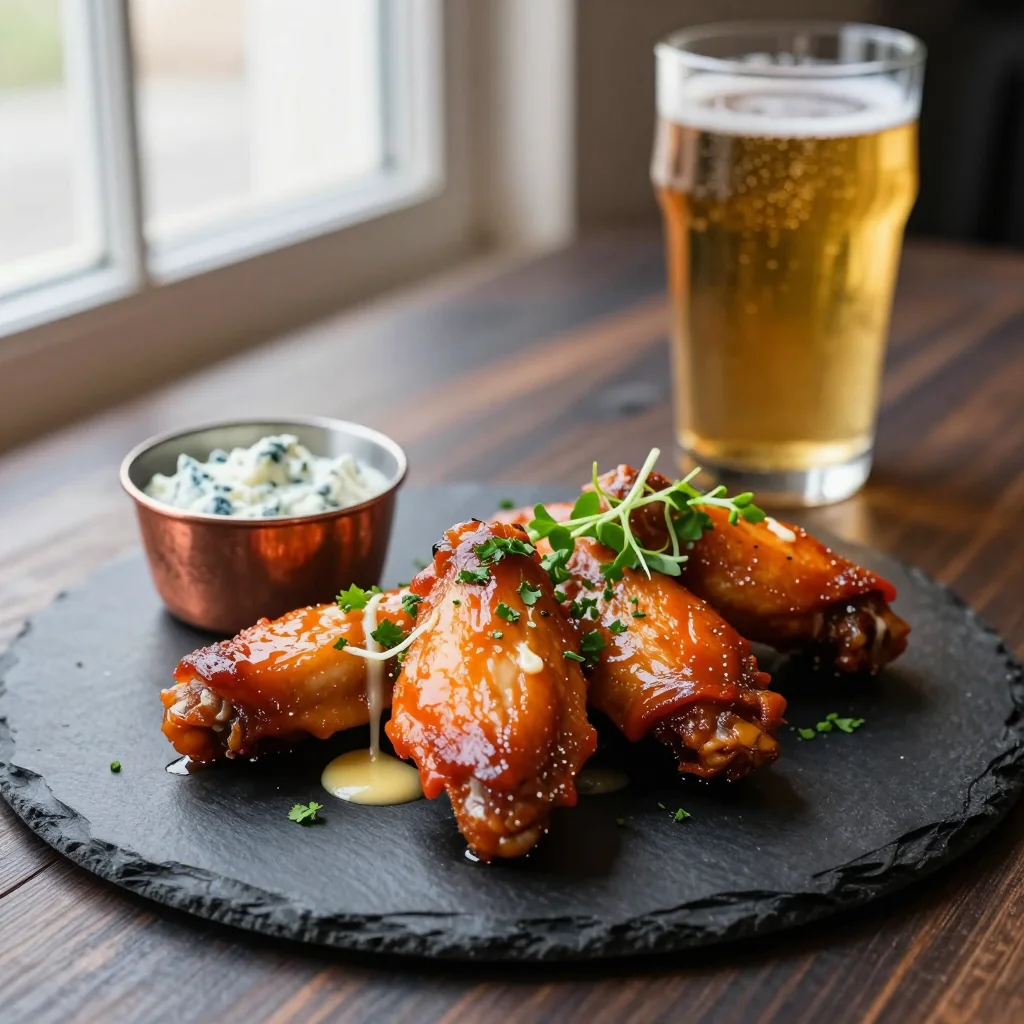
Transfer the sauced wings to a serving platter. Sprinkle chopped fresh parsley over the top for a pop of color and freshness. Add blue‑cheese crumbles if you enjoy the classic pairing, and arrange celery sticks on the side for a cooling contrast.
Enjoy Immediately
Serve the wings hot, straight from the platter. Pair them with a cold craft beer, a crisp cider, or a chilled glass of sparkling water with a splash of lime for balance.
💡 Expert Tips & Tricks
🛒 Choosing the Right Ingredients
When buying chicken wings, look for pieces that are uniform in size; this ensures even cooking. Fresh wings should have a pinkish hue and a slight sheen. Avoid any with a grayish tint or a sour smell. If possible, ask the butcher to separate the drumettes from the flats – the two cut differently and may need slightly different cooking times.
🔪 Preparation Techniques
Patting the wings dry is essential; moisture creates steam, which prevents the coating from crisping. Use a wire rack to allow air circulation around each wing, resulting in an even golden crust. For an even thicker coating, double‑dip: after the first flour coat, dip again in buttermilk and a second light dusting of flour.
🌡️ Mastering the Cooking Process
Preheating the oven is non‑negotiable – a hot oven creates the rapid steam burst needed for a crisp exterior. Keep the oven door closed during the first 15 minutes; opening it releases heat and can lead to soggy wings. Use a convection setting if available for even heat distribution.
🍽️ Presentation & Service
Arrange the wings in a single layer on a large platter, leaving space for the sauce to pool slightly. Garnish with bright green parsley and a few extra celery sticks for visual contrast. A small ramekin of blue‑cheese dressing on the side adds a creamy counterpoint to the heat.
🏆 Pro Tips
Elevate your wing game from good to restaurant‑level with these professional insights.
- 🎯 Brine Before Baking: Submerge the wings in a simple brine of water, salt, and a pinch of sugar for 30 minutes. This enhances moisture retention, resulting in juicier meat even after high‑heat baking.
- 🎯 Use a Double‑Layered Rack: Placing a second wire rack on top of the first creates a mini‑oven effect, allowing hot air to circulate both above and below the wings, maximizing crispness.
- 🎯 Finish Under the Broiler: After baking, switch the oven to broil for the last 2‑3 minutes. The direct heat caramelizes the sauce, giving it a glossy, slightly caramelized finish.
- 🎯 Control Heat with Smoke: Add a smoked wood chip to a small pan on the oven floor; the subtle smoke infuses the wings with a nuanced flavor without overpowering the Buffalo heat.
- 🎯 Precision Cutting for Even Cooking: Trim any overly thick tendons on the drumettes. Uniform thickness ensures that each wing reaches the safe internal temperature at the same time.
- 🎯 Serve on a Pre‑Warmed Plate: Warm the serving platter in the oven for a few minutes. Warm plates keep the wings hot longer, preserving the crisp texture.
“Great wings are a balance of heat, butter, and a crackling that sings with every bite.” — Chef Gordon Ramsay
🔄 Variations & Adaptations
This Buffalo wing recipe is a flexible canvas. Feel free to experiment with flavors, dietary needs, and presentation styles.
🥬 Vegetarian/Vegan Version
Swap chicken wings for cauliflower florets or plant‑based chicken substitutes. Coat the cauliflower in the same flour‑buttermilk (use plant‑based milk with lemon) and bake at 425°F for 20‑25 minutes. Toss with the Buffalo sauce for a crunchy, spicy bite.
- Cauliflower florets (2 large heads) – provides a sturdy bite.
- Plant‑based milk + 1 tbsp lemon juice – mimics buttermilk tang.
🌶️ Flavor Variations
Adjust the sauce to match your culinary mood. Below are three distinct twists.
Spicy Inferno
Increase cayenne to 1 tsp, add 1 tsp chipotle powder, and finish with a drizzle of sriracha for a smoky heat that lingers.
Mediterranean Twist
Replace hot sauce with ½ cup roasted red pepper puree, add 1 tsp oregano, and finish with crumbled feta and fresh oregano leaves.
Asian Fusion
Swap hot sauce for ¼ cup soy sauce, 2 tbsp gochujang, 1 tbsp honey, and finish with toasted sesame seeds and sliced green onions.
⚠️ Dietary Adaptations
Gluten‑Free
Use a gluten‑free flour blend or almond flour for the coating. Ensure the flour you choose does not contain added wheat starch.
Lactose‑Free
Replace butter with a dairy‑free alternative such as clarified ghee or a vegan butter substitute. The flavor remains buttery while eliminating lactose.
Low‑Calorie
Air‑fry the wings at 400°F for 20 minutes instead of baking, and reduce the butter in the sauce to 2 tbsp, supplementing with a splash of low‑fat Greek yogurt for creaminess.
👶 Kid‑Friendly Version
Reduce the cayenne and smoked paprika, and add a touch of honey to the sauce for a milder, sweeter flavor that appeals to younger palates. Serve with carrot sticks instead of celery for added sweetness.
📦 Storage & Reheating
🧊 Conservation
Refrigerator
- Duration: 3 days
- Container: Airtight glass container or resealable bag
- Tip: Store sauce separately to prevent sogginess.
Freezer
- Duration: 2 months
- Method: Cool wings completely, then flash‑freeze on a tray before transferring to a zip‑lock bag.
- Defrost: Thaw overnight in the refrigerator, then reheat as described below.
💡 For best texture, reheat using the oven method rather than the microwave, which can make the coating rubbery.
♨️ Reheating
🔥 Oven (Recommended)
- Preheat to 350°F (175°C).
- Place wings on a wire rack over a baking sheet; cover loosely with foil.
- Reheat for 10 minutes.
- Remove foil and continue for 5‑7 minutes until the skin regains crispness.
⚡ Microwave (Quick)
- Arrange wings on a microwave‑safe plate; cover with a microwave‑safe lid.
- Heat on medium power for 2 minutes.
- Flip and heat for another 1‑2 minutes, checking for even warmth.
🍳 Skillet
Heat a non‑stick skillet over medium‑high heat, add a splash of oil, and toss the wings for 3‑4 minutes, stirring occasionally, until the exterior is crisp again.
🍷 Perfect Pairings
🥗 Side Dishes
- Celery & Carrot Sticks: Provide a crisp, cooling contrast to the heat.
- Blue‑Cheese Dip: Classic creamy counterpoint that mellows the spice.
- Garlic Parmesan Fries: Starchy comfort that absorbs any extra sauce.
🍷 Wine & Beverage Pairings
- American IPA: The bitterness balances the buttery heat.
- Riesling (off‑dry): Sweetness tempers spiciness while complementing the sauce.
- Non‑Alcoholic: Sparkling water with a splash of lime adds freshness.
🍰 Complementary Courses
Begin with a light citrus salad tossed in a vinaigrette to awaken the palate. Follow the wings with a tangy lemon tart or a simple vanilla panna cotta, providing a sweet finish that cleanses the palate after the spice.
❓ Frequently Asked Questions
Q: Can I use boneless chicken pieces instead of whole wings?
A: Yes, boneless chicken thighs or breast strips work well, but they lack the skin that provides the classic crunch. To compensate, coat them heavily in the flour‑buttermilk mixture and bake on a rack. Expect a slightly softer texture, but the sauce will still cling beautifully.
Q: How spicy is the sauce, and can I adjust the heat?
A: The base recipe delivers a moderate heat (approximately 450 Scoville units). Increase the cayenne or add a dash of chipotle powder for extra heat, or reduce the hot sauce and replace part of it with melted butter for a milder version. Always taste the sauce before tossing the wings.
Q: Is it possible to make the wings ahead of time?
A: Absolutely. You can bake the wings up to 24 hours in advance, store them in the refrigerator, and reheat using the oven method. Toss with fresh sauce just before serving to keep the coating crisp.
Q: What if I don’t have a wire rack?
A: You can line a baking sheet with parchment paper and place the wings directly on it, but the bottom may be less crisp. Alternatively, use a cooling rack placed over a rimmed baking sheet.
Q: Can I make the sauce ahead of time?
A: Yes, the Buffalo sauce can be prepared up to 3 days in advance. Store it in an airtight container in the refrigerator, and gently reheat before tossing the wings. The butter may solidify; whisk it back into a smooth sauce before use.
Q: How do I prevent the wings from becoming soggy after saucing?
A: Ensure the wings are completely dry before coating, and bake them until the crust is firmly set. Toss the wings quickly with the sauce so the coating doesn’t sit in excess liquid. Serve immediately for optimal crispness.
🎉 Let’s Get Cooking!
These Buffalo chicken wings combine the satisfying crunch of a well‑baked coating with the bold, buttery heat that defines the classic American bar snack. By following each step, you’ll master the balance of flavor, texture, and presentation, turning a simple party appetizer into a show‑stopping centerpiece. Remember, the portion‑adjuster lets you scale the recipe effortlessly, so you can feed a family dinner or a full‑blown game‑day crowd with equal confidence.
Now that you’ve got the knowledge, the ingredients, and the techniques, it’s time to fire up the oven, whisk that sauce, and bring the heat. Don’t forget to share your results, ask questions in the comments, and rate the recipe so we can keep improving.
Have you tried this recipe?
Leave a comment and a rating below! Share your photos on Instagram with #BuffaloWingMagic to be featured.
Chicken Wings with Buffalo Sauce
Crispy, fiery wings that bring the spirit of a classic American bar right to your kitchen.
📝 Ingredients
Wings
Buffalo Sauce
Garnish
👨🍳 Instructions
- 1
Pat the wings dry, season with salt, pepper, and garlic powder, then let rest 10 minutes.
- 2
Dip each wing in buttermilk, then coat with seasoned flour; place on a wire rack.
- 3
Bake at 425°F for 25 minutes, flipping halfway, until golden and internal temp 165°F.
- 4
Meanwhile, melt butter, add hot sauce, vinegar, Worcestershire, cayenne, and smoked paprika; simmer 3‑4 minutes.
- 5
Toss baked wings in the sauce until fully coated.
- 6
Check doneness with a thermometer; ensure crisp skin.
- 7
Garnish with parsley, optional blue‑cheese, and serve with celery sticks.
- 8
Enjoy hot, paired with your favorite beverage.
- 9
If leftovers, store in airtight container and reheat in oven for best texture.
- 10
Share your creation on social media with #BuffaloWingMagic!
🥗 Nutritional Information (per serving)
*Values are estimates based on standard ingredients.
📚 You Might Also Like
Garlic Parmesan Wings
Honey BBQ Wings
Teriyaki Chicken Wings


💬 Comments & Reviews
Leave a Comment
No comments yet. Be the first to share your thoughts!